vc++ duilib中xml中combo不显示的问题
xml
<VerticalLayout name="VerticalLayoutUI2" pos="1,25,209,83" width="208" height="59"><Label name="LabelUI1" text="☆更新设置" float="true" pos="14,8,74,22" textcolor="#00FFFFFF" disabledtextcolor="#FFA7A6AA" align="right"/><Label name="LabelUI1" text="(设置天气刷新时间)" float="true" pos="76,10,195,22" textcolor="#00FFFFFF" disabledtextcolor="#FFA7A6AA" align="right"/><Combo name="accountcombo" float="true" pos="30,35,170,55" tooltip="请点击这里选择您准备使用的账号" normalimage="file='Combo_nor.png' corner='2,2,24,2" hotimage="file='Combo_over.png' corner='2,2,24,2'" pushedimage="file='Combo_over.png' corner='2,2,24,2'" textpadding="1,1,1,1"><ListLabelElement text="张三" selected="true"/><ListLabelElement text="李四"/></Combo></VerticalLayout>
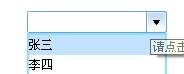
想出现下拉框:如图
创建窗体的方法:
m_pApplySet =newCApplySetWnd(_T("ApplySetSkin.xml"));
if(NULL == m_pApplySet)
{
returnfalse;
}
CRect rcWnd;
GetWindowRect(m_hWnd,&rcWnd);
m_pApplySet->Create(this->m_hWnd,_T("ApplySetWnd"), WS_POPUP,0L,0,0,210,350);
MoveWindow(m_pApplySet->GetHWND(),(rcWnd.left-210),pTNotifyUI->pSender->GetY()+rcWnd.top+20,210,350,FALSE);
m_pApplySet->ShowWindow();
Create函数

HWND CWindowWnd::Create(HWND hwndParent, LPCTSTR pstrName, DWORD dwStyle, DWORD dwExStyle,intx,inty,intcx,int cy, HMENU hMenu)
{
if( GetSuperClassName() != NULL && !RegisterSuperclass() )return NULL;
if( GetSuperClassName() == NULL && !RegisterWindowClass() )return NULL;
m_hWnd = ::CreateWindowEx(dwExStyle, GetWindowClassName(), pstrName, dwStyle, x, y, cx, cy, hwndParent, hMenu, CPaintManagerUI::GetInstance(),this);
ASSERT(m_hWnd!=NULL);
return m_hWnd;
}
各位,有什么解决的方法么?
来自 “ ITPUB博客 ” ,链接:https://blog.itpub.net/4692/viewspace-3141245/ ,如需转载,请注明出处,否则将追究法律责任。

