Swagger使用
Swagger学习及生成HTML文档
Swagger
1、集成springboot
第一步:pom
      io.springfox
      springfox-swagger2
      2.9.2


      io.springfox
      springfox-swagger-ui
      2.9.2
第二步:swagger在springboot中配置
属性类(省略get/set方法)
/**
 * swagger配置,生成api
 *
 * @author lirui
 * @date 2018-07-26
 */@ConfigurationProperties(prefix = "hyboot.api")public class HySwaggerProperties {    /**
     * 是否开启swagger
     */
    private boolean enabled = false;    /**
     * API服务标题
     */
    private String title;    /**
     * API服务描述
     */
    private String description;    /**
     * API服务版本
     */
    private String version;    /**
     * Api负责人相关信息
     */
    private Leader leader = new Leader();    public static class Leader{        /**
         * 负责人姓名
         */
        private String name;        /**
         * 负责人邮箱
         */
        private String email;
    }    /**
     * 用于生成api的html静态文档,需要配置
     */
    private Swagger swagger = new Swagger();    public static class Swagger{        /**
         * api 接口获取数据地址
         */
        private String apiUrl;        /**
         * 生成文件的位置
         */
        private String filePath;
    }
}
配置application.yml
enabled: false title: 测试服务api description: 用于测试 leader: name: 汤姆 email: tom@163.com version: 1.0.0
配置类
/**
 * swagger配置,生成api
 *
 * @author lirui
 * @date 2018-07-26
 */@Configuration@EnableConfigurationProperties({HySwaggerProperties.class})@EnableSwagger2public class HySwaggerAutoConfiguration {

    private Logger logger = LoggerFactory.getLogger(HySwaggerAutoConfiguration.class);    @Autowired
    private ApplicationContext applicationContext;
    @Autowired
    private HySwaggerProperties hySwaggerProperties;
    @Autowired
    private ServerProperties serverProperties;    /**
     * 定义api生成规则
     *
     * @return
     */
    @Bean
    public Docket hyApi() {        return new Docket(DocumentationType.SWAGGER_2)                  //group为系统编号(我们spring的id设置为了系统编号)
                .groupName(applicationContext.getId())
                .apiInfo(apiInfo())                //支持协议
                .protocols(Set.of("http", "https"))
                .select()                 //限制只有在类上加@Api才添加到swagger,默认是都添加的
                .apis(RequestHandlerSelectors.withClassAnnotation(Api.class))                 //限制只有在方法上加@Api才添加到swagger,默认是都添加的
                .apis(RequestHandlerSelectors.withMethodAnnotation(ApiOperation.class))
                .build();
    }    /**
     * api相关信息
     *
     * @return
     */
    public ApiInfo apiInfo() {        return new ApiInfoBuilder()                //服务标题
                .title(hySwaggerProperties.getTitle() == null ?
                    applicationContext.getId() + "系统服务API" :                                                   hySwaggerProperties.getTitle())                //api服务描述
                .description(hySwaggerProperties.getDescription())                //api版本
                .version(hySwaggerProperties.getVersion())                //联系人
                .contact(                        new Contact(hySwaggerProperties.getLeader().getName(), "",
                                hySwaggerProperties.getLeader().getEmail()))
                .build();
    }
}
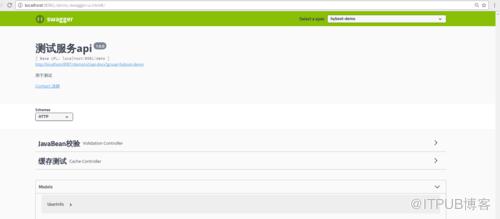
第三步:访问
http://host:port/contentPath/swagger-ui.html
2、生成adoc文件,便于生成HTML/PDF
主要想法是:Swagger2MarkupConverter(可以根据指定url生成adoc文件,用于生成html),如果想调用当前系统生成adoc文件,就必须保证系统启动完成,这样才能根据url访问
第一步:定义生成adoc文件的类
springboot中提供了ApplicationRunner,这个保证了系统启动完执行其中的run方法,所以只要在run方法中调用Swagger2MarkupConverter#from
/**
 * 系统运行完执行,用于swagger生成adoc文件,继而产生api接口Html静态文件
 * 必须是spring管理的Bean才生效
 * @author lirui
 * @date 2018-07-26
 */public class SwaggerCreatAdocRunner implements ApplicationRunner {    /**
     * api 接口获取数据地址
     */
    private String apiUrl;    /**
     * 生成文件的位置
     */
    private String filePath;    @Override
    public void run(ApplicationArguments args) throws Exception {        try {            //从指定地址获取数据生成接口文档
            Swagger2MarkupConverter.from(new URL(apiUrl)).build()
                    .toFile(Paths.get(filePath));

        } catch (MalformedURLException e) {
            e.printStackTrace();
        }
    }    public String getApiUrl() {        return apiUrl;
    }    public void setApiUrl(String apiUrl) {        this.apiUrl = apiUrl;
    }    public String getFilePath() {        return filePath;
    }    public void setFilePath(String filePath) {        this.filePath = filePath;
    }
}
第二步:swagger配置初始化SwaggerCreatAdocRunner
就是在上述HySwaggerAutoConfiguration增加了一个SwaggerCreatAdocRunnerspring的bean定义
(添加了默认不开启Swagger的配置)
/**
 * swagger配置,生成api
 *
 * @author lirui
 * @date 2018-07-26
 */@Configuration@EnableConfigurationProperties({HySwaggerProperties.class, ServerProperties.class})@EnableSwagger2@ConditionalOnExpression("${hyboot.api.enabled:false}")public class HySwaggerAutoConfiguration {

    private Logger logger = LoggerFactory.getLogger(HySwaggerAutoConfiguration.class);    public static final String LOCALHOST = "127.0.0.1";    @Autowired
    private ApplicationContext applicationContext;    @Autowired
    private HySwaggerProperties hySwaggerProperties;    @Autowired
    private ServerProperties serverProperties;        /**
     * 定义api生成规则
     *
     * @return
     */
    @Bean
    public Docket hyApi() {
        ...
    }    /**
     * 用于生成swagger API html文档
     * http://localhost:8081/demo/v2/api-docs?group=hyboot-demo
     *
     * @return
     */
    @Bean
    public SwaggerCreatAdocRunner swaggerRunner() {        //生成api文档的数据来源
        String apiUrl = hySwaggerProperties.getSwagger().getApiUrl();
        String filePath = ClassLoader.getSystemResource("").getPath()+"api";        //解决window系统路径前带"/"问题
        File file = new File(filePath);
        filePath = file.getPath();        //设置swagger生成adoc文件启动类
        SwaggerCreatAdocRunner swaggerCreatAdocRunner = new SwaggerCreatAdocRunner();
        swaggerCreatAdocRunner.setApiUrl(apiUrl);
        swaggerCreatAdocRunner.setFilePath(filePath);        if (StringUtils.isBlank(apiUrl)) {            //端口
            int port = serverProperties.getPort();            //项目
            String contextPath = serverProperties.getServlet().getContextPath();

            String group = applicationContext.getId();
            apiUrl = "http://" + LOCALHOST + ":" + port + contextPath + "/v2/api-docs?group=" + group;

            swaggerCreatAdocRunner.setApiUrl(apiUrl);
        }        return swaggerCreatAdocRunner;
    }    /**
     * api相关信息
     *
     * @return
     */
    public ApiInfo apiInfo() {
        ...
    }
}
第三步:利用上诉生成的adoc文件生成HTML静态文件
这里要用到maven的插件asciidoctor
<!--增加swagger生成html-->org.asciidoctor asciidoctor-maven-plugin 1.5.6 ${project.basedir}/target/classes/ api.adoc ${project.basedir}/target/classes/api.html html coderay left
执行mvn asciidoctor:process-asciidoc
在IDEA中直接点击如图即可: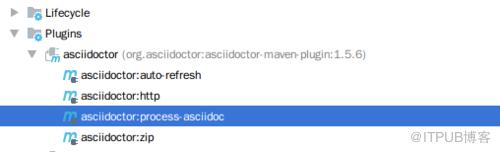
生成的HTML静态文件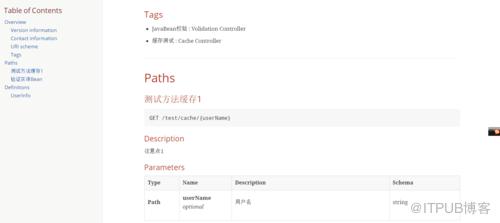
原文出处:http://www.cnblogs.com/liruiloveparents/p/9378327.html
来自 “ ITPUB博客 ” ,链接:https://blog.itpub.net/4295/viewspace-2805490/ ,如需转载,请注明出处,否则将追究法律责任。

