引言
看到很多项目都使用MyBatis,所以准备学一下。这里的笔记是我的学习纪要,有网上资料,有学习视频,也有自己在学习过程中的思考。但是代码都是我自己手写的。
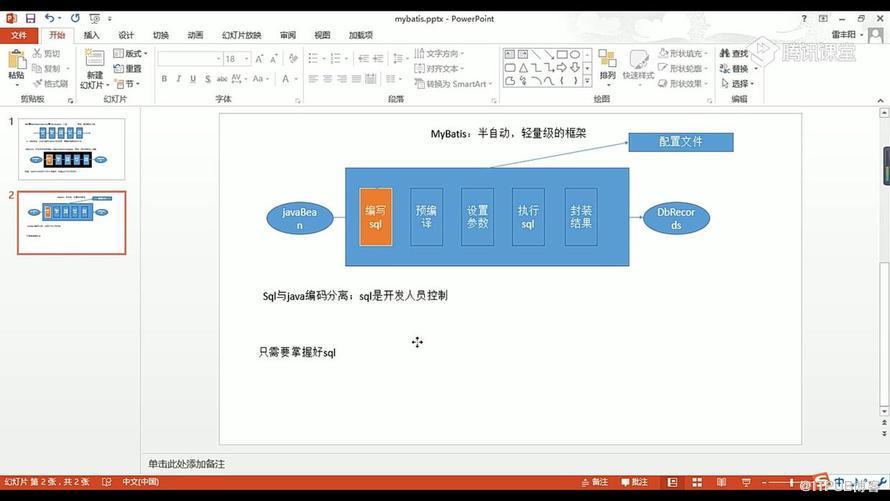
为什么要学习MyBatis?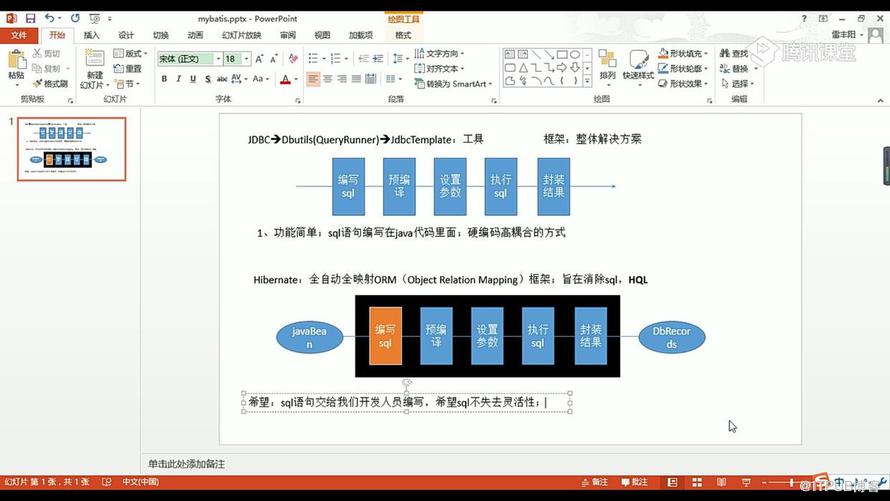
第一步:新建Module
pom.xml有如下依赖:
org.springframework.boot spring-boot-starter-web org.mybatis.spring.boot mybatis-spring-boot-starter 1.3.2 org.springframework.boot spring-boot-devtools runtime mysql mysql-connector-java runtime org.springframework.boot spring-boot-starter-test test 第二步:准备工作
application.properties配置如下:
spring.datasource.url=jdbc:mysql://localhost:3306/mybatis_demo
spring.datasource.username=root
spring.datasource.password=xfsy2018
spring.datasource.driver-class-name=com.mysql.jdbc.Driver

mybatis.type-aliases-package=com.fengwenyi.demo1.entity
mybatis.mapper-locations=classpath:mapper/*.xml
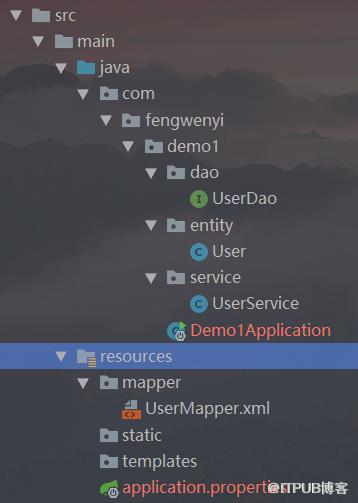
再建如下目录结构
建数据库:
DROP TABLE IF EXISTS `user`;
CREATE TABLE `user` (
  `id` bigint(20) NOT NULL AUTO_INCREMENT,
  `name` varchar(255) DEFAULT NULL,
  `age` int(11) DEFAULT NULL,
  PRIMARY KEY (`id`)
) ENGINE=MyISAM AUTO_INCREMENT=8 DEFAULT CHARSET=utf8mb4;
第三步:下面我们以查询为例
User
package com.fengwenyi.demo1.entity;

/**
 * @author Wenyi Feng
 */
public class User {

    private Long id;
    private String name;
    private Integer age;
    // getter and setter
    // toString
}
UserMapper
UserDao
package com.fengwenyi.demo1.dao;

import com.fengwenyi.demo1.entity.User;
import org.apache.ibatis.annotations.Mapper;

/**
 * @author Wenyi Feng
 */
@Mapper
public interface UserDao {
    User findById (Long id);
}
UserService
package com.fengwenyi.demo1.service;

import com.fengwenyi.demo1.dao.UserDao;
import com.fengwenyi.demo1.entity.User;
import org.springframework.beans.factory.annotation.Autowired;
import org.springframework.stereotype.Service;

/**
 * @author Wenyi Feng
 */
@Service
public class UserService {

    @Autowired
    private UserDao userDao;

    public User findById (Long id) {
        return userDao.findById(id);
    }
}到这里准备工作就算完成了,这里值得一提的是,service的作用会到这么体现出来,下面来看下测试代码。
我是在Spring Boot提供的测试代码中进行测试的:
package com.fengwenyi.demo1;

import com.fengwenyi.demo1.entity.User;
import com.fengwenyi.demo1.service.UserService;
import org.junit.Test;
import org.junit.runner.RunWith;
import org.springframework.beans.factory.annotation.Autowired;
import org.springframework.boot.test.context.SpringBootTest;
import org.springframework.test.context.junit4.SpringRunner;

@RunWith(SpringRunner.class)
@SpringBootTest
public class Demo1ApplicationTests {

    @Autowired
    private UserService userService;

    @Test
    public void contextLoads() {

    }

    @Test
    public void findById () {
        User user = userService.findById(1L);

        System.out.println(user.toString());
    }
}我已将我的代码放至 Github
我们一起学习,一起进步吧!!!
来自 “ ITPUB博客 ” ,链接:https://blog.itpub.net/3702/viewspace-2800292/ ,如需转载,请注明出处,否则将追究法律责任。
上一篇:
SQL Server 扩展事件
下一篇:
c#读取Excel的Sheet表方法

请登录后发表评论
登录
全部评论
