原标题:Serverless 框架 OpenWhisk 开发:hello, world
在尝试了使用 AWS 开发 Serverless 应用之后,我便想尝试使用 OpenWhisk 框架来搭建自己的 Serverless 服务。
Apache OpenWhisk(http://openwhisk.org/)是一个由IBM和Adobe驱动的开源项目,它是一个健壮的FaaS平台,可以部署在云或数据中心内。相比其他serverless项目,OpenWhisk是一个健壮的、可扩展的平台,支持数千并发触发器和调用。
OpenWhisk 简介
其系统架构如下所示:

对应的组件的功能如下:
Nginx 暴露HTTP(S)端点给客户端。
Controller 充当系统的守门员、系统的协调者,它将决定请求最终采取的路径。
CouchDB 护和管理系统的状态。
Consul 作为系统每个组件可访问的单一数据源。 同时,consul还提供服务发现功能,使控制器发现调用操作的实体。
Apache Kafka 用于构建实时数据管道和流应用程序。
Invoker 使用 Scala实现,它是处理执行过程的最后阶段。
Docker, 几乎所有的 OpenWhisk 组件都打包和部署为容器。
macOS 搭建 OpenWhisk 环境
官网的指引很简单,但是中间还是遇到一些环境问题。
首先 clone 代码
git clone --depth=1 https://github.com/apache/incubator-openwhisk.git openwhisk
然后于是虚拟机的目录:
cd openwhisk/tools/vagrant
接着执行 hello 命令
$./hello

./hello: line 8: vagrant: command not found
便提示 vagrant 没有安装。Vagrant 只是一个虚拟机管理和配置工具,为了安装 vagrant,还需要先安装 virtualbox 虚拟机:
brew cask install virtualbox
然后安装 vagrant,顺便也 可以安装 vagrant-manager
$ brew cask install vagrant vagrant-manager

==> Satisfying dependencies
==> Downloading https://releases.hashicorp.com/vagrant/2.0.1/vagrant_2.0.1_x86_64.dmg######################################################################## 100.0%
==> Verifying checksum for Cask vagrant
==> Installing Cask vagrant
==> Running installer for vagrant; your password may be necessary.
==> Package installers may write to any location; options such as --appdir are ignored.Password:
==> installer: Package name is Vagrant
==> installer: Installing at base path /
==> installer: The install was successful.
  vagrant was successfully installed!
==> Satisfying dependencies
==> Downloading https://github.com/lanayotech/vagrant-manager/releases/download/2.6.0/vagrant-manager-2.6.0.dmg######################################################################## 100.0%
==> Verifying checksum for Cask vagrant-manager
==> Installing Cask vagrant-manager
==> Moving App 'Vagrant Manager.app' to '/Applications/Vagrant Manager.app'.
再次执行:
$ ./hello
Bringing machine 'default' up with 'virtualbox' provider...
==> default: Box 'ubuntu/trusty64' could not be found. Attempting to find and install...    default: Box Provider: virtualbox    default: Box Version: >= 0==> default: Loading metadata for box 'ubuntu/trusty64'
    default: URL: https://vagrantcloud.com/ubuntu/trusty64==> default: Adding box 'ubuntu/trusty64' (v20171205.0.1) for provider: virtualbox    default: Downloading: https://vagrantcloud.com/ubuntu/boxes/trusty64/versions/20171205.0.1/providers/virtualbox.box
    default: Progress: 11% (Rate: 2806k/s, Estimated time remaining: 0:04:16)
然后挑个网速好的时间,比如早上(经过测试晚上的下载速度比较慢),等它下载完。下载完后,便自动开始在虚拟机里搭建 OpenWhisk 环境,如安装 Docker、Git 等等的操作。
最麻烦的是等待 Docker 安装拉各种镜像。OpenWhisk系统由许多组件构建而成:
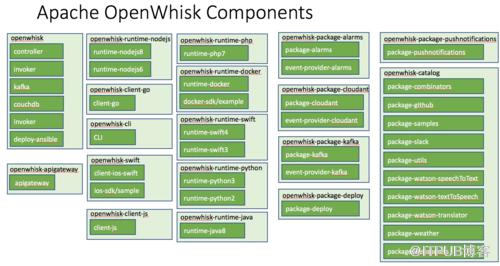
直至:
    default: +++ cat /home/vagrant/openwhisk/ansible/files/auth.guest
    default: ++ wsk property set --apihost 192.168.33.13 --namespace guest --auth 23bc46b1-71f6-4ed5-8c54-816aa4f8c502:123zO3xZCLrMN6v2BKK1dXYFpXlPkccOFqm12CdAsMgRU4VrNZ9lyGVCGuMDGIwP
    default: ok: whisk auth set. Run 'wsk property get --auth' to see the new value.    default: ok: whisk API host set to 192.168.33.13
    default: ok: whisk namespace set to guest    default: ++ wsk action invoke /whisk.system/utils/echo -p message hello --result
    default: {    default:     "message": "hello"
    default: }    default: +++ date
    default: ++ echo 'Mon Dec 11 12:09:23 UTC 2017: build-deploy-end'
我们就顺利地运行了我们的 hello world。
你也可以 ssh 到机器上:vagrant ssh,然后运行 wsk 命令试试:
$ vagrant@vagrant-ubuntu-trusty-64:~/openwhisk/bin$ wsk

        ____      ___                   _    _ _     _     _       /       / _  _ __   ___ _ __ | |  | | |__ (_)___| | __  /  /__     | | | | '_  / _  '_ | |  | | '_ | / __| |/ /
 /  ____   /  | |_| | |_) |  __/ | | | |/| | | | | __
来自 “ ITPUB博客 ” ,链接:https://blog.itpub.net/3316/viewspace-2799923/ ,如需转载,请注明出处,否则将追究法律责任。

