1、需求
1、随着TiDB集群的数量的发展,需要监控TiDB集群的存活情况
2、公司监控使用zabbix,需要将TiDB的监控接入进去
3、需要实现一键添加、删除集群监控,实现自动化
2、实现方式
1、通过Prometheus 的接口,获取各个组件的状态,处理数据后,推送至zabbix ;
2、通过各个组件(TiDB、PD、TiKV、Grafana)的本地 API 获取组件状态,防止prometheus的单点问题,开发中。
3、通过zabbix的接口,创建监控等
4、通过zabbix实现短信报警
美团的实现方式:
https://tech.meituan.com/2018/11/22/mysql-pingcap-practice.html
5、其他实现
也可以通过 Alertmanager报警
3、具体实现
3.1、规范
3.1.1、host规范
{tidb/pd/tikv/prometheus/grafana}_{实例端口port}_{实例IP}
举例:
tidb_6666_10.0.0.1
pd_6666_ 10.0.0.1
tikv_6666_ 10.0.0.1
prometheus_6666_ 10.0.0.1 暂时没有查到接口判断存活
grafana_666_ 10.0.0.1
3.1.2、监控项
注:Prometheus 的自己存活无接口,先忽略
监控项名字keytype值情况采集时间
TiDBAliveCheckTiDBaliveCheckZabbix trapper0:不存活
1:存活
10s 采集一次
PDAliveCheckPDaliveCheckZabbix trapper0:不存活
1:存活
10s 采集一次
TiKVAliveCheckTiKValiveCheckZabbix trapper0:不存活
1:存活
10s 采集一次
GrafAliveCheckGrafaliveCheckZabbix trapper0:不存活
1:存活
10s 采集一次
3.1.3、触发器
监控项名字触发器名字key采集时间触发
TiDBAliveCheckTiDB DownTiDBaliveCheck10s 采集一次最近3次采集数据值等于0 个数大于2即30s内采集不到即报警)
{ TiDB.GrafanaaliveCheck .count (#3,0,"eq")} >2
PDAliveCheckPD DownPDaliveCheck10s 采集一次最近3次采集数据值等于0 个数大于2即30s内采集不到即报警)
{ TiDB.GrafanaaliveCheck.count(#3,0,"eq")} >2
TiKVAliveCheckTiKV DownTiKValiveCheck10s 采集一次最近3次采集数据值等于0 个数大于2即30s内采集不到即报警)
{ GrafanaaliveCheck.count(#3,0,"eq")} >2
GrafAliveCheckGraf DownGrafaliveCheck10s 采集一次最近3次采集数据值等于0 个数大于2即30s内采集不到即报 警)
{ GrafanaaliveCheck.count(#3,0,"eq")} >2
3.2、发送至zabbix实现
3.2.1、举例zabbix_sender命令
/zabbix_agent34/bin/zabbix_sender --zabbix-server= 10.0.0.2 --host=tidb_6666_10.1.1.1 --key=TiDBaliveCheck --value=1
info from server: "processed: 1; failed: 0; total: 1; seconds spent: 0.000037"
sent: 1; skipped: 0; total: 1
3.2.2、具体
tidb_monitor
输入如下:
python tidb_monitor.py -c {$cluster_id1,$cluster_id2} (检查 指定tidb cluster)
python tidb_monitor.py -a (检查 所有tidb cluster)
python tidb_monitor.py -g (从mysql获取tidb集群信息,生成最新的配置文件)
python tidb_monitor.py -m (检查zabbix的监控与cdb的一致性)
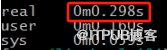
【 1】举例检查某个Tidb集群
tidb_monitor.py -c 6666-1

单个集群的检查时间:0.298s
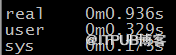
【2 】举例检查全部Tidb集群,耗时0.936s
python tidb_monitor.py -a
3.3、一致性检查
python tidb_monitor.py -m
获取zabbix的host
检查zabbix多的,并删除
检查元信息库多的,并添加
【一致的情况】

【zabbix缺少监控的情况】

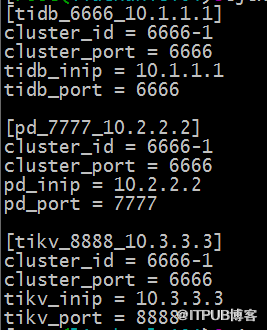
3.4、更新配置文件
配置文件里面记录了集群的拓扑信息,用于检查监控获取实例信息
tidb_monitor -g

3.5、配置文件
3.6、运行
放在管理机的crontab任务里面运行,后期与平台联动即可
4、zabbix部分
4.1、Template
TiDB

4.2、Applications

4.3、items

4.4、Triggers

4.5、Graphs

4.6、Actions

4.7、Users

4.8、 测试报警
4.9.1、宕机测试 – 微信
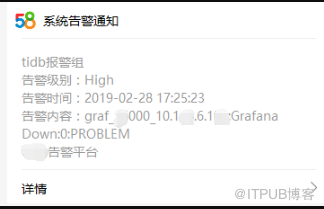
4.9.2、宕机测试 – 短信
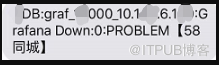
4.9.3、宕机测试 – zabbix

4.9.4、ack测试

4.9.5、恢复测试--zabbix

4.9.6、恢复测试--微信
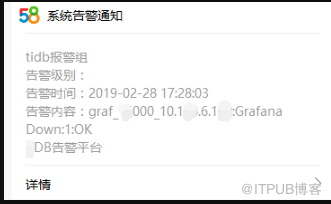
4.9.7、恢复测试--短信
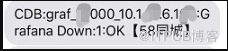
yum install perl-Test-Simple -y
3.安装MySQL Sandbox
cpan MySQL::Sandbox
4.设置环境变量(否则会抛错)
[root@localhost ~]# echo 'export SANDBOX_AS_ROOT=1' >> /root/.bash_profile
[root@localhost ~]# source /root/.bash_profile
5.下载mysql二进制软件包(我这里下载mysql5.6和mariadb-10,软件各位童鞋自己搜索,我这里已经下载,如下)
1
2
3
4
5
6
7
[root@localhost mysql]# pwd
/opt/mysql
[root@localhost mysql]# ll
total 588236
-rw-r--r--. 1 root root 295874759 Jun 4 04:56 mariadb-10.0.12-linux-x86_64.tar.gz
-rw-r--r--. 1 root root 306470256 Jun 4 04:56 mysql-5.6.12-linux-glibc2.5-x86_64.tar.gz
[root@localhost mysql]#
6.在沙箱环境中运行我们mysql两个实例
(1)首先创建mysql5.6的实例
1
2
3
4
5
6
7
8
9
10
11
12
13
14
15
16
17
18
19
20
21
22
23
24
25
26
27
28
29
30
31
32
33
34
35
36
37
38
39
40
41
42
43
44
45
[root@localhost mysql]# cd /opt/mysql/
[root@localhost mysql]# make_sandbox mysql-5.6.12-linux-glibc2.5-x86_64.tar.gz
unpacking /opt/mysql/mysql-5.6.12-linux-glibc2.5-x86_64.tar.gz
Executing low_level_make_sandbox --basedir=/opt/mysql/5.6.12 \
--sandbox_directory=msb_5_6_12 \
--install_version=5.6 \
--sandbox_port=5612 \
--no_ver_after_name \
--my_clause=log-error=msandbox.err
The MySQL Sandbox, version 3.0.44
(C) 2006-2013 Giuseppe Maxia
installing withthe following parameters:
upper_directory = /root/sandboxes
sandbox_directory = msb_5_6_12
sandbox_port = 5612
check_port =
no_check_port =
datadir_from = script
install_version = 5.6
basedir = /opt/mysql/5.6.12
tmpdir =
my_file =
operating_system_user = root
db_user = msandbox
remote_access = 127.%
bind_address = 127.0.0.1
ro_user = msandbox_ro
rw_user = msandbox_rw
repl_user = rsandbox
db_password = msandbox
repl_password = rsandbox
my_clause = log-error=msandbox.err
master =
slaveof =
high_performance =
prompt_prefix = mysql
prompt_body = [\h] {\u} (\d) >
force=
no_ver_after_name = 1
verbose =
load_grants = 1
no_load_grants =
no_run =
no_show =
do you agree? ([Y],n)
看见各种提示都给出了,相信童鞋们都看的懂,选择Y同意。
do you agree? ([Y],n) y
loading grants
.... sandbox server started
Your sandbox server was installed in $HOME/sandboxes/msb_5_6_12
[root@localhost mysql]#
最后会有安装路径的提示,默认在家目录下的sandboxes下。我们可以看看
1
2
3
4
5
6
7
8
9
10
11
12
13
14
15
[root@localhost sandboxes]# pwd
/root/sandboxes
[root@localhost sandboxes]# ll
total 40
-rwxr-xr-x. 1 root root 54 Jun 4 05:25 clear_all
drwxr-xr-x. 4 root root 4096 Jun 4 05:25 msb_5_6_12
-rw-r--r--. 1 root root 3621 Jun 4 05:25 plugin.conf
-rwxr-xr-x. 1 root root 56 Jun 4 05:25 restart_all
-rwxr-xr-x. 1 root root 2139 Jun 4 05:25 sandbox_action
-rwxr-xr-x. 1 root root 58 Jun 4 05:25 send_kill_all
-rwxr-xr-x. 1 root root 54 Jun 4 05:25 start_all
-rwxr-xr-x. 1 root root 55 Jun 4 05:25 status_all
-rwxr-xr-x. 1 root root 53 Jun 4 05:25 stop_all
-rwxr-xr-x. 1 root root 52 Jun 4 05:25 use_all
[root@localhost sandboxes]#
那么如何启动mysql呢,默认安装以后就启动了。
[root@localhost ~]# pgrep -fl mysql2151 /bin/sh /opt/mysql/5.6.12/bin/mysqld_safe --defaults-file=/root/sandboxes/msb_5_6_12/my.sandbox.cnf2331 /opt/mysql/5.6.12/bin/mysqld --defaults-file=/root/sandboxes/msb_5_6_12/my.sandbox.cnf --basedir=/opt/mysql/5.6.12 --datadir=/root/sandboxes/msb_5_6_12/data --plugin-dir=/opt/mysql/5.6.12/lib/plugin --user=root --log-error=/root/sandboxes/msb_5_6_12/data/msandbox.err --pid-file=/root/sandboxes/msb_5_6_12/data/mysql_sandbox5612.pid --socket=/tmp/mysql_sandbox5612.sock --port=5612[root@localhost ~]#
可以杀掉进程,自己启动看看,启动停止脚本在/root/sandboxes/msb_5_6_12

[root@localhost msb_5_6_12]# pkill -9 mysqld
[root@localhost msb_5_6_12]# ./start
sandbox server already started (found pid file /root/sandboxes/msb_5_6_12/data/mysql_sandbox5612.pid)
sandbox server started
[root@localhost msb_5_6_12]# rm -f /root/sandboxes/msb_5_6_12/data/mysql_sandbox5612.pid
[root@localhost msb_5_6_12]# ./start
. sandbox server started
[root@localhost msb_5_6_12]#
登陆mysql瞧瞧
1
2
3
4
5
6
7
8
9
10
11
12
[root@localhost msb_5_6_12]# pwd
/root/sandboxes/msb_5_6_12
[root@localhost msb_5_6_12]# ./use
Welcome tothe MySQL monitor. Commands endwith; or\g.
Your MySQL connectionid is2
Server version: 5.6.12 MySQL Community Server (GPL)
Copyright (c) 2000, 2013, Oracle and/orits affiliates. Allrights reserved.
Oracle isa registered trademark ofOracle Corporation and/orits
affiliates. Other names may be trademarks oftheir respective
owners.
Type 'help;'or'\h'forhelp. Type '\c'toclear the currentinput statement.
mysql [localhost] {msandbox} ((none)) >
就这么简单哈,当然有复杂的用法,大家可以试试,通常这样能快速部署一个mysql用于测试已经足够了。(下面的是mariadb实例,安装实例都是一样的)
[root@localhost msb_10_0_10]# pwd/root/sandboxes/msb_10_0_10
[root@localhost msb_10_0_10]# ./use
Welcome to the MariaDB monitor. Commands end with ; or \g.
Your MariaDB connection id is 5Server version: 10.0.10-MariaDB MariaDB Server
Copyright (c) 2000, 2014, Oracle, SkySQL Ab and others.
Type 'help;' or '\h' for help. Type '\c' to clear the current input statement.
mysql [localhost] {msandbox} ((none)) >
各个mysql实例的端口号就是mysql的版本号哦:)
[root@localhost msb_10_0_10]# netstat -nltp | grep mysqld
tcp 0 0 127.0.0.1:5612 0.0.0.0:* LISTEN 2547/mysqld
tcp 0 0 127.0.0.1:10010 0.0.0.0:* LISTEN 3015/mysqld
[root@localhost msb_10_0_10]#
对于需要部署多个实例呢?同一个版本部署多实例,其实也非常的简单,提供了make_multiple_sandbox这个命令,具体的参数自行help。或者查阅官方文档。
对于部署多个实例,我们还可以添加一个环境变量,就是将实例安装在指定的位置,
[root@mysql-server-01 mysql]# echo "export SANDBOX_HOME=/data/" >> /root/.bash_profile
[root@mysql-server-01 mysql]# source /root/.bash_profile
下面默认部署3个实例(相同的版本)
[root@mysql-server-01 mysql]# make_multiple_sandbox mariadb-10.0.12-linux-x86_64.tar.gz
installing node 1
installing node 2
installing node 3
group directory installed in $SANDBOX_HOME/multi_msb_mariadb-10_0_12
[root@mysql-server-01 mysql]#
默认部署3个实例,想要部署更多实例可以加参数--how_many_nodes = number,上面部署完成以后我们看看。
1
2
3
4
5
6
7
8
9
10
11
12
13
14
15
16
17
18
19
20
21
22
[root@mysql-server-01 multi_msb_mariadb-10_0_12]# pwd
/data/multi_msb_mariadb-10_0_12
[root@mysql-server-01 multi_msb_mariadb-10_0_12]# ll
total 72
-rwxr-xr-x 1 root root 365 Jul 13 16:18 check_slaves
-rwxr-xr-x 1 root root 432 Jul 13 16:18 clear_all
-rw-r--r-- 1 root root 7811 Jul 13 16:18 connection.json
-rw-r--r-- 1 root root 626 Jul 13 16:18 default_connection.json
-rwxr-xr-x 1 root root 48 Jul 13 16:18 n1
-rwxr-xr-x 1 root root 48 Jul 13 16:18 n2
-rwxr-xr-x 1 root root 48 Jul 13 16:18 n3
drwxr-xr-x 4 root root 4096 Jul 13 16:17 node1
drwxr-xr-x 4 root root 4096 Jul 13 16:17 node2
drwxr-xr-x 4 root root 4096 Jul 13 16:18 node3
-rw-r--r-- 1 root root 1088 Jul 13 16:18 README
-rwxr-xr-x 1 root root 204 Jul 13 16:18 restart_all
-rwxr-xr-x 1 root root 460 Jul 13 16:18 send_kill_all
-rwxr-xr-x 1 root root 432 Jul 13 16:18 start_all
-rwxr-xr-x 1 root root 232 Jul 13 16:18 status_all
-rwxr-xr-x 1 root root 425 Jul 13 16:18 stop_all
-rwxr-xr-x 1 root root 315 Jul 13 16:18 use_all
[root@mysql-server-01 multi_msb_mariadb-10_0_12]#
可以可以已经有3个节点了,我们登陆其中一个看看。
1
2
3
4
5
6
7
[root@mysql-server-01 multi_msb_mariadb-10_0_12]# ./n1
Welcome tothe MariaDB monitor. Commands endwith; or\g.
Your MariaDB connectionid is5
Server version: 10.0.12-MariaDB-log MariaDB Server
Copyright (c) 2000, 2014, Oracle, SkySQL Ab andothers.
Type 'help;'or'\h'forhelp. Type '\c'toclear the currentinput statement.
node1 [localhost] {msandbox} ((none)) >
现在是不是开始爱上MySQL Sandbox了呢?那你还等什么?心动就上吧!哈哈,就写到这里了。
mysql sandbox经典讲义(因为被墙,故放在网盘给同学们下载)
http://pan.baidu.com/s/1sjLMJCx
参考资料
http://search.cpan.org/~gmax/MySQL-Sandbox-3.0.44/lib/MySQL/Sandbox.pm
一 sandbox是什么?
MySQL Sandbox 是一个非常简单快捷的安装搭建MySQL实例的工具,它可以非常快速地满足我们对MySQL环境各种需求:单机实例,主从,一主多从等等架构(区别于自己安装MySQL 软件)。比如 新的数据库版本发行之后,想要尽快尝鲜 ,又不想花太多资源去安装,就可以使用sandbox帮助我们完成创建单个或者主从结构的实例。对于那些不懂MySQL安装的开发,测试同学而言,可以使用sandbox的快速搭建一个符合要求的数据库。MySQL Sandbox 快速,是以秒来衡量的,谁用谁知道。
二 如何安装和使用
2.1 安装sandbox
本文的案例是基于Centos虚拟机测试。
yum install cpan -y
yum install perl - Test -Simple -y
cpan MySQL : :Sandbox
echo 'export SANDBOX_AS_ROOT=1' > >/root/ .bash_profile && source /root/ .bash_profile
获取Percona server 5.7.17 版本
wget "https://www.percona.com/downloads/Percona-Server-5.7/Percona-Server-5.7.17-11/binary/tarball/Percona-Server-5.7.17-11-Linux.x86_64.ssl101.tar.gz"
2.2 常用命令
安装完成之后默认会在 /usr/local/bin/ 目录下产生make_开头的文件。
make_sandbox 基于二进制压缩包创建MySQL实例
make_sandbox_from_source 基于源码创建MySQL实例,参数是而执行 . /configure && make 成功的源码存放目录
make_sandbox_from_installed 基于已经安装好的mysql可执行文件目录安装MySQL实例
make_sandbox_from_url 从网上下载docker 镜像进行安装,具体参考 - -help 命令
make_multiple_sandbox 创建多个相同版本的MySQL实例
make_multiple_custom_sandbox 创建不同版本的MySQL实例
make_replication_sandbox 搭建主从复制结构 ,可以是一主一从,也可以是一主多从。
sbtool : sandbox管理工具
要深入了解各个命令的具体用法,请参考源码目录下的README文档,然后再自己动手实践,能理解更深刻,毕竟纸上来得终觉浅,绝知此事要躬行。下面主要通过
make_sandbox 和 make_replication_sandbox 来介绍如何使用 。
2.3 使用sandbox
安装单个实例
root@rac4 : /data/mysql# >make_sandbox /data/mysql/Percona -Server -5 .7 .17 -11 -Linux .x86_64 .ssl101 .tar .gz
unpacking /data/mysql/Percona -Server -5 .7 .17 -11 -Linux .x86_64 .ssl101 .tar .gz
Executing low_level_make_sandbox - -basedir = /data/mysql/5 .7 .17 \
- -sandbox_directory =msb_5_7_17 \
- -install_version =5 .7 \
- -sandbox_port =5717 \
- -no_ver_after_name \
- -my_clause =log -error =msandbox .err
The MySQL Sandbox ,version 3 .2 .05
(C )2006 -2016 Giuseppe Maxia
Installing with the following parameters :
upper_directory =/root/sandboxes
sandbox_directory =msb_5_7_17
sandbox_port =5717
check_port =
no_check_port =
datadir_from =script
install_version =5 .7
basedir =/data/mysql/5 .7 .17
tmpdir =
my_file =
operating_system_user =root
db_user =msandbox
remote_access =127 . %
bind_address =127 .0 .0 .1
ro_user =msandbox_ro
rw_user =msandbox_rw
repl_user =rsandbox
db_password =msandbox
repl_password =rsandbox
my_clause =log -error =msandbox .err
. . . . . . 省略部分内容
prompt_prefix =mysql
prompt_body = [ \h ]{\u} ( \d ) >
force =
no_ver_after_name =1
verbose =
load_grants =1
no_load_grants =
no_run =
no_show =
keep_uuid =
history_dir =
do you agree ? ( [Y ] ,n )Y
输入Y 然后sandbox就会启动一个实例,需要等待20s 左右。
# Starting server
.sandbox server started
# Loading grants
Your sandbox server was installed in$HOME/sandboxes/msb_5_7_17
因为本案例采用root用户安装测试,新生成的数据库目录在 /root/sandboxes/msb_5_7_17 ,其中的文件如下

大家可以研究各个可执行文件的具体内容。常用的有use,stop,start,restart 等等,例如
root@rac4 : ~ /sandboxes/msb_5_7_17# > . /use - -登陆数据库
Welcome to the MySQL monitor .Commands end with ; or\g .
Your MySQL connection id is 9
Server version :5 .7 .17 -11 Percona Server (GPL ) ,Release 11 ,Revision f60191c
Copyright (c )2009 -2016 Percona LLC and / orits affiliates
mysql [localhost ]{msandbox} ( (none ) ) >show databases ;
+ - - - - - - - - - - - - - - - - - - - - +
|Database |
+ - - - - - - - - - - - - - - - - - - - - +
|information_schema |
|mysql |
|performance_schema |
|sys |
| test |
+ - - - - - - - - - - - - - - - - - - - - +
5 rows inset (0 .00 sec )
搭建主从 ,本例中启用gtid 并且设置创建1个slave. 因为上例已经创建了一个5.7.17 源程序目录,我们可以基于该目录创建主从,当然也可以基于源码的压缩包。
root@rac4 : /data/mysql# >make_replication_sandbox - -gtid - -how_many_slaves =1 5 .7 .17
installing andstarting master
installing slave 1
starting slave 1
. .sandbox server started
initializing slave 1
replication directory installed in$HOME/sandboxes/rsandbox_5_7_17
根据结果提示sandbox创建的主从在目录$HOME/sandboxes/rsandbox_5_7_17,进入该目录查看有如下文件

其中master 和node1 分别是主库和备库的数据库目录, m和n1 都是登陆主库的命令,s1 和n2 都是登陆slave 的命令 ,其他的可以从文件名知道具体用途。这里介绍两个命令 test_replication和 check_slaves 两个命令功能类似,都是检查slave 的状态信息。 check_slaves会把主库相关信息输出。
root@rac4 : ~ /sandboxes/rsandbox_5_7_17# >sh test_replication 检查主备关系
# Master log :mysql -bin .000001 -Position :10732 -Rows :20
# Testing slave #1
ok -Slave #1 acknowledged reception oftransactions from master
ok -Slave #1 IO thread is running
ok -Slave #1 SQL thread is running
ok -Table t1 found on slave #1
ok -Table t1 has 20 rows on #1
# TESTS :5
# FAILED :0 (0 .0% )
# PASSED :5 (100 .0% )
# exit code :0
root@rac4 : ~ /sandboxes/rsandbox_5_7_17# > . /check_slaves #
master
port :20192
File :mysql -bin .000001
Position :10732
Executed_Gtid_Set :00020192 -1111 -1111 -1111 -111111111111 :1 -40
slave # 1 1、需求
1、随着TiDB集群的数量的发展,需要监控TiDB集群的存活情况
2、公司监控使用zabbix,需要将TiDB的监控接入进去
3、需要实现一键添加、删除集群监控,实现自动化
2、实现方式
1、通过Prometheus 的接口,获取各个组件的状态,处理数据后,推送至zabbix ;
2、通过各个组件(TiDB、PD、TiKV、Grafana)的本地 API 获取组件状态,防止prometheus的单点问题,开发中。
3、通过zabbix的接口,创建监控等
4、通过zabbix实现短信报警
美团的实现方式:
https://tech.meituan.com/2018/11/22/mysql-pingcap-practice.html
5、其他实现
也可以通过 Alertmanager报警
3、具体实现
3.1、规范
3.1.1、host规范
{tidb/pd/tikv/prometheus/grafana}_{实例端口port}_{实例IP}
举例:
tidb_6666_10.0.0.1
pd_6666_ 10.0.0.1
tikv_6666_ 10.0.0.1
prometheus_6666_ 10.0.0.1 暂时没有查到接口判断存活
grafana_666_ 10.0.0.1
3.1.2、监控项
注:Prometheus 的自己存活无接口,先忽略
监控项名字keytype值情况采集时间
TiDBAliveCheckTiDBaliveCheckZabbix trapper0:不存活
1:存活
10s 采集一次
PDAliveCheckPDaliveCheckZabbix trapper0:不存活
1:存活
10s 采集一次
TiKVAliveCheckTiKValiveCheckZabbix trapper0:不存活
1:存活
10s 采集一次
GrafAliveCheckGrafaliveCheckZabbix trapper0:不存活
1:存活
10s 采集一次
3.1.3、触发器
监控项名字触发器名字key采集时间触发
TiDBAliveCheckTiDB DownTiDBaliveCheck10s 采集一次最近3次采集数据值等于0 个数大于2即30s内采集不到即报警)
{ TiDB.GrafanaaliveCheck .count (#3,0,"eq")} >2
PDAliveCheckPD DownPDaliveCheck10s 采集一次最近3次采集数据值等于0 个数大于2即30s内采集不到即报警)
{ TiDB.GrafanaaliveCheck.count(#3,0,"eq")} >2
TiKVAliveCheckTiKV DownTiKValiveCheck10s 采集一次最近3次采集数据值等于0 个数大于2即30s内采集不到即报警)
{ GrafanaaliveCheck.count(#3,0,"eq")} >2
GrafAliveCheckGraf DownGrafaliveCheck10s 采集一次最近3次采集数据值等于0 个数大于2即30s内采集不到即报 警)
{ GrafanaaliveCheck.count(#3,0,"eq")} >2
3.2、发送至zabbix实现
3.2.1、举例zabbix_sender命令
/zabbix_agent34/bin/zabbix_sender --zabbix-server= 10.0.0.2 --host=tidb_6666_10.1.1.1 --key=TiDBaliveCheck --value=1
info from server: "processed: 1; failed: 0; total: 1; seconds spent: 0.000037"
sent: 1; skipped: 0; total: 1
3.2.2、具体
tidb_monitor
输入如下:
python tidb_monitor.py -c {$cluster_id1,$cluster_id2} (检查 指定tidb cluster)
python tidb_monitor.py -a (检查 所有tidb cluster)
python tidb_monitor.py -g (从mysql获取tidb集群信息,生成最新的配置文件)
python tidb_monitor.py -m (检查zabbix的监控与cdb的一致性)
【 1】举例检查某个Tidb集群
tidb_monitor.py -c 6666-1
单个集群的检查时间:0.298s
【2 】举例检查全部Tidb集群,耗时0.936s
python tidb_monitor.py -a
3.3、一致性检查
python tidb_monitor.py -m
获取zabbix的host
检查zabbix多的,并删除
检查元信息库多的,并添加
【一致的情况】
【zabbix缺少监控的情况】
3.4、更新配置文件
配置文件里面记录了集群的拓扑信息,用于检查监控获取实例信息
tidb_monitor -g
3.5、配置文件
3.6、运行
放在管理机的crontab任务里面运行,后期与平台联动即可
4、zabbix部分
4.1、Template
TiDB
4.2、Applications
4.3、items
4.4、Triggers
4.5、Graphs
4.6、Actions
4.7、Users
4.8、 测试报警
4.9.1、宕机测试 – 微信
4.9.2、宕机测试 – 短信
4.9.3、宕机测试 – zabbix
4.9.4、ack测试
4.9.5、恢复测试--zabbix
4.9.6、恢复测试--微信
4.9.7、恢复测试--短信
来自 “ ITPUB博客 ” ,链接:https://blog.itpub.net/3244/viewspace-3141582/ ,如需转载,请注明出处,否则将追究法律责任。

