最近官方推出了免费试用365天的云数据库,版本也升级到了4.3.支持了向量功能.
官方推出了活动体验AI的 动手实战活动, 教程中使用了docker单机版数据库,既然有免费的云数据库,就优先使用云数据库体验一下.
1. 云环境申请
在官网的主页有有一个大大的标题,OB Cloud 365天免费试用.经过简单的操作后,大约等5分钟,就创建了一个免费的数据库实例了.
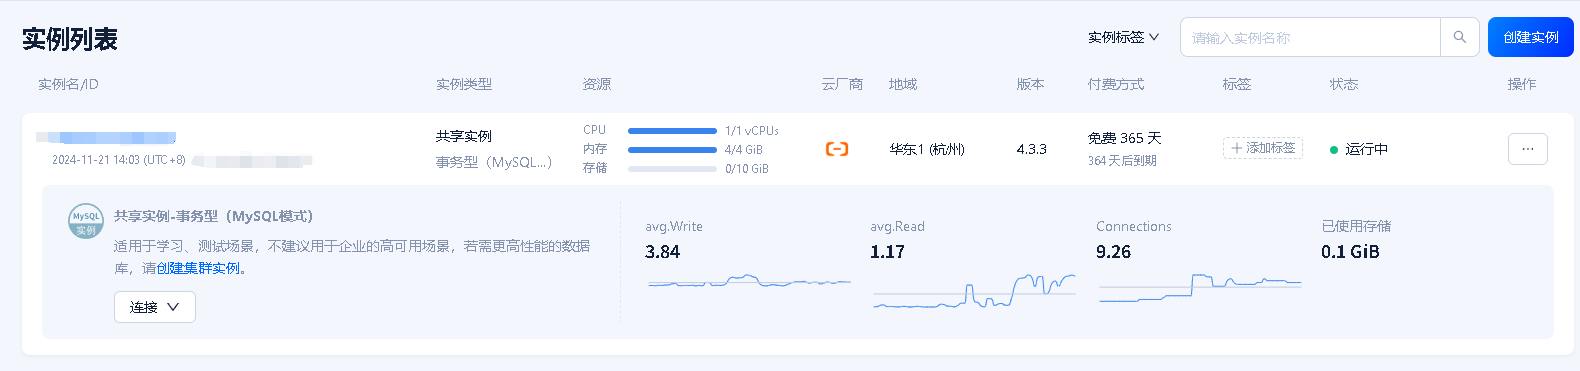
点击右上方的"三个点",依次创建用户、创建数据库、获取连接串,就可以通过公网连接云上数据库了,要谨慎添加白名单,避免资源被非法连接.
进入实例控制台后,点击"参数管理",设置ob_vector_memory_limit_percentage,启用向量检索功能,将参数值设置为30.
2. 安装python
要求的python版本大于等于3.9,小于4.0.我使用的是3.9.6.
# yum install python39
3. CLONE项目
# git clone https://github.com/oceanbase-devhub/ai-workshop-2024.git
4. 安装poetry
poetry是python的依赖和包管理工具,安装包更简单也更方便.
# python3 -m pip install poetry
# cd ~/ai-workshop-2024
# poetry install
如果下载包比较慢,可以将官方源换为阿里源
# cd ai-workshop-2024
# vi pyproject.toml
// 删除下面的源信息
[[tool.poetry.source]]
name = "PyPI"
priority = "primary"

[[tool.poetry.source]]
name = "tuna"
url = "https://mirrors.tuna.tsinghua.edu.cn/pypi/web/simple"
priority = "supplemental"
// 添加下面的源信息
[[tool.poetry.source]]
name = "ali"
url = "https://mirrors.aliyun.com/pypi/simple/"
priority = "primary"

[[tool.poetry.source]]
name = "tuna"
url = "https://mirrors.tuna.tsinghua.edu.cn/pypi/web/simple"
priority = "supplemental"
//使配置生效
# poetry lock
接下来配置环境变量
# cp .env.example .env
# vi .env
API_KEY=xxxxxxxxxxxxxxxxxxxxxxxxxxxxxxxx	# 替换https://open.bigmodel.cn/usercenter/apikeys 智谱AI的API KEY
LLM_MODEL="glm-4-flash"
LLM_BASE_URL="https://open.bigmodel.cn/api/paas/v4/" # BigModel (ZhipuAI)
# LLM_BASE_URL="https://api.openai.com/v1/" # OpenAI
# LLM_BASE_URL="https://dashscope.aliyuncs.com/compatible-mode/v1" # Dashscope (Alibaba)
HF_ENDPOINT=https://hf-mirror.com
BGE_MODEL_PATH=BAAI/bge-m3
OLLAMA_URL=
OLLAMA_TOKEN=
OPENAI_API_KEY=
OPENAI_BASE_URL=
OPENAI_EMBEDDING_MODEL=
DB_HOST="127.0.0.1"	# 数据库的IP或域名
DB_PORT="2881"		# 数据库的端口
DB_USER="root@test"	# 连接的用户名
DB_NAME="test"		# 连接的数据库名
DB_PASSWORD=""		# 连接的密码
5. 准备BGE-M3 模型
# poetry run python utils/prepare_bgem3.py

===================================
BGEM3FlagModel loaded successfully!
===================================
出现以上的输出,就成功了.
6. 准备文档数据
从github克隆文档数据
# cd doc_repos
# git config --global http.postBuffer 16000M  // 增加修改buffer大小
# git config --global core.compression -1 // 启动压缩
# git clone --single-branch --branch V4.3.3 https://github.com/oceanbase/oceanbase-doc.git --depth 1  //如果git报错,添加后面的参数
# git clone --single-branch --branch V4.3.0 https://github.com/oceanbase/ocp-doc.git
# git clone --single-branch --branch V4.3.1 https://github.com/oceanbase/odc-doc.git
# git clone --single-branch --branch V4.2.5 https://github.com/oceanbase/oms-doc.git
# git clone --single-branch --branch V2.10.0 https://github.com/oceanbase/obd-doc.git
# git clone --single-branch --branch V4.3.0 https://github.com/oceanbase/oceanbase-proxy-doc.git
# cd ..
把文档的标题转换为标准的 markdown 格式
# poetry run python convert_headings.py \
  doc_repos/oceanbase-doc/zh-CN \
  doc_repos/ocp-doc/zh-CN \
  doc_repos/odc-doc/zh-CN \
  doc_repos/oms-doc/zh-CN \
  doc_repos/obd-doc/zh-CN \
  doc_repos/oceanbase-proxy-doc/zh-CN
生成文档向量和元数据,等待时间比较长,并且相当看硬件性能,是个不错的性能压测工具
# poetry run python embed_docs.py --doc_base doc_repos/oceanbase-doc/zh-CN
# poetry run python embed_docs.py --doc_base doc_repos/ocp-doc/zh-CN --component ocp
# poetry run python embed_docs.py --doc_base doc_repos/odc-doc/zh-CN --component odc
# poetry run python embed_docs.py --doc_base doc_repos/oms-doc/zh-CN --component oms
# poetry run python embed_docs.py --doc_base doc_repos/obd-doc/zh-CN --component obd
# poetry run python embed_docs.py --doc_base doc_repos/oceanbase-proxy-doc/zh-CN --component odp
保存加载数据
# poetry run python utils/extract.py --output_file ~/my-data.json
加载预处理的文档数据
# poetry run python utils/load.py --source_file ~/my-data.json
7. 验证数据库和数据
进入.env配置文件中的数据库,会有一个新表,表名是corpus,表结构中的embedding列的数据类型是VECTOR(1024),这个类型就是向量类型,
mysql> desc corpus;
+----------------+---------------+------+-----+---------+-------+
| Field          | Type          | Null | Key | Default | Extra |
+----------------+---------------+------+-----+---------+-------+
| id             | varchar(4096) | NO   | PRI | NULL    |       |
| embedding      | VECTOR(1024)  | YES  |     | NULL    |       |
| document       | longtext      | YES  |     | NULL    |       |
| metadata       | json          | YES  |     | NULL    |       |
| component_code | int(11)       | NO   | PRI | NULL    |       |
+----------------+---------------+------+-----+---------+-------+
5 rows in set (0.04 sec)
mysql> select count(*) from corpus;
+----------+
| count(*) |
+----------+
|     6500 |
+----------+
1 row in set (0.05 sec)
8.启动web界面
上面的准备工作已经全部完成,接下来就是激动人心的时刻了,原神启动!!!(走错片场了)
# poetry run streamlit run --server.runOnSave false chat_ui.py

    You can now view your Streamlit app in your browser.

	Local URL: http://localhost:8501
	Network URL: http://172.xxx.xxx.xxx:8501
	External URL: http://xxx.xxx.xxx.xxx:8501 # 这是您可以从浏览器访问的 URL
刚好streamlit提供服务的IP都不是对外的,修改.streamlit/config.toml,指定对外服务的IP和端口
[server]
port = 8501
enableCORS = false

[browser]
serverAddress = "192.168.56.110"
gatherUsageStats = false
重启后,IP被绑定到了192.168.56.110上.
接下来就是一个尖锐的问题(开玩笑)
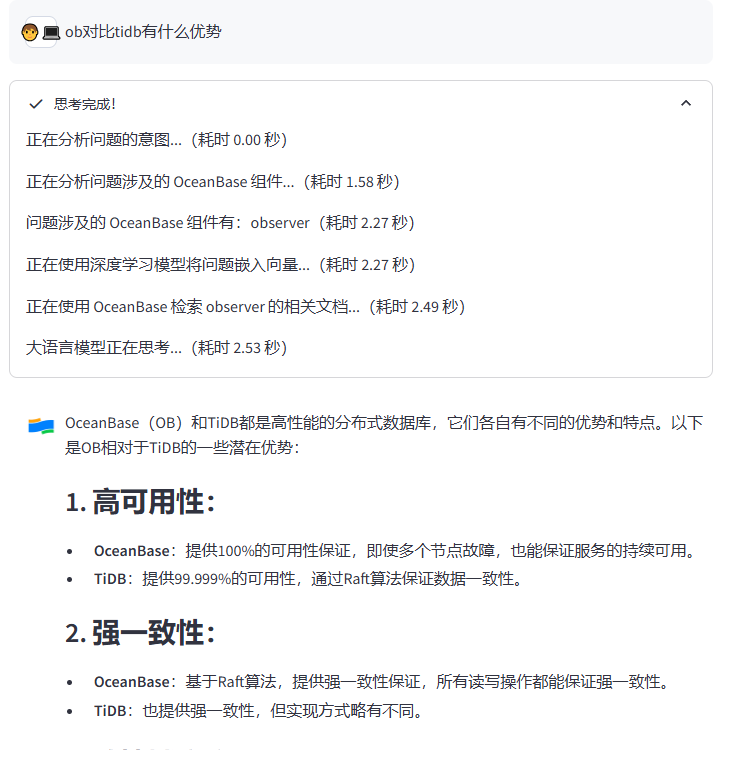
又提问了一个问题,总体来说还是不错的
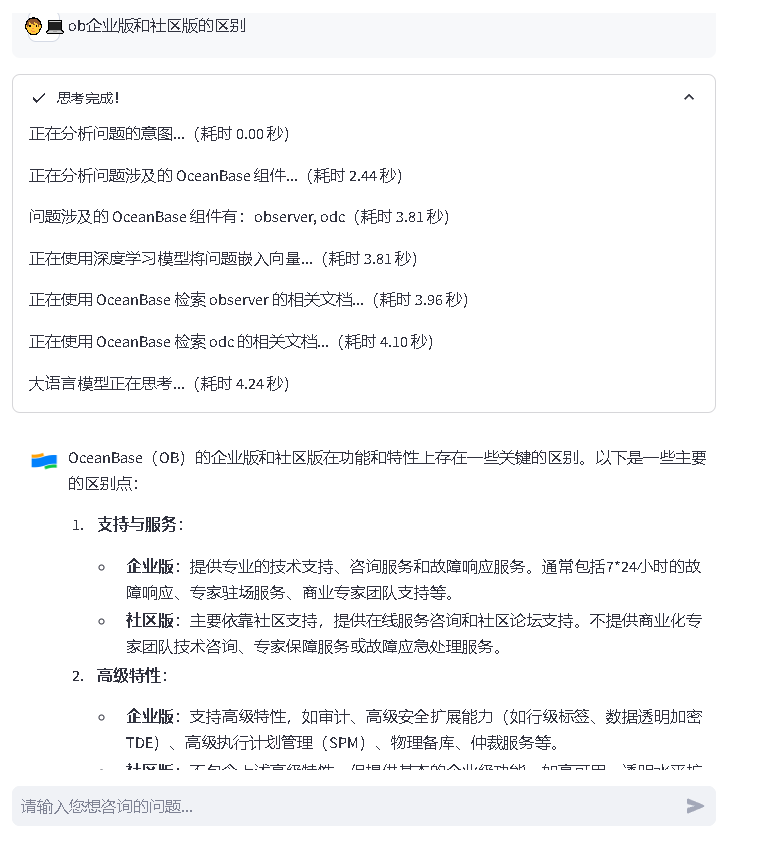
参考文档:
https://github.com/oceanbase-devhub/ai-workshop-2024/blob/main/README_zh.md
https://www.oceanbase.com/docs/common-oceanbase-database-cn-1000000001579715
来自 “ ”, 原文作者: ;原文链接:,如有侵权,请联系管理员删除。

最新文章
- 快思考与慢思考:数据库的AI进化论
- DTCC 2026 精彩回顾 | NineData 面向 AI Agent 的数据库 DevOps 与数据复制思考与实践
- 锚定 "1+2" 战略 共筑技术高地 ——openGauss 亮相 DTCC 2026
- 内生智能、全栈可信!HaishanDB亮相DTCC 2026
- Agentic DB Day 深圳——当数据库长成Agentic形态
- YashanDB数据沙箱敏捷探索,两场连播,带你从原理到实测分享!
- 原生 AI 赋能产业革新 海山数据库领航数智新赛道
- YashanDB AI 应用挑战赛:你的创意,值得被看见
- OceanBase 4.4.2 LTS版本正式发布:TP/AP/AI一体化融合
- 千日稳定守护,金仓数据库赋能北京一卡通斩获鼎信杯奖项
