一、前言
随着企业业务的快速发展和数据量的不断增长,高性能、高可用的数据库解决方案成为了关键需求。OceanBase作为一款分布式关系型数据库,以其高扩展性、高可用性和高性能的特点,逐渐受到企业的广泛关注。然而,在复杂的分布式架构中,如何高效地部署和运维OceanBase以满足企业对可靠性和性能的要求,是一个亟待解决的技术挑战。本篇文章旨在探讨基于 Amazon EKS 部署高可用 OceanBase 的最佳实践,从架构设计、部署流程到高可用性的保障,全面剖析其中的关键技术和操作步骤。希望通过本实践,为开发者和企业提供一个清晰的技术参考,加速分布式数据库的云端部署进程,实现业务稳定运行与创新发展的双赢目标。
1.1 本实验架构图
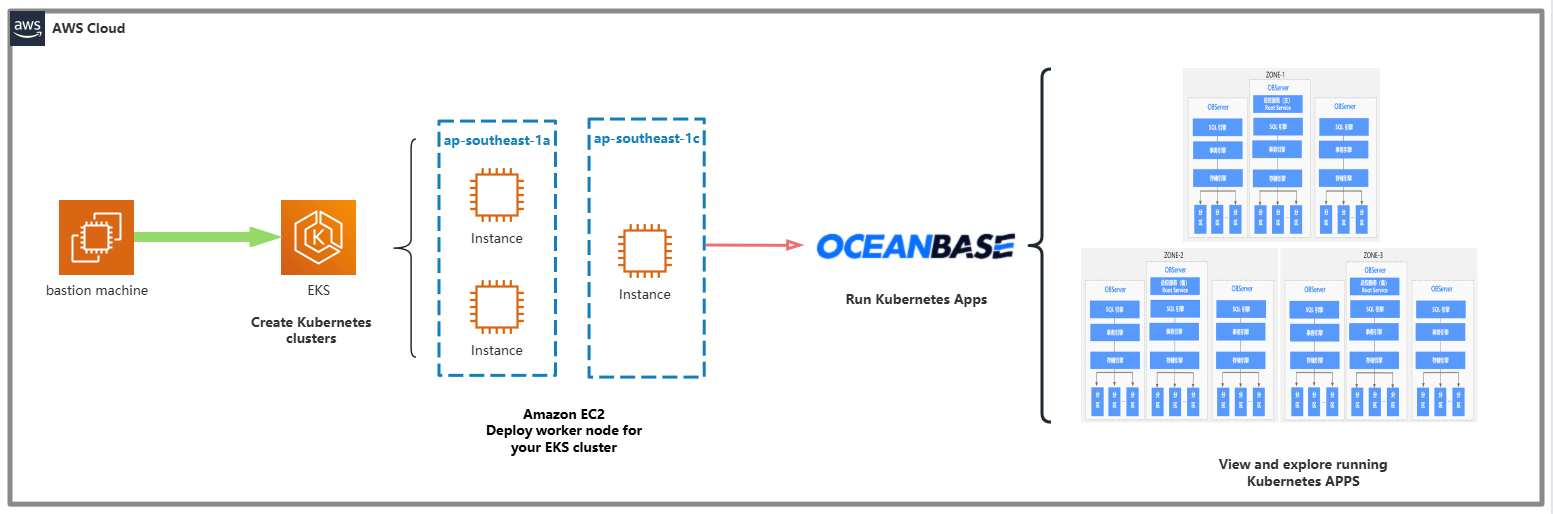
架构说明:该架构展示了如何利用 Amazon EKS 和 OceanBase 实现高性能、可扩展的分布式数据库解决方案。通过跨可用区部署和负载分布,确保了系统的高可用性、容错性和数据安全性。
二、理论篇
2.1 EKS介绍
Amazon Elastic Kubernetes Service(Amazon EKS) 是一项基于开源 Kubernetes 项目的 AWS 托管式服务。虽然您需要了解 Amazon EKS 服务如何与 AWS Cloud 集成(尤其是在您首次创建 Amazon EKS 集群时),但是一旦它启动并运行,您就可以像使用任何其他 Kubernetes 集群一样使用您的 Amazon EKS 集群。
2.2 OceanBase介绍
OceanBase 数据库 是一款完全自研的企业级原生分布式数据库,在普通硬件上实现金融级高可用,首创“三地五中心”城市级故障自动无损容灾新标准,刷新 TPC-C 标准测试,单集群规模超过 1500 节点,具有云原生、强一致性、高度兼容 Oracle/MySQL 等特性。
2.3 OceanBase组件介绍
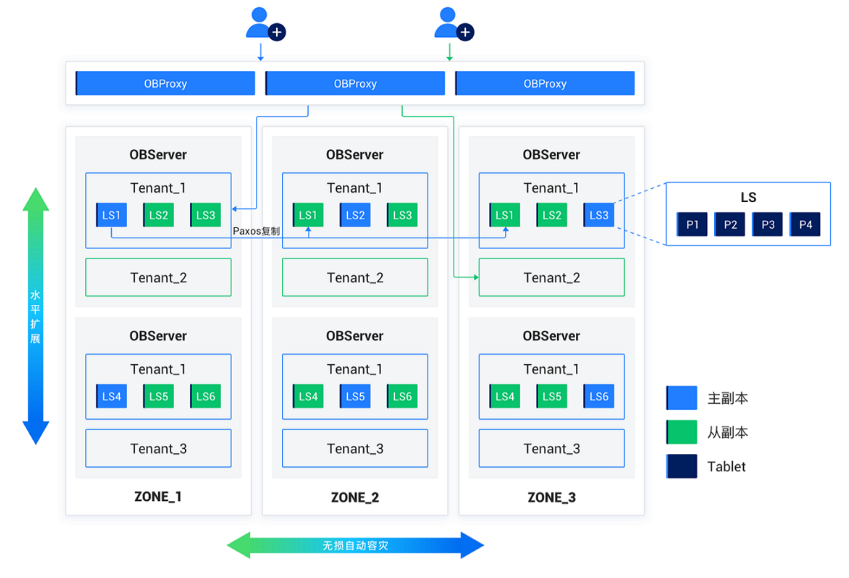
这张图展示了基于 OceanBase 数据库的分布式架构设计,结合主从复制、高可用性和水平扩展的特点。以下是对图的详细分析:
OBProxy:
- 位于架构的最顶层,作为 OceanBase 的访问代理。
- 负责处理用户请求并将其分发到后端的 OBServer 节点。
- 实现了负载均衡和高可用性,保证用户请求的高效路由。
OBServer:
- 是 OceanBase 数据库的核心存储和计算节点。
- 每个 OBServer 节点分布在不同的 Zone(区域)中,提供高可用的区域隔离能力。
多租户架构
- Tenant(租户):每个 OBServer 节点支持多租户架构,即在同一物理节点上可以运行多个逻辑租户。租户之间的资源隔离确保了不同业务或用户的数据安全和性能独立。
逻辑分区与数据分布
- LS(Log Stream,日志流):每个租户中的数据被分割为多个 LS(如 LS1、LS2、LS3 等)。每个 LS 是存储分区的逻辑单元,内部包含多个 Tablet(数据表)。通过 Paxos 协议实现分布式一致性,保障数据的高可用性。
- Tablet:数据分片的最小单位,每个 LS 内部进一步划分为多个 Tablet。Tablet 实现数据的分布式存储和管理。
高可用性与主从复制
- 主副本与从副本:每个 LS 都有一个主副本(蓝色)和多个从副本(绿色)。主副本负责处理写操作,从副本提供读操作支持。在主副本故障时,从副本可以快速提升为主副本,保证业务连续性。
- Paxos 协议:在多个副本之间实现强一致性,通过 Paxos 协议保障数据的一致性和高可用性。
水平扩展与无缝容灾
- 水平扩展:架构支持动态添加 OBServer 节点,实现系统的水平扩展。无需中断业务即可扩展存储和计算能力。
- 无缝自动容灾:在 Zone 级别实现了容灾能力,某个 Zone 出现故障时,其他 Zone 可自动接管其任务。多 Zone 部署进一步增强了数据可靠性。
OBD
OceanBase Deployer,OceanBase 安装部署工具,简称为 OBD。
ODP
OceanBase Database Proxy,OceanBase 数据库代理,是 OceanBase 数据库专用的代理服务器,简称为 ODP(又称为 OBProxy)。
OBAgent
OBAgent 是 OceanBase 数据库监控采集框架,支持推、拉两种数据采集模式,可以满足不同的应用场景。
Grafana
Grafana 是一款开源的数据可视化工具,它可以将数据源中的各种指标数据进行可视化展示,以便更直观地了解系统运行状态和性能指标。
Prometheus
Prometheus 是一个开源的服务监控系统和时序数据库,其提供了通用的数据模型以及快捷数据采集、存储和查询接口。
三、实战篇
3.1 使用eskctl工具部署EKS集群
3.1.1 使用CloudFormation创建堡垒机
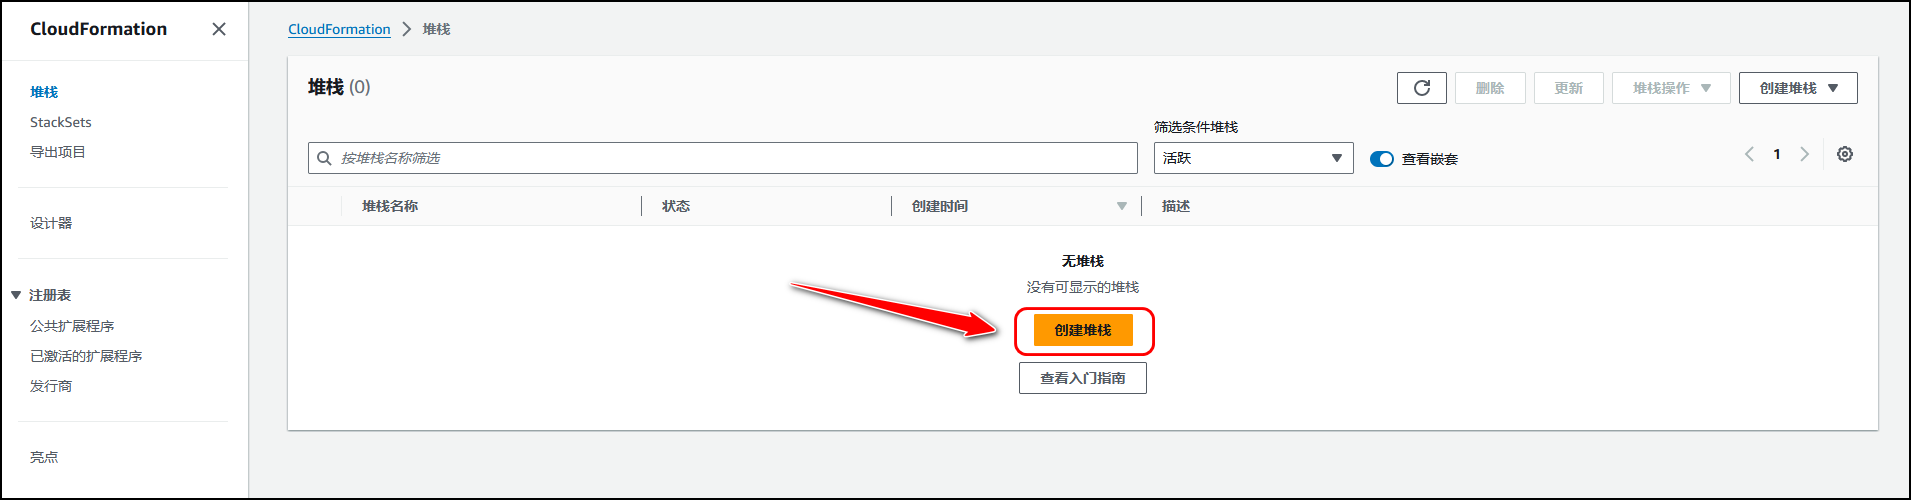
导航至 CloudFormation,点击 创建堆栈。
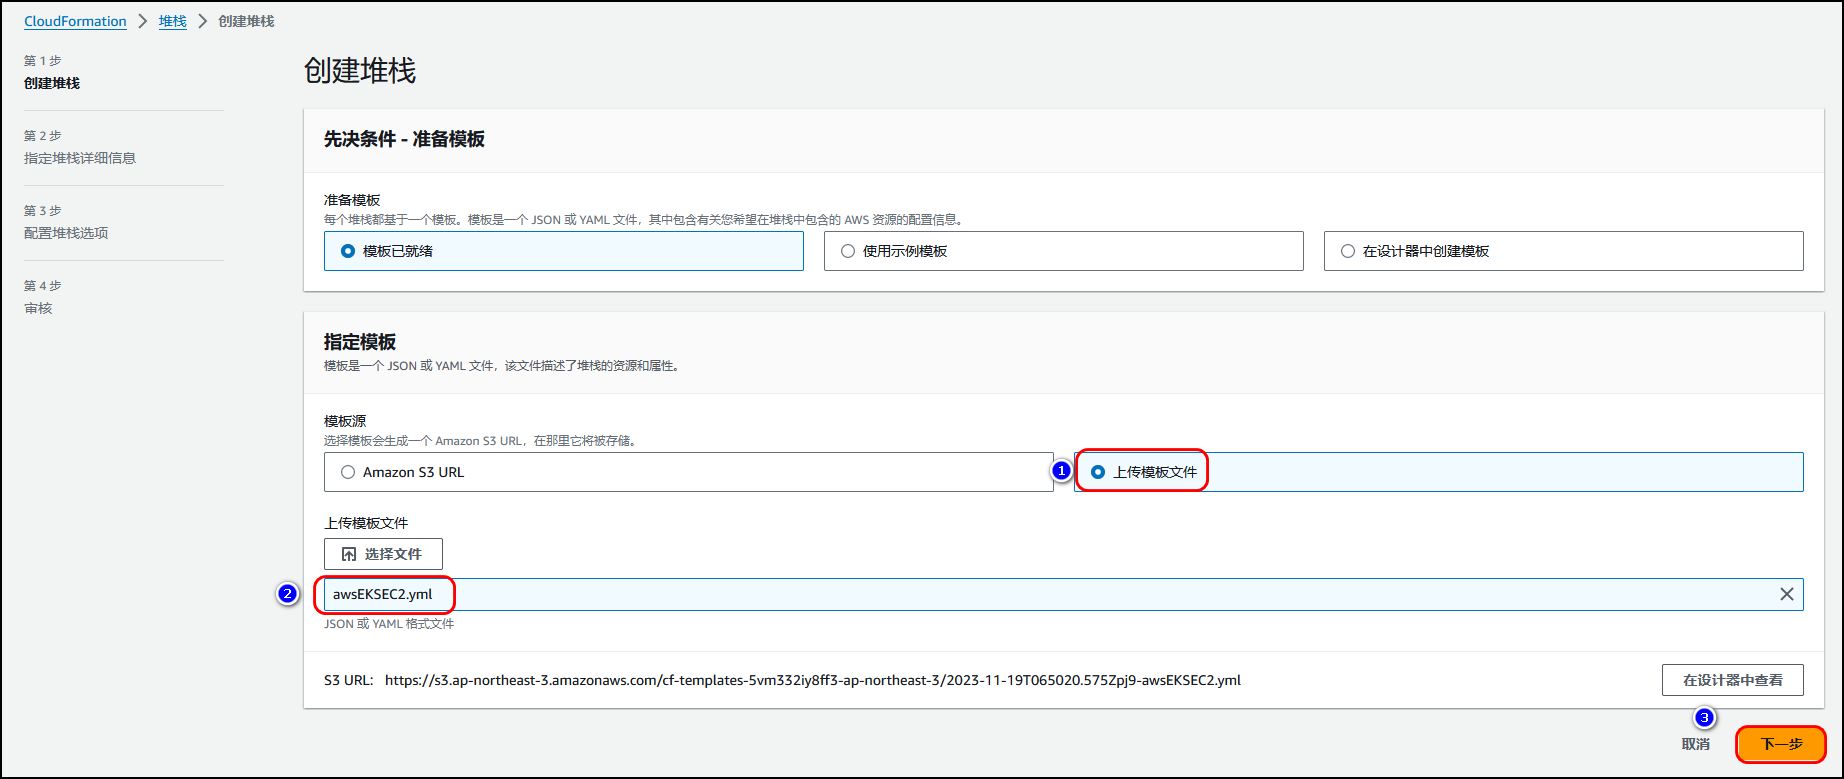
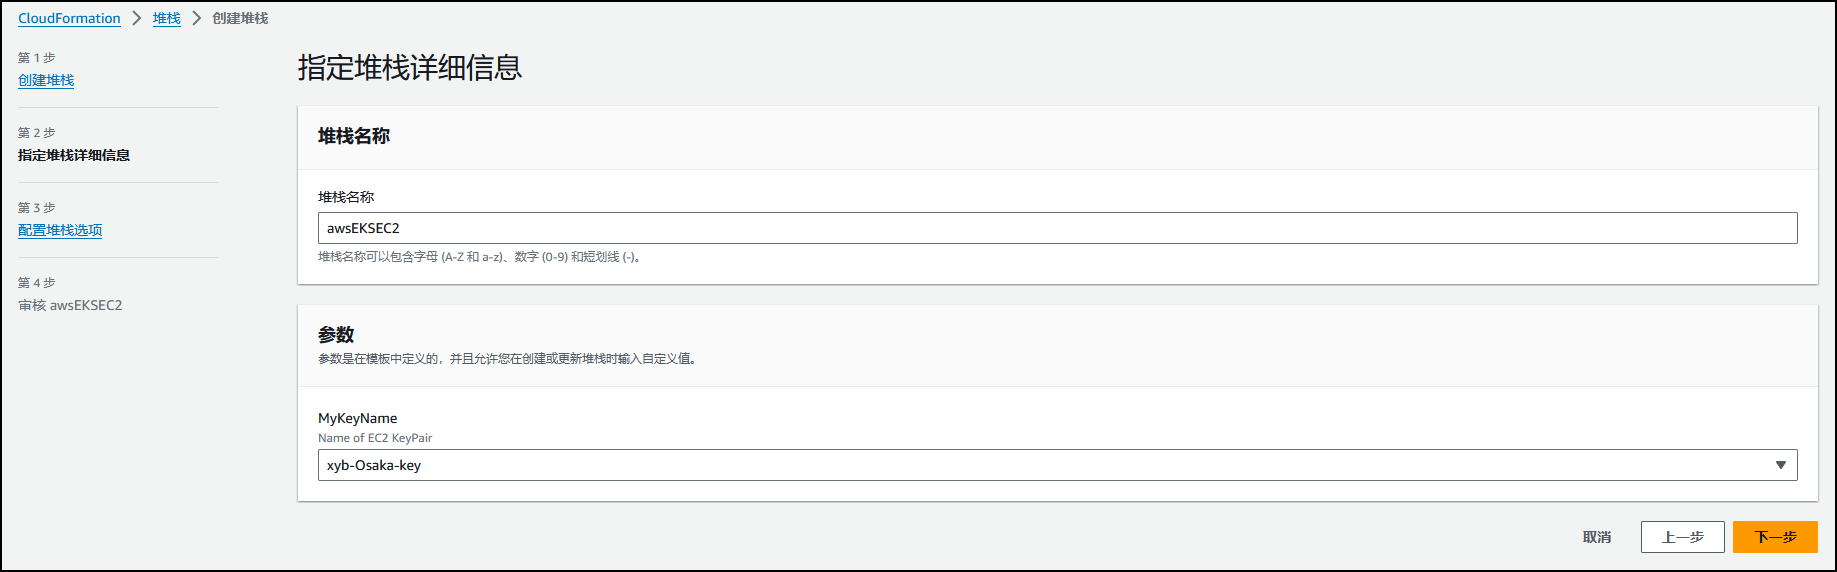
上传创建 EC2的yaml文件。
选择登录
堡垒机
的密钥。
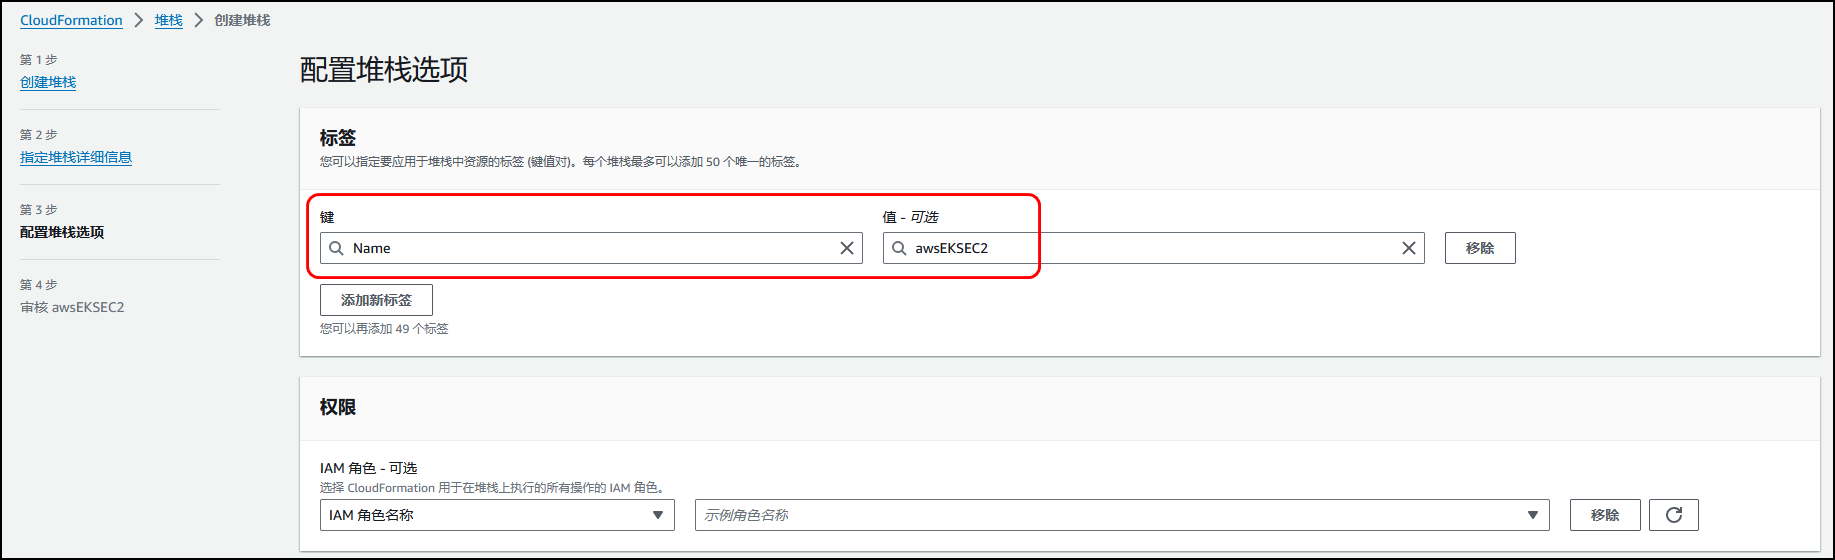
配置标签
Name:awsEKSEC2
。
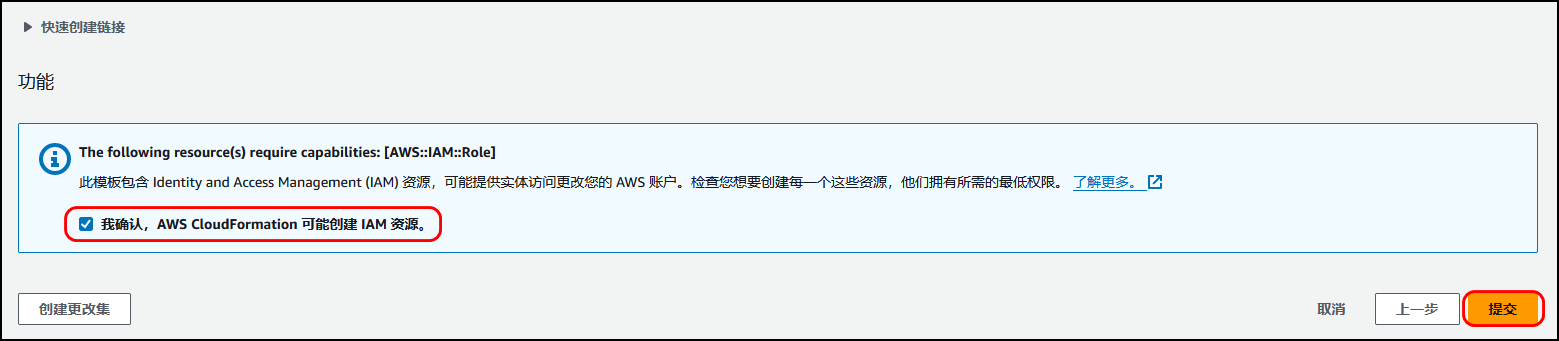
确认。
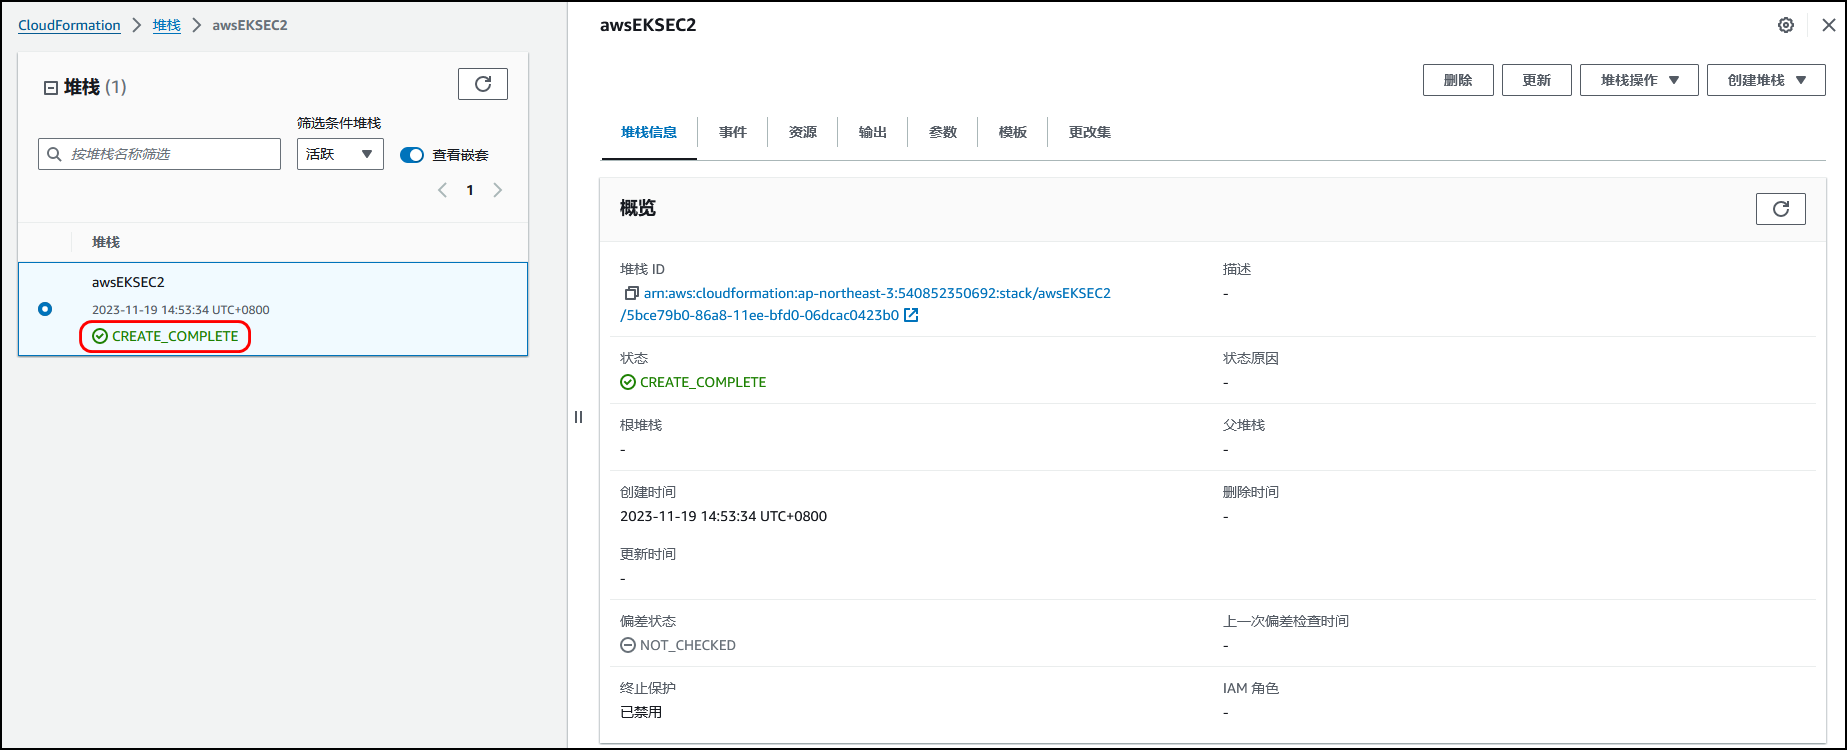
显示 CREATE_COMPLETE创建完成。
导航至EC2控制面板,查看此堡垒机的相关信息。
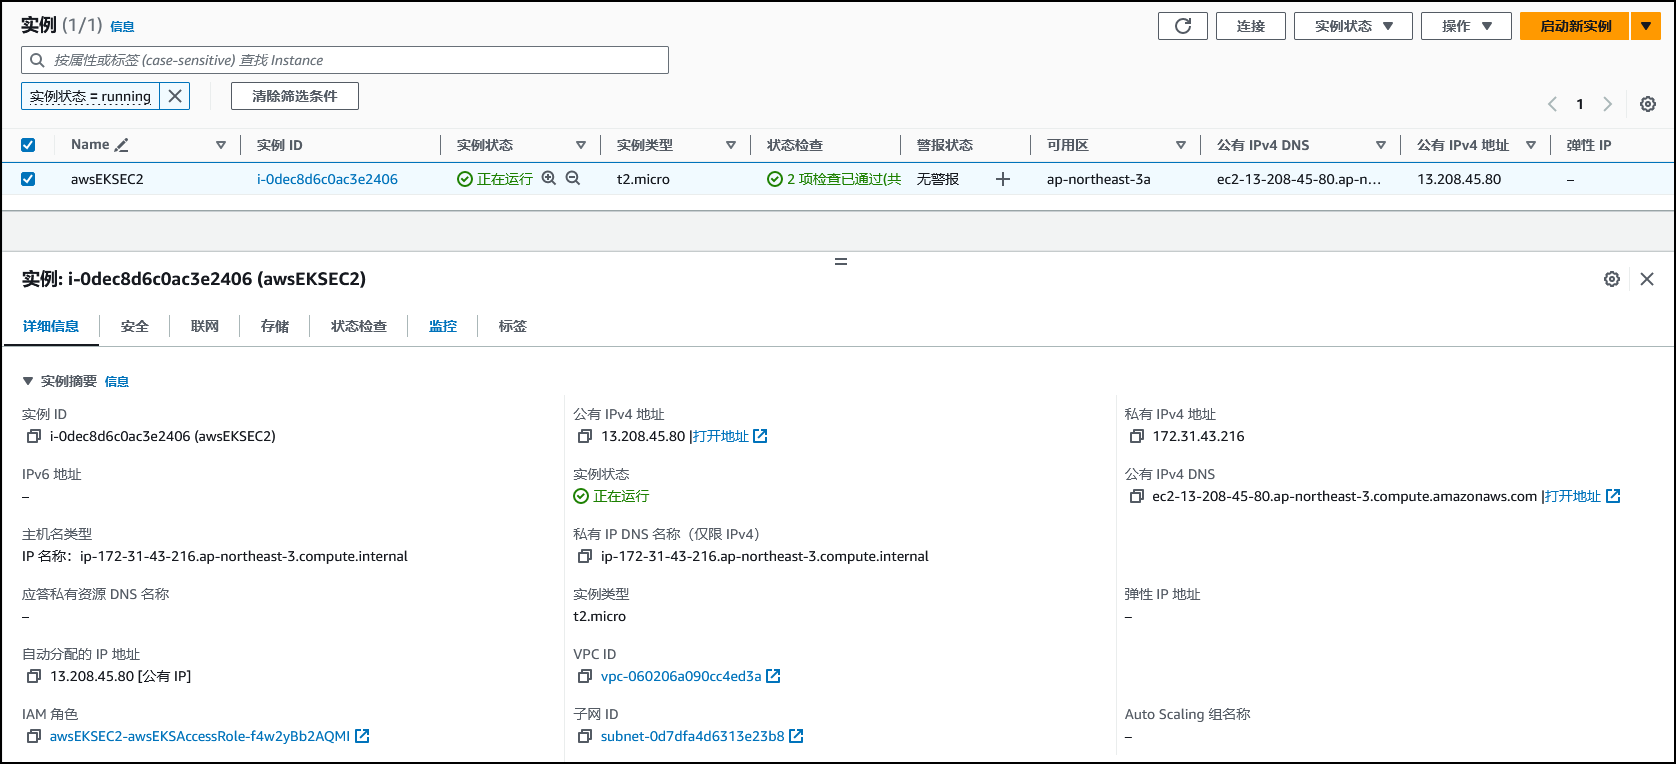
3.1.2 安装AWS CLI命令行工具
# 下载压缩包$ sudo curl "https://awscli.amazonaws.com/awscli-exe-linux-x86_64.zip" -o "awscliv2.zip"# 解压$ sudo unzip awscliv2.zip# 执行命令安装$ sudo ./aws/install# 查看aws cli版本信息,确认是否安装成功。$ sudo aws --version# 配置aws$ sudo aws configure# 配置信息如下:AWS Access Key ID [None]: AKIAXxxxxxxxxx3GB
AWS Secret Access Key [None]: xxxxxxxxxxxxxxxxxxxxxxxxxxxxxxx
Default region name [None]: ap-southeast-1
Default output format [None]: json
3.1.3 安装eksctl命令行工具
# for ARM systems, set ARCH to: `arm64`, `armv6` or `armv7`ARCH=amd64PLATFORM=$(uname -s)_$ARCHcurl -sLO "https://github.com/eksctl-io/eksctl/releases/latest/download/eksctl_$PLATFORM.tar.gz"# (Optional) Verify checksumcurl -sL "https://github.com/eksctl-io/eksctl/releases/latest/download/eksctl_checksums.txt" | grep $PLATFORM | sha256sum --checktar -xzf eksctl_$PLATFORM.tar.gz -C /tmp && rm eksctl_$PLATFORM.tar.gzsudo mv /tmp/eksctl /usr/local/bin# 添加环境变量# vim .bashrcexport PATH=/usr/local/bin:$PATHsource .bashrc
eksctl version
3.1.4 安装helm工具
$ curl -fsSL -o get_helm.sh https://raw.githubusercontent.com/helm/helm/main/scripts/get-helm-3
$ chmod 700 get_helm.sh
$ ./get_helm.sh

[root@bastion ~]# helm versionversion.BuildInfo{Version:"v3.16.3", GitCommit:"cfd07493f46efc9debd9cc1b02a0961186df7fdf", GitTreeState:"clean", GoVersion:"go1.22.7"}3.1.5 创建 EKS集群
编写
cluster.yaml
。
[root@bastion ~]# vim cluster.yaml[root@bastion ~]# cat cluster.yamlapiVersion: eksctl.io/v1alpha5
kind: ClusterConfig
metadata:
  name: xybeks-cluster
  region: ap-southeast-1
managedNodeGroups:
- name: xybaws-ngs
  desiredCapacity: 3
  instanceType: m5.2xlarge
  volumeSize: 500
  iam:
    withAddonPolicies:
      autoScaler: true
  availabilityZones: ["ap-southeast-1a", "ap-southeast-1c"]availabilityZones: ["ap-southeast-1a", "ap-southeast-1c"]
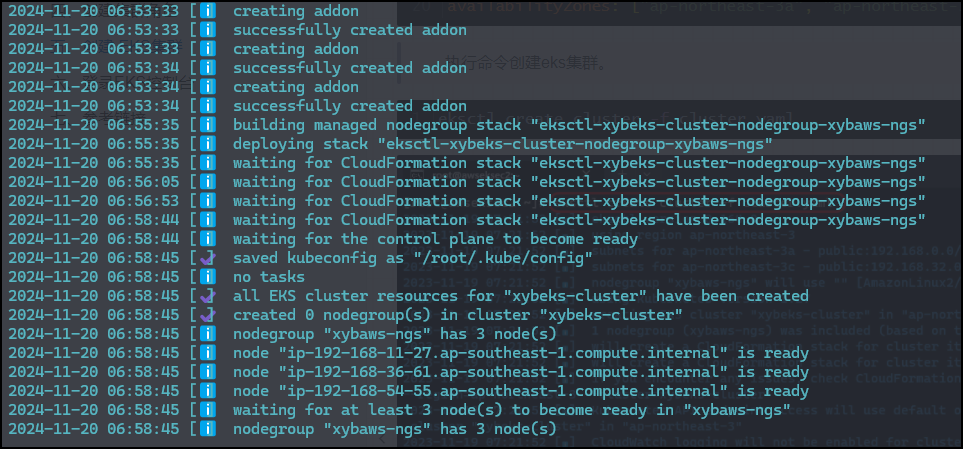
执行命令创建eks集群。
eksctl create cluster -f cluster.yaml

3.2 基于EKS部署高可用OceanBase
3.2.1 前提条件
在开始之前,确保已满足以下条件:
1. 有可用的 Kubernetes 集群且至少有 9 个可用 CPU,33 GB 可用内存 和 360 GB 的可用存储空间。
2. ob-operator 依赖 cert-manager,确保已安装 cert-manager。
3. 连接 OceanBase 集群时,需已安装 MySQL 客户端或 OBClient。
3.2.2 安装 cert-manager
[root@bastion ~]# kubectl apply -f https://github.com/cert-manager/cert-manager/releases/download/v1.16.1/cert-manager.yaml[root@bastion ~]# kubectl get pods --namespace cert-managerNAME                                       READY   STATUS    RESTARTS   AGE
cert-manager-6796d554c5-hlvlv              1/1     Running   0          4m59s
cert-manager-cainjector-77cd756b5d-nsssk   1/1     Running   0          4m59s
cert-manager-webhook-dbb5879d7-9wbb2       1/1     Running   0          4m59s
3.2.3 部署 ob-operator
使用 ob-operator 可以简化 OceanBase 数据库在 Kubernetes 中的部署和运维。
helm repo add ob-operator https://oceanbase.github.io/ob-operator/
helm install ob-operator ob-operator/ob-operator --namespace=oceanbase-system --create-namespace --version=2.3.0
[root@bastion ~]# helm install ob-operator ob-operator/ob-operator --namespace=oceanbase-system --create-namespace --version=2.3.0NAME: ob-operator
LAST DEPLOYED: Fri Nov 22 08:48:15 2024NAMESPACE: oceanbase-system
STATUS: deployed
REVISION: 1TEST SUITE: None
NOTES:
_                                      _
  ___ | |__         ___  _ __   ___ _ __ __ _| |_ ___  _ __
 / _ \| '_ \ _____ / _ \| '_ \ / _ \ '__/ _` | __/ _ \| '__|| (_) | |_) |_____| (_) | |_) |  __/ | | (_| | || (_) | |
 \___/|_.__/       \___/| .__/ \___|_|  \__,_|\__\___/|_|
                        |_|Welcome to ob-operator! We are so happy to see you here! Once ob-operator is installed, you can explore OceanBase database on your Kubernetes cluster with ease.
The following steps will guide you through the OceanBase database deployment:1. Quick Start - Deploy a single-node OceanBase database for testing
  https://oceanbase.github.io/ob-operator/docs/manual/quick-start-of-ob-operator2. Advanced - Create an OceanBase database with customized configurations
  https://oceanbase.github.io/ob-operator/docs/manual/ob-operator-user-guide/cluster-management-of-ob-operator/create-cluster3. Tenants - Create and manage tenants in OceanBase database
  https://oceanbase.github.io/ob-operator/docs/manual/ob-operator-user-guide/tenant-management-of-ob-operator/tenant-management-intro4. High availability - Enable high availability for OceanBase on K8s
  https://oceanbase.github.io/ob-operator/docs/manual/ob-operator-user-guide/high-availability/high-availability-intro5. Get help from the community
  Feel free to ask questions or report issues on GitHub: https://github.com/oceanbase/ob-operator/issues
  Other ways to get help: https://oceanbase.github.io/ob-operator/#getting-helpFor more information, please visit our website: https://oceanbase.github.io/ob-operator[root@bastion ~]#
[root@bastion ~]# helm repo add ob-operator https://oceanbase.github.io/ob-operator/"ob-operator" has been added to your repositories[root@bastion ~]# helm repo listNAME            URL
ob-operator     https://oceanbase.github.io/ob-operator/
- --namespace:命名空间,可根据需要自定义,建议使用 oceanbase-system。
- --version:ob-operator 版本号,建议使用最新的版本。

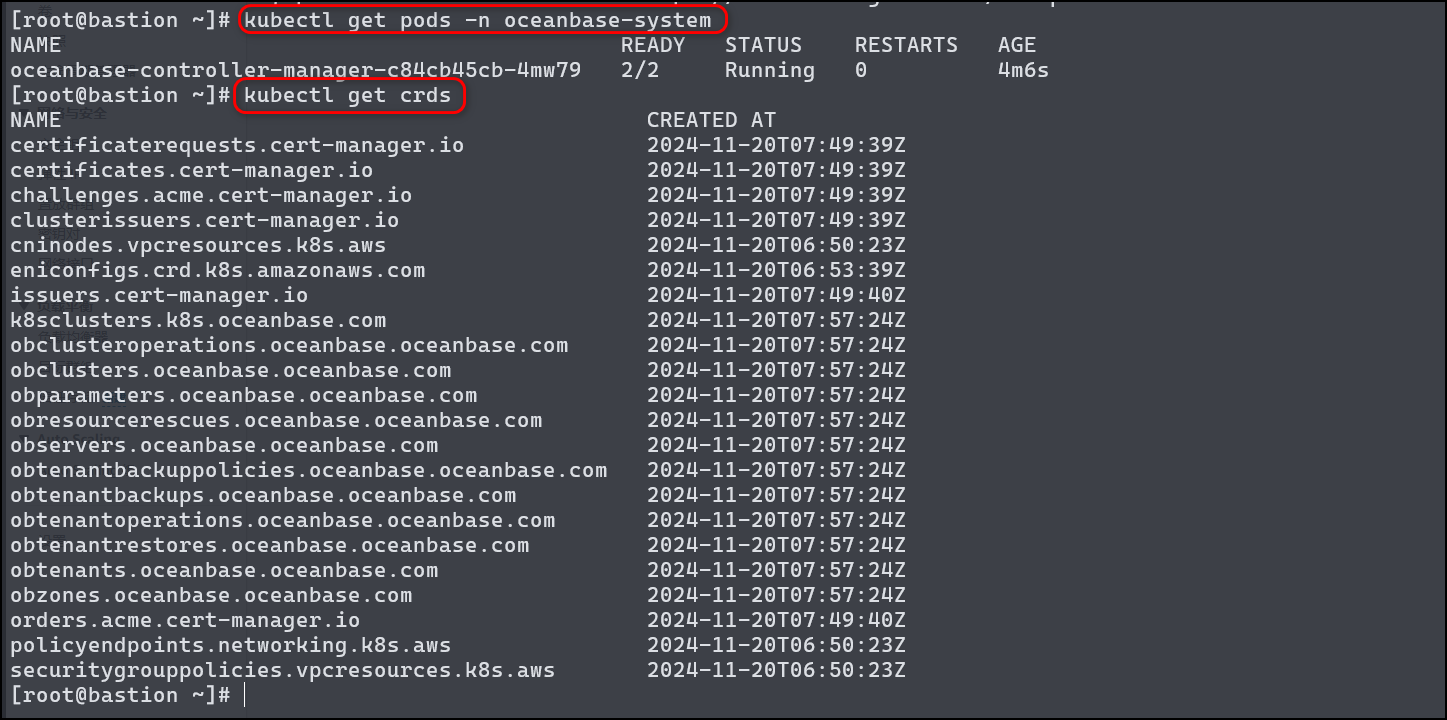
- 查看部署结果
[root@bastion ~]# kubectl get pods -n oceanbase-systemNAME                                           READY   STATUS    RESTARTS   AGE
oceanbase-controller-manager-c84cb45cb-4mw79   2/2     Running   0          4m6s[root@bastion ~]# kubectl get crdsNAME                                             CREATED AT
certificaterequests.cert-manager.io              2024-11-20T07:49:39Z
certificates.cert-manager.io                     2024-11-20T07:49:39Z
challenges.acme.cert-manager.io                  2024-11-20T07:49:39Z
clusterissuers.cert-manager.io                   2024-11-20T07:49:39Z
cninodes.vpcresources.k8s.aws                    2024-11-20T06:50:23Z
eniconfigs.crd.k8s.amazonaws.com                 2024-11-20T06:53:39Z
issuers.cert-manager.io                          2024-11-20T07:49:40Z
k8sclusters.k8s.oceanbase.com                    2024-11-20T07:57:24Z
obclusteroperations.oceanbase.oceanbase.com      2024-11-20T07:57:24Z
obclusters.oceanbase.oceanbase.com               2024-11-20T07:57:24Z
obparameters.oceanbase.oceanbase.com             2024-11-20T07:57:24Z
obresourcerescues.oceanbase.oceanbase.com        2024-11-20T07:57:24Z
observers.oceanbase.oceanbase.com                2024-11-20T07:57:24Z
obtenantbackuppolicies.oceanbase.oceanbase.com   2024-11-20T07:57:24Z
obtenantbackups.oceanbase.oceanbase.com          2024-11-20T07:57:24Z
obtenantoperations.oceanbase.oceanbase.com       2024-11-20T07:57:24Z
obtenantrestores.oceanbase.oceanbase.com         2024-11-20T07:57:24Z
obtenants.oceanbase.oceanbase.com                2024-11-20T07:57:24Z
obzones.oceanbase.oceanbase.com                  2024-11-20T07:57:24Z
orders.acme.cert-manager.io                      2024-11-20T07:49:40Z
policyendpoints.networking.k8s.aws               2024-11-20T06:50:23Z
securitygrouppolicies.vpcresources.k8s.aws       2024-11-20T06:50:23Z
3.2.4 部署 OceanBase 集群
创建 PVC
kubectl apply -f https://raw.githubusercontent.com/rancher/local-path-provisioner/v0.0.24/deploy/local-path-storage.yaml
创建 Namespace
kubectl create namespace oceanbase
创建默认用户的 Secret
kubectl create secret -n oceanbase generic root-password --from-literal=password='<root_password>'kubectl create secret -n oceanbase generic proxyro-password --from-literal=password='<proxyro_password>'
[root@bastion ~]# kubectl create secret -n oceanbase generic root-password --from-literal=password='C1sc@123'secret/root-password created[root@bastion ~]# kubectl create secret -n oceanbase generic proxyro-password --from-literal=password='C1sc!123'secret/proxyro-password created[root@bastion ~]# kubectl get secret -n oceanbaseNAME               TYPE     DATA   AGE
proxyro-password   Opaque   1      37s
root-password      Opaque   1      46s
定义 OceanBase 集群
vim obcluster.yaml
apiVersion: oceanbase.oceanbase.com/v1alpha1
kind: OBCluster
metadata:
  name: obcluster
  namespace: oceanbase
spec:
  clusterName: obcluster
  clusterId: 1
  userSecrets:
    root: root-password
    proxyro: proxyro-password
  topology:
    - zone: zone1
      replica: 1
    - zone: zone2
      replica: 1
    - zone: zone3
      replica: 1
  observer:
    image: oceanbase/oceanbase-cloud-native:4.2.1.1-101010012023111012
    resource:
      cpu: 8
      memory: 32Gi
    storage:
      dataStorage:
        storageClass: local-path
        size: 100Gi
      redoLogStorage:
        storageClass: local-path
        size: 100Gi
      logStorage:
        storageClass: local-path
        size: 100Gi
  monitor:
    image: oceanbase/obagent:4.2.1-100000092023101717
    resource:
      cpu: 2
      memory: 2Gi
部署 OceanBase 集群
kubectl apply -f obcluster.yaml
执行如下命令查看 OceanBase 集群状态,当状态变成 running 时即表示 OceanBase 集群已成功部署并完成初始化。该过程一般需要几分钟时间,主要耗时过程为镜像拉取和集群初始化。
kubectl get obclusters.oceanbase.oceanbase.com obcluster -n oceanbase
[root@bastion ~]kubectl get obclusters.oceanbase.oceanbase.com obcluster -n oceanbasese
NAME        STATUS    AGE     CLUSTERNAME
obcluster   running   4m20s   obcluster
3.2.5 直连 OceanBase 集群
获取 OceanBase 集群 Pod 地址
kubectl get pods -n oceanbase -l ref-obcluster=obcluster -o wide
[root@bastion ~]# kubectl get pods -n oceanbase -l ref-obcluster=obcluster -o wideNAME                       READY   STATUS    RESTARTS   AGE     IP               NODE                                                NOMINATED NODE   READINESS GATES
obcluster-1-zone1-hnf88c   2/2     Running   0          4m47s   192.168.23.253   ip-192-168-19-85.ap-southeast-1.compute.internal    <none>           <none>obcluster-1-zone2-qz5z76   2/2     Running   0          4m47s   192.168.26.226   ip-192-168-13-178.ap-southeast-1.compute.internal   <none>           <none>obcluster-1-zone3-m6nrwv   2/2     Running   0          4m47s   192.168.52.203   ip-192-168-33-45.ap-southeast-1.compute.internal    <none>           <none>

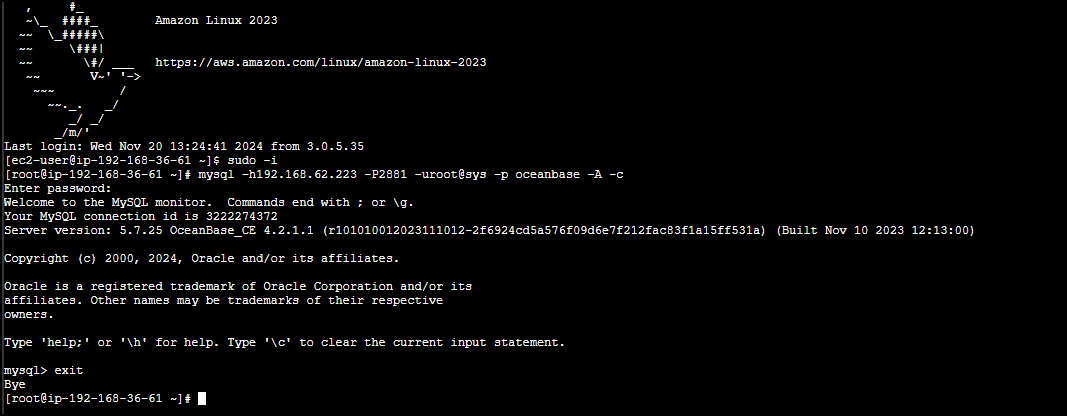
连接 OceanBase 集群
mysql -h10.10.10.1 -P2881 -uroot@sys -p oceanbase -A -cmysql -h192.168.52.203 -P2881 -uroot@sys -p oceanbase -A -c
3.2.6 部署ODP
创建 ODP 的配置文件
vim obproxy.yaml
apiVersion: v1
kind: Service
metadata:
  name: svc-obproxy
  namespace: oceanbase
spec:
  type: NodePort
  selector:
    app: obproxy
  ports:
    - name: "sql"
      port: 2883
      targetPort: 2883
    - name: "prometheus"
      port: 2884
      targetPort: 2884---
apiVersion: apps/v1
kind: Deployment
metadata:
  name: obproxy
  namespace: oceanbase
spec:
  selector:
    matchLabels:
      app: obproxy
  replicas: 2
  template:
    metadata:
      labels:
        app: obproxy
    spec:
      containers:
        - name: obproxy
          image: oceanbase/obproxy-ce:4.2.1.0-11
          ports:
            - containerPort: 2883
              name: "sql"
            - containerPort: 2884
              name: "prometheus"
          env:
            - name: APP_NAME
              value: helloworld
            - name: OB_CLUSTER
              value: obcluster
            - name: RS_LIST
              value: "192.168.23.253:2881;192.168.26.226:2881;192.168.52.203:2881"
            - name: PROXYRO_PASSWORD
              valueFrom:
                secretKeyRef:
                  name: proxyro-password
                  key: password
          resources:
            limits:
              memory: 2Gi
              cpu: "1"
            requests:
              memory: 200Mi
              cpu: 200m
主要环境变量配置说明:
- APP_NAME:ODP 的应用名称。
- OB_CLUSTER:ODP 连接的 OceanBase 集群名。
- RS_LIST:OceanBase 集群的 rs_list,格式为 ${ip1}:${sql_port1};${ip2}:${sql_port2};${ip3}:${sql_port3},需要根据实际部署情况来进行替换。
- PROXYRO_PASSWORD:需要配置 name 为上文创建的 proxyro@sys 用户的 Secret 名称,Secret 中需要包含 password 字段。
[root@ip-192-168-33-45 ~]# mysql -h192.168.23.253 -P2881 -uroot@sys -p oceanbase -A -cEnter password:
Welcome to the MySQL monitor.  Commands end with ; or \g.
Your MySQL connection id is 3221527956Server version: 5.7.25 OceanBase_CE 4.2.1.1 (r101010012023111012-2f6924cd5a576f09d6e7f212fac83f1a15ff531a) (Built Nov 10 2023 12:13:00)Copyright (c) 2000, 2024, Oracle and/or its affiliates.
Oracle is a registered trademark of Oracle Corporation and/or its
affiliates. Other names may be trademarks of their respective
owners.
Type 'help;' or '\h' for help. Type '\c' to clear the current input statement.
mysql> SELECT GROUP_CONCAT(CONCAT(SVR_IP, ':', SQL_PORT) SEPARATOR ';') AS RS_LIST FROM oceanbase.DBA_OB_SERVERS;+-------------------------------------------------------------+| RS_LIST                                                     |+-------------------------------------------------------------+| 192.168.23.253:2881;192.168.26.226:2881;192.168.52.203:2881 |+-------------------------------------------------------------+1 row in set (0.00 sec)mysql>
- 部署 ODP
kubectl apply -f obproxy.yaml
- 验证是否部署成功(执行如下命令查看 ODP 的 pod 状态。)
kubectl get pod -A | grep obproxy
输出结果:
[root@bastion ~]# kubectl get pod -A | grep obproxyoceanbase            obproxy-599f8548b6-26hm2                                   1/1     Running   0             64s
oceanbase            obproxy-599f8548b6-qwj44                                   1/1     Running   0             64s
执行如下命令查看 ODP 的服务
kubectl get svc svc-obproxy -n oceanbase
[root@bastion ~]# kubectl get svc svc-obproxy -n oceanbaseNAME          TYPE       CLUSTER-IP      EXTERNAL-IP   PORT(S)                         AGE
svc-obproxy   NodePort   10.100.45.141   <none>        2883:30962/TCP,2884:30989/TCP   91s
3.2.7 通过 ODP 连接 OceanBase 集群
获取 ODP 的服务连接地址
kubectl get svc ${servicename} -n ${namespace}for example
kubectl get svc svc-obproxy -n oceanbase
[root@bastion ~]# kubectl get svc svc-obproxy -n oceanbaseNAME TYPE CLUSTER-IP EXTERNAL-IP PORT(S) AGE svc-obproxy NodePort 10.100.110.207 <none> 2883:32566/TCP,2884:30472/TCP 22m[root@bastion ~]# kubectl get svc svc-obproxy -n oceanbaseNAME TYPE CLUSTER-IP EXTERNAL-IP PORT(S) AGE svc-obproxy ClusterIP 10.100.110.207 <none> 2883/TCP,2884/TCP 58m
- 连接 OceanBase 集群(可以通过 CLUSTER-IP 和 PORT 的方式进行连接,对应的连接命令如下。)
mysql -h10.100.251.241 -P2883 -uroot@sys#obcluster -p oceanbase -A -cmysql -h47.129.178.84 -P30962 -uroot@sys#obcluster -pC1sc@123 oceanbase -A -c

3.2.8 监控 OceanBase 集群
部署 OceanBase Dashboard
helm repo add ob-operator https://oceanbase.github.io/ob-operator/
helm repo update ob-operator
helm install oceanbase-dashboard ob-operator/oceanbase-dashboard --version=0.2.1
[root@bastion ~]# helm repo add ob-operator https://oceanbase.github.io/ob-operator/"ob-operator" already exists with the same configuration, skipping[root@bastion ~]# helm repo update ob-operatorHang tight while we grab the latest from your chart repositories......Successfully got an update from the "ob-operator" chart repository
Update Complete. ⎈Happy Helming!⎈[root@bastion ~]# helm install oceanbase-dashboard ob-operator/oceanbase-dashboard --version=0.2.1NAME: oceanbase-dashboard
LAST DEPLOYED: Fri Nov 22 09:21:43 2024NAMESPACE: default
STATUS: deployed
REVISION: 1TEST SUITE: None
NOTES:
Welcome to OceanBase dashboard1. After installing the dashboard chart, you can use `port-forward` to expose the dashboard outside like:  > kubectl port-forward -n default services/oceanbase-dashboard-oceanbase-dashboard 18081:80 --address 0.0.0.0then you can visit the dashboard on http://$YOUR_SERVER_IP:180812. Use the following command to get password for default admin user  > echo $(kubectl get -n default secret oceanbase-dashboard-user-credentials -o jsonpath='{.data.admin}' | base64 -d)Log in as default account:
Username: admin
Password: <Get from the above command>

部署 OceanBase Dashboard 后 K8s 集群需要一段时间用于拉取所需镜像,可通过如下命令查询 OceanBase Dashboard 是否完成安装。
[root@bastion ~]# kubectl get deployment oceanbase-dashboard-oceanbase-dashboardNAME                                      READY   UP-TO-DATE   AVAILABLE   AGE
oceanbase-dashboard-oceanbase-dashboard   1/1     1            1           70s
3.2.9 访问 OceanBase Dashboard
OceanBase Dashboard 默认创建的登录账号为 `admin`,通过输出中的第二条命令可获取默认账号的密码,命令如下。
echo $(kubectl get -n default secret oceanbase-dashboard-user-credentials -o jsonpath='{.data.admin}' | base64 -d)eqWD3vMdvlAzf0QK通过 NodePort 访问:OceanBase Dashboard 默认创建 NodePort 类型的服务,可通过 NodePort 访问 OceanBase Dashboard。
[root@bastion ~]# kubectl get svc oceanbase-dashboard-oceanbase-dashboardNAME                                      TYPE       CLUSTER-IP     EXTERNAL-IP   PORT(S)        AGE
oceanbase-dashboard-oceanbase-dashboard   NodePort   10.100.70.58   <none>        80:32354/TCP   22h
3.2.10 查看监控指标
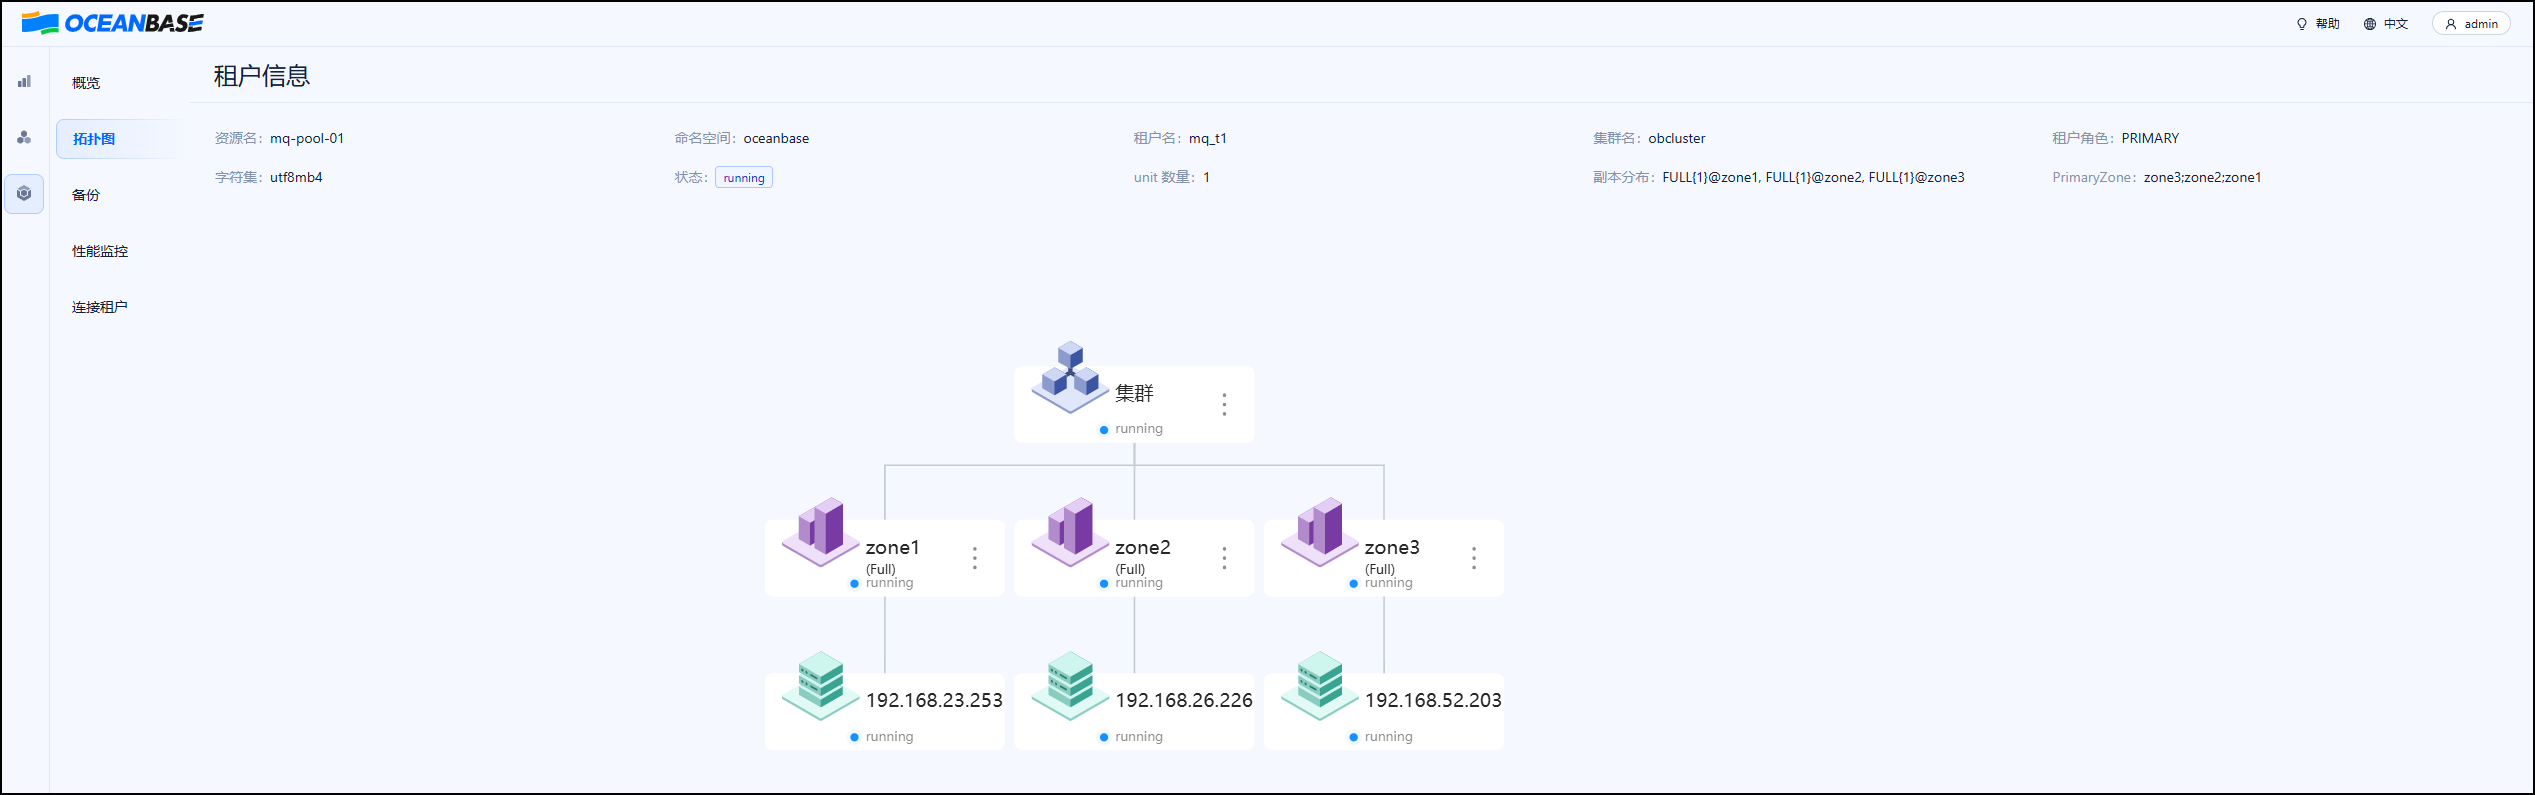
访问到 OceanBase Dashboard 页面后,可单击左侧的 **集群** 和 **租户**,选择查看集群或租户的监控信息。页面展示示例如


四、参考链接
1️⃣ 在 Kubernetes 环境中部署 OceanBase 集群-V4.2.1-OceanBase 数据库文档-分布式数据库使用文档
2️⃣ 在 Amazon Linux 2023 上安装 MySQL 8 服务器和客户端 - LinuxStory
3️⃣ kubectl apply - cert-manager Documentation
来自 “ ”, 原文作者: ;原文链接:,如有侵权,请联系管理员删除。

最新文章
- 快思考与慢思考:数据库的AI进化论
- DTCC 2026 精彩回顾 | NineData 面向 AI Agent 的数据库 DevOps 与数据复制思考与实践
- 锚定 "1+2" 战略 共筑技术高地 ——openGauss 亮相 DTCC 2026
- 内生智能、全栈可信!HaishanDB亮相DTCC 2026
- Agentic DB Day 深圳——当数据库长成Agentic形态
- YashanDB数据沙箱敏捷探索,两场连播,带你从原理到实测分享!
- 原生 AI 赋能产业革新 海山数据库领航数智新赛道
- YashanDB AI 应用挑战赛:你的创意,值得被看见
- OceanBase 4.4.2 LTS版本正式发布:TP/AP/AI一体化融合
- 千日稳定守护,金仓数据库赋能北京一卡通斩获鼎信杯奖项
