operation SIG : 使用 obshell python SDK 搭建 OceanBase 集群实战
1. 背景
1.1 obshell 是什么?是用来做什么的?
刚刚听说 obshell 这个工具时大部分人应该会有这个疑问,先上图,大家感受下。
- obshell 命令行初始化集群

- obshell API 初始化集群

- obshell SDK 初始化集群
Python 环境

Go 环境

是的,obshell 可以用来初始化 OceanBase 集群。
当然 obshell 不仅仅可以用来初始化 OceanBase 集群,还可以做集群管理、资源规格管理、租户管理、备份恢复管理、回收站管理、任务管理等等。详细情况大家可以参考 官方文档。
1.2 到这里大家可能仍然还是会有疑问,我可以用 OBD 或者 OCP 去创建 OceanBase 集群,为什么要用 obshell 呢?
这里就要说下我们今天使用 obshell 的场景了: 当我们需要在自研平台集成 OceanBase 管理功能时 ,OBD 和 OCP 并没有提供友好的接入方案。而 obshell 提供的 Go 和 Python SDK 可以快速的完成适配,同时 obshell 还承诺了 API 和 SDK 向前兼容,我们也不用担心版本迭代导致我们需要变更代码。
接下来我们将使用 Python 语言调用 obshell SDK 来搭建一套 OceanBase 集群。
2. 测试环境拓扑
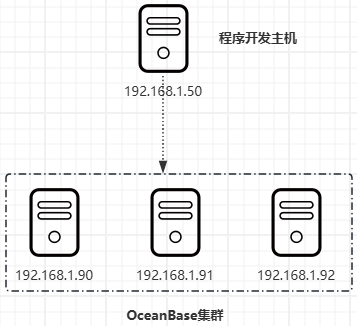
如上拓扑图说明:
192.168.1.50 为程序开发主机,主要的用途有:使用 Python 编写搭建 OceanBase 集群的代码、时钟服务端。
192.168.1.90、192.168.1.91、192.168.1.92 为 OceanBase 集群主机,主要参数:CPU16c、内存32G、操作系统CentOS7.9。
3. 环境准备
3.1 开发环境准备
开发环境部署可以参考我之前的文章,进行 远程开发环境搭建。
3.2 OceanBase 集群主机环境准备
OB 集群主机环境配置可参考 OB 官方文档,配置主机免密登录、时钟源、操作系统参数、关闭防火墙和 SELinux。
4. 使用 Python 搭建 OceanBase 集群
如下操作都在 192.168.1.50 开发主机上操作
4.1 安装 SDK
说明:pip install obshell 命令默认安装的是 0.0.2 版本,由于本例使用到了 obshell 最新特性,所以选择源码安装
- 下载源码
git clone git@github.com:oceanbase/obshell-sdk-python.gitcd obshell-sdk-python
- 安装依赖
pip install setuptools wheel -i http://mirrors.aliyun.com/pypi/simple/ --trusted-host mirrors.aliyun.com
pip install -r requirements.txt -i http://mirrors.aliyun.com/pypi/simple/ --trusted-host mirrors.aliyun.com
- 构建whl包
python setup.py sdist bdist_wheel
- 执行成功后在当前目录的 dist 目录下将会生成如下内容。(注意这里的 obshell 版本号为0.0.3版本)
obshell-0.0.3-py3-none-any.whl
obshell-0.0.3.tar.gz
- 这两个包都是可以 pip install 来安装,一般来说我们用whl,tar.gz是源码包。接下来你可以任意使用其中一个包进行pip 安装
pip install dist/obshell-0.0.3-py3-none-any.whl## 或者使用下面命令# pip install dist/obshell-0.0.3.tar.gz
- 由于 SDK 有依赖三方库,所以直接安装 whl 或 tar.gz 一样会请求 pypi 下载三方依赖,因此你同样可以用阿里源加速这一过程
pip install dist/obshell-0.0.3-py3-none-any.whl -i http://mirrors.aliyun.com/pypi/simple/ --trusted-host mirrors.aliyun.com## 或者使用下面命令# pip install dist/obshell-0.0.3.tar.gz -i http://mirrors.aliyun.com/pypi/simple/ --trusted-host mirrors.aliyun.com
4. 2 节点初始化
这一步的目标是将部署 ob 需要的rpm包发送给各个节点,并完成目录初始化。
rpm包下载链接(rpm包下载后上传到开发机 /root/download 目录):
节点初始化 Python 源码:
from obshell import initialize_nodes, start_obshell, NodeConfigdef init_nodes():
    pkgs = [
        "/root/download/oceanbase-ce-libs-4.2.5.0-100000052024102022.el7.x86_64.rpm",
        "/root/download/oceanbase-ce-4.2.5.0-100000052024102022.el7.x86_64.rpm",
        # 这里使用的 OB 4.2.5.0 版本中已经包含了 obshell,但推荐使用最新版本的 obshell,所以这里单独安装了最新版本的 obshell
        "/root/download/obshell-4.2.4.3-12024110711.el7.x86_64.rpm",
    ]
    ips = [
        "192.168.1.90",
        "192.168.1.91",
        "192.168.1.92",
    ]
    work_dir = "/data/ob" # OBServer 的工作目录,不需要提前创建,初始化 OBServer 时会自动创建
    nodes_config = []
    for _, ip in enumerate(ips):
        node = NodeConfig(ip, work_dir)
        nodes_config.append(node)
    # # sdk 会自动判断是否使用 rsync,如果不想使用 rsync,传输效率比较低
    # # 使用 rsync 传输文件时,需要在 SDK 执行机器和目标机器之间配置免密登录,同时两边都需要安装 rsync.
    # # 你可以通过以下方法关闭 rsync 传输,但是不推荐这么做
    # from obshell.ssh import USE_RSYNC
    # USE_RSYNC = False
    # 初始化节点
    # 参数说明:
    # rpm_packages: 所需要安装的软件包路径
    # force_clean: 是否强制清理 OBServer 工作目录,如果为 True,则工作目录会被清空并 kill 掉所有相关进程
    # configs: 集群配置项, 必须是 NodeConfig 类型的列表
    initialize_nodes(rpm_packages=pkgs, force_clean=True, configs=nodes_config)
    # 启动 obshell
    start_obshell(nodes_config)
4.3 创建集群
创建 OB 集群 Python 源码:
from obshell import ClientSetdef create_cluster():
    ips = [
        "192.168.1.90",
        "192.168.1.91",
        "192.168.1.92",
    ]
    work_dir = "/data/ob" # OBServer 的工作目录,不需要提前创建,初始化 OBServer 时会自动创建
    # 创建 sdk 客户端
    client = ClientSet(ips[0])
    # 填充各节点的配置
    configs = {}
    i = 0
    for ip in ips:
        i += 1
        configs["%s:2886" % ip] = {
            "zone": "zone%s" % (i % 3 + 1), # 打散到三个 zone
            "home_path": work_dir,
            # "data_dir": data_dir, # 数据目录
            # "redo_dir": redo_dir, # 日志目录
            "datafile_size": "14G", "cpu_count": "6",
            "memory_limit": "16G", "system_memory": "4G", "log_disk_size": "14G",
            "enable_syslog_recycle": "true", "enable_syslog_wf": "true","__min_full_resource_pool_memory": "1073741824"
        }
    # 创建集群
    client.v1.agg_create_cluster(
        configs,
        "cluster-obtest", # 集群名
        1, # 集群ID
        "Password" # root@sys 密码
    )
4.4 执行创建
编辑 main.py
if __name__ == '__main__':
    init_nodes()
    create_cluster()
执行创建任务
$ python main.py
4.5 验证
创建完成后验证
# obclient -h192.168.1.90 -P2881 -uroot@sys -p -Doceanbase -AEnter password:
Welcome to the OceanBase.  Commands end with ; or \g.
Your OceanBase connection id is 3221781269Server version: OceanBase_CE 4.2.5.0 (r100000052024102022-e7c676806fda04726bbbcdfbf1758057bb465b59) (Built Oct 20 2024 23:06:30)Copyright (c) 2000, 2018, OceanBase and/or its affiliates. All rights reserved.
Type 'help;' or '\h' for help. Type '\c' to clear the current input statement.
obclient [oceanbase]>obclient [oceanbase]>
相关链接:
https://ask.oceanbase.com/t/topic/35615608
来自 “ ”, 原文作者: ;原文链接:,如有侵权,请联系管理员删除。

最新文章
- 快思考与慢思考:数据库的AI进化论
- DTCC 2026 精彩回顾 | NineData 面向 AI Agent 的数据库 DevOps 与数据复制思考与实践
- 锚定 "1+2" 战略 共筑技术高地 ——openGauss 亮相 DTCC 2026
- 内生智能、全栈可信!HaishanDB亮相DTCC 2026
- Agentic DB Day 深圳——当数据库长成Agentic形态
- YashanDB数据沙箱敏捷探索,两场连播,带你从原理到实测分享!
- 原生 AI 赋能产业革新 海山数据库领航数智新赛道
- YashanDB AI 应用挑战赛:你的创意,值得被看见
- OceanBase 4.4.2 LTS版本正式发布:TP/AP/AI一体化融合
- 千日稳定守护,金仓数据库赋能北京一卡通斩获鼎信杯奖项
