一、简介
1.1 MyBatis Generator介绍
MyBatis Generator 是MyBatis 官方出品的一款,用来自动生成MyBatis的 mapper、dao、entity 的框架,让我们省去规律性最强的一部分最基础的代码编写。
1.2 MyBatis Generator使用
MyBatis Generator的使用方式有4种:
- 命令行生成
- Maven方式生成
- 使用Ant任务生成
- 使用Java代码生成
其中推荐使用Maven方式进行代码生成,因为集成和使用比较简单。
1.3 开发环境
MySQL:8.0.12
MyBatis Generator:1.3.7
Maven:4.0
IDEA:2018.2
二、代码自动生成配置
上面介绍了使用MyBatis Generator的几种方式,其中最推荐使用的是Maven方式,所以下面我们来看Maven方式的MyBatis代码生成,分为四步:
Step1:添加依赖
配置pom.xml文件,增加依赖和配置生成文件(“generatorConfig.xml”)路径:
plugin>
    groupId>org.mybatis.generatorgroupId>
    artifactId>mybatis-generator-maven-pluginartifactId>
    version>1.3.7version>
    dependencies>
        dependency>
            groupId>mysqlgroupId>
            artifactId>mysql-connector-javaartifactId>
            version>8.0.12version>
        dependency>
        dependency>
            groupId>org.mybatis.generatorgroupId>
            artifactId>mybatis-generator-coreartifactId>
            version>1.3.7version>
        dependency>
    dependencies>
    executions>
        execution>
            id>Generate MyBatis Artifactsid>
            phase>packagephase>
            goals>
                goal>generategoal>
            goals>
        execution>
    executions>
    configuration>
        <!--允许移动生成的文件 -->
        verbose>trueverbose>
        <!-- 是否覆盖 -->
        overwrite>trueoverwrite>
        <!-- 自动生成的配置 -->
        configurationFile>generatorConfig.xmlconfigurationFile>
    configuration>
plugin>
Step2:添加配置文件
根据上面在pom里的配置,我们需要添加generatorConfig.xml在项目的根目录:
generatorConfiguration>
    <!--加载配置文件,为下面读取数据库信息准备-->
    properties resource="application.properties"/>

    <!--defaultModelType="flat" 大数据字段,不分表 -->
    context id="Mysql" targetRuntime="MyBatis3Simple" defaultModelType="flat">
        property name="autoDelimitKeywords" value="true" />
        property name="beginningDelimiter" value="`" />
        property name="endingDelimiter" value="`" />
        property name="javaFileEncoding" value="utf-8" />
        plugin type="org.mybatis.generator.plugins.SerializablePlugin" />

        plugin type="org.mybatis.generator.plugins.ToStringPlugin" />

        <!-- 注释 -->
        commentGenerator >
            property name="suppressAllComments" value="true"/><!-- 是否取消注释 -->
            property name="suppressDate" value="true" /> <!-- 是否生成注释代时间戳-->
        commentGenerator>

        <!--数据库链接地址账号密码-->
        jdbcConnection driverClass="${spring.datasource.driver-class-name}"
                        connectionURL="${spring.datasource.url}"
                        userId="${spring.datasource.username}"
                        password="${spring.datasource.password}">
        jdbcConnection>

        <!-- 类型转换 -->
        javaTypeResolver>
            <!-- 是否使用bigDecimal, false可自动转化以下类型(Long, Integer, Short, etc.) -->
            property name="forceBigDecimals" value="false"/>
        javaTypeResolver>

        <!--生成Model类存放位置-->
        javaModelGenerator targetPackage="com.hello.springboot.entity" targetProject="src/main/java">
            property name="enableSubPackages" value="true"/>
            property name="trimStrings" value="true"/>
        javaModelGenerator>

        <!-- 生成mapxml文件 -->
        sqlMapGenerator targetPackage="mapper" targetProject="src/main/resources/mybatis" >
            property name="enableSubPackages" value="false" />
        sqlMapGenerator>

        <!-- 生成mapxml对应client,也就是接口dao -->
        javaClientGenerator targetPackage="com.hello.springboot.dao" targetProject="src/main/java" type="XMLMAPPER" >
            property name="enableSubPackages" value="false" />
        javaClientGenerator>

        table tableName="article" enableCountByExample="true" enableUpdateByExample="true" enableDeleteByExample="true" enableSelectByExample="true" selectByExampleQueryId="true">
            generatedKey column="id" sqlStatement="Mysql" identity="true" />
        table>

        table tableName="user_log" enableCountByExample="true" enableUpdateByExample="true" enableDeleteByExample="true" enableSelectByExample="true" selectByExampleQueryId="true">
            generatedKey column="id" sqlStatement="Mysql" identity="true" />
        table>

    context>
generatorConfiguration>
其中数据库连接的配置,是从application.properties直接读取的。
Step3:配置全局属性文件
全局属性文件application.properties的配置,和Spring Boot增加MyBatis的配置是一样的,如果你的Spring Boot项目里面已经配置了MyBatis支持,请忽略此步骤。
# MyBatis 配置
spring.datasource.url=jdbc:mysql://172.16.10.79:3306/mytestdb?serverTimezone=UTC&useSSL=false&allowPublicKeyRetrieval=true
spring.datasource.username=root
spring.datasource.password=123456
spring.datasource.driver-class-name=com.mysql.cj.jdbc.Driver
mybatis.type-aliases-package=com.hello.springboot.mapper
mybatis.config-locations=classpath:mybatis/mybatis-config.xml
mybatis.mapper-locations=classpath:mybatis/mapper/*.xml
注意: MySQL 6以后JDBC的配置就不一样了,参照如上MySQL 8的配置。
Step4:点击Maven生成代码
如果你使用的是IDEA,点击最右侧的Maven Projects => 点击mybatis-generator => 右键mybatis-generator:generate => Run Maven Build,如下图所示:
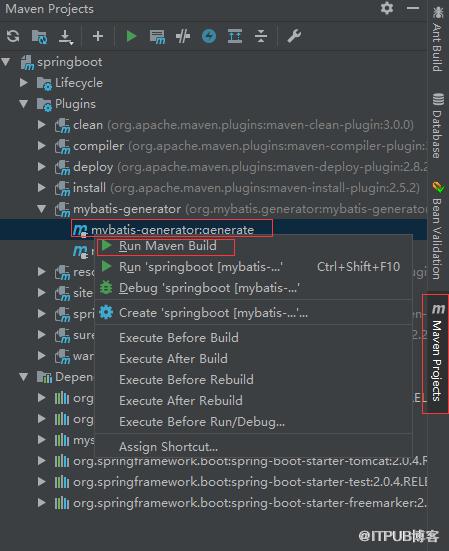
正常控制台输出“BUILD SUCCESS”说明生成已经成功了,如果出现错误,根据错误提示信息排除处理错误即可。
MyBatis Generator 示例源码:https://github.com/vipstone/springboot-example/tree/master/springboot-mybatis-xml
三、安装IDEA插件
如果你使用的是 IDEA,那么强烈建议你安装一款免费的IDEA插件“Free MyBatis plugin”,可以实现dao到mapper xml对应方法的快速映射,点击任意一个快速调整到相应的方法,提高工作效率,效果如下图所示:
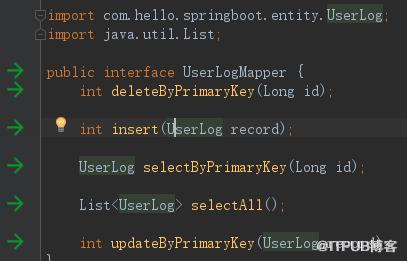
点击绿色的箭头直接跳转到了mapper xml对应的方法了,如下图所示:
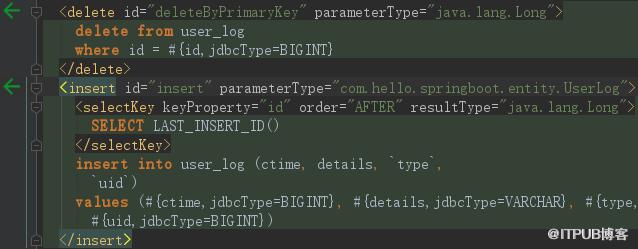
可以相互点击,进行对应的跳转。
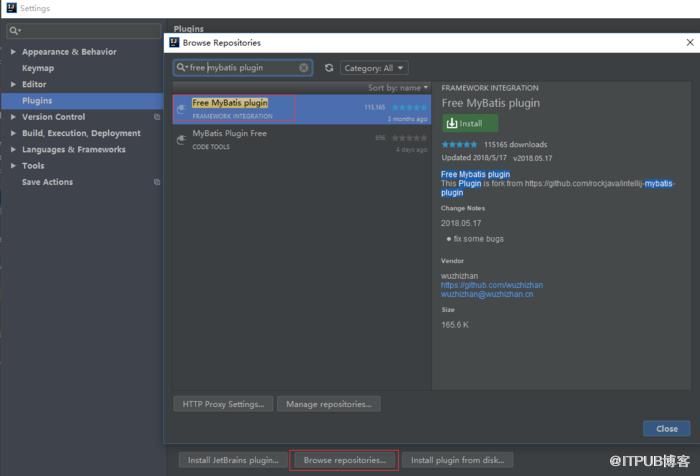
安装步骤
- 点击菜单栏Flie => Settings
- 点击Browse repostitories…
- 输入“Free MyBatis plugin”查找插件
- 点击安装,重启IDEA
关键步骤的截图如下:
四、总结
使用了MyBatis Generator可以帮我们自动生成实体类,和5个最基础的方法,大大的提高我们的工作效率,用户只需要按需写自己独有的一些业务即可。同时增加“Free MyBatis plugin”插件,可以很方便的帮我们开发和调试代码,真是实实在在的福利。
原创首发于慕课网
来自 “ ITPUB博客 ” ,链接:https://blog.itpub.net/3062/viewspace-2814562/ ,如需转载,请注明出处,否则将追究法律责任。

