在我开发一个完整的 Serverless 应用之前,我决定尝试一下不同的 Serverless 服务。这次我打算结合一下 AWS IoT,作为我对云服务与物联网结合的探索。
Serverless 框架安装服务
依旧的,我还将继续使用 Serverless 框架,而不是自己写 lambda 来实现。
因此,首先,让我们使用官方的服务 demo,执行以下的命令,就可以在本地复制远程的 demo 到本地。
serverless install -u https://github.com/serverless/examples/tree/master/aws-node-iot-event -n aws-iot-example
其相当于将远程的 https://github.com/serverless/examples/tree/master/aws-node-iot-event 复制到本地的 aws-iot-example
这次我们的 handler.js 只是打了个日志,其它什么也没做。
'use strict';module.exports.log = (event, context, callback) => {  console.log(event);
  callback(null, {});
};
重点还在于 serverless.yml 文件中的配置:
service: aws-node-iot-eventframeworkVersion: ">=1.5.0在这个
CloudFormation配置文件中,我们设置了运行配置 nodejs4.3,以及对应的handler.log函数 。在events里,写了一个 sql 语句来选择mybutton的相关内容,即查看 mybutton 相关主题的日志。部署 AWS IoT Serverless 服务
依旧的我们只需要执行
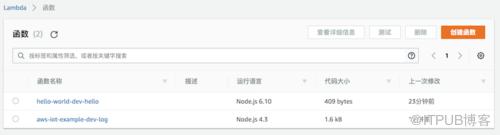
serverless deploy即可:................. Serverless: Stack update finished... Service Information service: aws-iot-example stage: dev region: us-east-1stack: aws-iot-example-dev api keys: None endpoints: None functions: log: aws-iot-example-dev-log完成部署后, 我们就可以在 AWS Lambda 后台看到我们的相关函数:
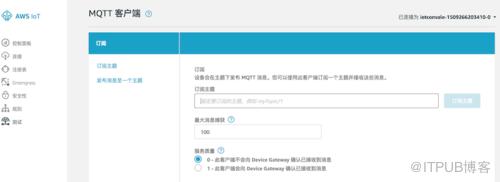
然后打开 AWS IoT 控制台,进入『测试』,即 MQTT 客户端页面:
接着在发布主题里,填入
mybutton,然后输入以下的内容:{ "message": "My first IoT event", "value": 2}如下图所示:
查看日志
然后执行以下的命令,我们就可以查看到对应的日志:
$ serverless logs --function log内容如下所示:
START RequestId: 76ad40d4-bc84-11e7-885a-6182fb121f8c Version: $LATEST2017-10-29 16:37:57.481 (+08:00) 76ad40d4-bc84-11e7-885a-6182fb121f8c { message: 'My first IoT event', value: 2 }END RequestId: 76ad40d4-bc84-11e7-885a-6182fb121f8cREPORT RequestId: 76ad40d4-bc84-11e7-885a-6182fb121f8c Duration: 68.80 ms Billed Duration: 100 ms Memory Size: 1024 MB Max Memory Used: 22 MB如果只是测试用途,可以在执行完成后执行
serverless remove来删除对应的服务,以减少开支。

来自 “ ITPUB博客 ” ,链接:https://blog.itpub.net/3062/viewspace-2808329/ ,如需转载,请注明出处,否则将追究法律责任。

