Redis 的哨兵(sentinel) 系统用于管理多个 Redis 服务器, 该系统执行以下三个任务:
监控(Monitoring): 哨兵(sentinel) 会不断地检查你的Master 和Slave 是否运作正常。
提醒(Notification): 当被监控的某个 Redis 出现问题时, 哨兵(sentinel) 可以通过 API 向管理员或者其他应用程序发送通知。
自动故障迁移(Automatic failover): 当一个Master 不能正常工作时,哨兵(sentinel) 会开始一次自动故障迁移操作, 它会将失效Master 的其中一个Slave 升级为新的Master, 并让失效Master 的其他Slave 改为复制新的Master; 如果修复好的master 重新启动后,原master 变成slave 。
本文在redis主从已经搭建好的前提下做哨兵的简单配置。(想要安装redis主从具体步骤的可以翻看上一篇文章)
在安装的redis 目录下,有sentinel.conf 文件,可以设置超时等等。
本次测试是我自己新建一个文件格式如下:
[root@localhost ~]# cd /redis/redis-5.0.5/
[root@localhost redis-5.0.5]# cp sentinel.conf redis_master/sentinel_6379.conf
[root@localhost redis_master]# vi sentinel_6379.conf
修改redis-sentinel 配置文件:/etc/redis-sentinel.conf
# 1. 绑定的地址
bind 0.0.0.0
# 2. 设置端口
port 26379
# 3. 将daemonize 的值从no 设置为yes (设置哨兵模式为后台启动)
daemonize yes
# 4. 搜索pidfile (pid 文件),设置值
pidfile /redis/redis-5.0.5/redis_master/sentinel_26379.pid
# 5. 搜索logfile (日志文件),设置值
logfile "/redis/redis-5.0.5/redis_master/sentinel_26379.log"
# 6. 搜索dir( 工作目录) ,设置值
dir /redis-data/master/26379
# 7. 设定监控地址,为对应的主redis 库的内网地址
sentinel monitor mymaster 192.168.242.70 6379 2
# 8. 主数据库密码, 需要将配置放在sentinel monitor mymaster 192.168.242.70 6379 2 下面
sentinel auth-pass mymaster hzmcdba
# 9. 设定5 秒内没有响应,说明服务器挂了, 需要将配置放在sentinel monitor mymaster 192.168.242.70 6379 2 下面
sentinel down-after-milliseconds mymaster 5000
# 10. 设定15 秒内master 没有活起来,就重新选举主(根据需求调整)
sentinel failover-timeout mymaster 15000
# 11. 表示如果master 重新选出来后,其它slave 节点能同时并行从新master 同步缓存的台数有多少个,显然该值越大,所有slave 节点完成同步切换的整体速度越快,但如果此时正好有人在访问这些slave ,可能造成读取失败,影响面会更广。最保定的设置为1 ,只同一时间,只能有一台干这件事,这样其它slave 还能继续服务,但是所有slave 全部完成缓存更新同步的进程将变慢。
sentinel parallel-syncs mymaster 2
注意:含有mymaster 的配置,都必须放置在sentinel monitor mymaster 192.168.242.70 6379 2 之后,否则会出现问题
sentinel monitor mymaster 后监控的是redis 中的master 节点,也就是192.168.242.70 ,所以这个文件在三台机器上是相同的。将该文件拷贝至其他两个节点,放到相应目录,并创建文件中使用到得目录。
因为主从前面已经启动,所以这边直接启动哨兵即可(三个节点都启动):
root@localhost redis_master]# redis-sentinel /redis/redis-5.0.5/redis_master/sentinel_6379.conf
查看日志:
[root@test1 redis_master]# tail -100f sentinel_26379.log
如果主从都重启,则需要按照下面顺序启动
启动需要按照Master->Slave->Sentinel 的顺序进行启动
查看哨兵信息:
[root@localhost redis_master]# redis-cli -h 192.168.242.70 -p 26379
192.168.242.70:26379> info sentinel
# Sentinel
sentinel_masters:1
sentinel_tilt:0
sentinel_running_scripts:0
sentinel_scripts_queue_length:0
sentinel_simulate_failure_flags:0
master0:name=mymaster,status=ok,address=192.168.242.70:6379,slaves=2,sentinels=3
[root@localhost redis_master]# redis-cli -h 192.168.242.71 -p 26379
192.168.242.71:26379> info sentinel
# Sentinel
sentinel_masters:1
sentinel_tilt:0
sentinel_running_scripts:0
sentinel_scripts_queue_length:0
sentinel_simulate_failure_flags:0
master0:name=mymaster,status=ok,address=192.168.242.70:6379,slaves=2,sentinels=3
192.168.242.71:26379> exit
[root@localhost redis_master]# redis-cli -h 192.168.242.72 -p 26379
192.168.242.72:26379> info sentinel
# Sentinel
sentinel_masters:1
sentinel_tilt:0
sentinel_running_scripts:0
sentinel_scripts_queue_length:0
sentinel_simulate_failure_flags:0
master0:name=mymaster,status=ok,address=192.168.242.70:6379,slaves=2,sentinels=3
查看日志信息
[root@test1 redis_master]# tail -100f sentinel_26379.log
成功日志,+slave slave 包含两台从库的地址,+sentinel sentinel 包含两台哨兵的id



高可用测试case
哨兵作为对redis 实例的监控,通过选举算法保证哨兵的鲁棒性和高可用,所以哨兵至少要部署3 台,符合半数原则,需要5 或者,7 ,超过一半,不包含一半存活的时候,才能够选举出leader ,才能进行主从的切换功能。
redis 服务,至少需要存活一台,才能保证服务正常运行sentinel 选择新 master 的原则是最近可用 且 数据最新 且 优先级最高 且 活跃最久 !
哨兵高可用测试:分别连接对应的redis 服务端,手动停止哨兵,停止主reids 服务,看主从是否切换成功。
三哨兵情况:redis 实例挂掉两台,剩下一台能够成为主,自动切换
Master 检查状态
[root@localhost redis_master]# redis-cli -h 192.168.242.70 -p 6379 -a hzmcdba
Warning: Using a password with '-a' or '-u' option on the command line interface may not be safe.
192.168.242.70:6379> set k3 3
OK
192.168.242.70:6379> get k3
"3"
192.168.242.70:6379> info replication
# Replication
role:master
connected_slaves:2
slave0:ip=192.168.242.71,port=6380,state=online,offset=887111,lag=0
slave1:ip=192.168.242.72,port=6381,state=online,offset=886968,lag=0
master_replid:8b90010b378c34aaf89c39a9002684363de31b40
master_replid2:0000000000000000000000000000000000000000
master_repl_offset:887111
second_repl_offset:-1
repl_backlog_active:1
repl_backlog_size:1048576
repl_backlog_first_byte_offset:1
repl_backlog_histlen:887111
salve1 检查状态
[root@test2 slave1]# redis-cli -h 192.168.242.71 -p 6380 -a hzmcdba
Warning: Using a password with '-a' or '-u' option on the command line interface may not be safe.
192.168.242.71:6380> get k3
"3"
192.168.242.71:6380> info replication
# Replication
role:slave
master_host:192.168.242.70
master_port:6379
master_link_status:up
master_last_io_seconds_ago:0
master_sync_in_progress:0
slave_repl_offset:888541
slave_priority:100
slave_read_only:1
connected_slaves:0
master_replid:8b90010b378c34aaf89c39a9002684363de31b40
master_replid2:0000000000000000000000000000000000000000
master_repl_offset:888541
second_repl_offset:-1
repl_backlog_active:1
repl_backlog_size:1048576
repl_backlog_first_byte_offset:1
repl_backlog_histlen:888541
salve2 检查状态
[root@test3 slave2]# redis-cli -h 192.168.242.72 -p 6381 -a hzmcdba
Warning: Using a password with '-a' or '-u' option on the command line interface may not be safe.
192.168.242.72:6381> get k3
"3"
192.168.242.72:6381> info replication
# Replication
role:slave
master_host:192.168.242.70
master_port:6379
master_link_status:up
master_last_io_seconds_ago:0
master_sync_in_progress:0
slave_repl_offset:889127
slave_priority:100
slave_read_only:1
connected_slaves:0
master_replid:8b90010b378c34aaf89c39a9002684363de31b40
master_replid2:0000000000000000000000000000000000000000
master_repl_offset:889127
second_repl_offset:-1
repl_backlog_active:1
repl_backlog_size:1048576
repl_backlog_first_byte_offset:1
repl_backlog_histlen:889127
在从库尝试写:
192.168.242.72:6381> set c c
(error) READONLY You can't write against a read only replica
失败。
可以看到一主而从得复制目前是正常同步的,且主库可以读写,从库只能读。
模拟master 节点down
192.168.242.70:6379> shutdown
not connected>
查看master 的哨兵日志
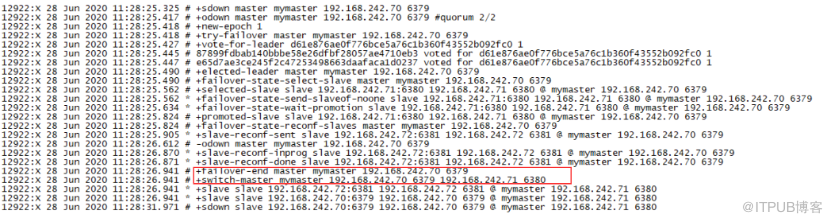
从中看出failover 到原slave1 了
查看原salve1( 现master) 哨兵进程日志:

Slave1 为新master 了
查看slave2 日志

Salve2 变成原slave1 的从库了
查看新master 信息:
192.168.242.71:6380> info replication
# Replication
role:master
connected_slaves:1
slave0:ip=192.168.242.72,port=6381,state=online,offset=1644182,lag=1
master_replid:284d7b39a0b6ef7ba9fc0e821f5841e39b52d3f1
master_replid2:8b90010b378c34aaf89c39a9002684363de31b40
master_repl_offset:1644468
second_repl_offset:890272
repl_backlog_active:1
repl_backlog_size:1048576
repl_backlog_first_byte_offset:595893
repl_backlog_histlen:1048576
角色为master, 一个从库, 为原slave1
查看新从库信息:
192.168.242.72:6381> info replication
# Replication
role:slave
master_host: 192.168.242.71
master_port:6380
master_link_status:up
master_last_io_seconds_ago:1
master_sync_in_progress:0
slave_repl_offset:1655692
slave_priority:100
slave_read_only:1
connected_slaves:0
master_replid:284d7b39a0b6ef7ba9fc0e821f5841e39b52d3f1
master_replid2:8b90010b378c34aaf89c39a9002684363de31b40
master_repl_offset:1655692
second_repl_offset:890272
repl_backlog_active:1
repl_backlog_size:1048576
repl_backlog_first_byte_offset:607117
repl_backlog_histlen:1048576
为slave 角色,新的主库为192.168.242.71
测试是否同步
新master
192.168.242.71:6380> set k4 4
OK
192.168.242.71:6380> set k5 5
OK
192.168.242.71:6380> set k6 6
OK
从库(slave2 )
192.168.242.72:6381> get k4
"4"
192.168.242.72:6381> get k5
"5"
192.168.242.72:6381> get k6
"6"
看到同步正常
原master 修好后
原master 修好后,启动后查看日志:

哨兵日志提示为192.168.242.71 的从库了
查看复制情况:
[root@localhost redis_master]# redis-cli -h 192.168.242.70 -p 6379 -a hzmcdba
Warning: Using a password with '-a' or '-u' option on the command line interface may not be safe.
192.168.242.70:6379> info replication
# Replication
role:slave
master_host:192.168.242.71
master_port:6380
master_link_status:up
master_last_io_seconds_ago:0
master_sync_in_progress:0
slave_repl_offset:1703883
slave_priority:100
slave_read_only:1
connected_slaves:0
master_replid:284d7b39a0b6ef7ba9fc0e821f5841e39b52d3f1
master_replid2:0000000000000000000000000000000000000000
master_repl_offset:1703883
second_repl_offset:-1
repl_backlog_active:1
repl_backlog_size:1048576
repl_backlog_first_byte_offset:1699100
repl_backlog_histlen:4784
变成现在master 的从机了,并不会变成独立的一台master 。
测试数据同步正常。
来自 “ ITPUB博客 ” ,链接:https://blog.itpub.net/29956245/viewspace-2933100/ ,如需转载,请注明出处,否则将追究法律责任。

