通过前面10篇文章的学习相信我们对SpringBoot已经有了一些了解那么如何来验证我们的学习成果呢当然是通过做项目来证明啦所以从这一篇开始我将会对之前自己做的.net项目用java来重写。这一篇我们来现实登录模块。
一提到登录我们首先想到的基本的功能点就有如下
输入用户名、密码、验证码。
登录成功后跳转到后台。如果未登录直接访问后台将会跳转到登录页面。
这里暂不考虑复杂的登录实现。
技术选型沿用前面用到的知识点。那么这里较之于之前的文章新用到的一个就是图片验证码一个就是权限拦截器了。
1、新建spring boot web项目具体配置信息如pom.xml所示


4.0.0 com.yujie website 0.0.1-SNAPSHOT jar website 通用角色权限管理系统 org.springframework.boot spring-boot-starter-parent 1.5.13.RELEASE <!-- lookup parent from repository --> UTF-8 UTF-8 1.8 <!--mybatis--> org.springframework.boot spring-boot-starter-web <!--mysql--> org.mybatis.spring.boot mybatis-spring-boot-starter 1.3.2 <!--集成druid使用连接池--> mysql mysql-connector-java runtime <!--thymeleaf--> com.alibaba druid 1.1.0 org.springframework.boot spring-boot-starter-thymeleaf <!-- 分页插件 --> net.sourceforge.nekohtml nekohtml 1.9.22 <!--单元测试--> com.github.pagehelper pagehelper-spring-boot-starter 1.1.2 <!--热部署--> org.springframework.boot spring-boot-starter-test test org.springframework.boot spring-boot-devtools true <!-- mybatis generator 自动生成代码插件 --> org.springframework.boot spring-boot-maven-plugin org.mybatis.generator mybatis-generator-maven-plugin 1.3.2 ${basedir}/src/main/resources/generator/generatorConfig.xml true true src/main/java **/*.xml true

2、准备数据库、数据表。这里只用一张用户表t_user.sql

/*Navicat MySQL Data Transfer

Source Server         : localhost
Source Server Version : 50717
Source Host           : localhost:3306
Source Database       : rightcontrol

Target Server Type    : MYSQL
Target Server Version : 50717
File Encoding         : 65001

Date: 2018-07-13 11:19:03*/SET FOREIGN_KEY_CHECKS=0;-- ------------------------------ Table structure for `t_user`-- ----------------------------DROP TABLE IF EXISTS `t_user`;CREATE TABLE `t_user` (
  `Id` int(4) NOT NULL AUTO_INCREMENT,
  `UserName` varchar(20) DEFAULT NULL COMMENT '用户名登录',
  `RealName` varchar(20) DEFAULT NULL COMMENT '姓名',
  `PassWord` char(32) DEFAULT NULL COMMENT '密码',
  `RoleId` int(4) DEFAULT NULL COMMENT '角色ID',
  `Status` bit(1) DEFAULT NULL COMMENT '状态',
  `CreateOn` datetime DEFAULT NULL COMMENT '创建时间',
  `UpdateOn` datetime DEFAULT NULL COMMENT '修改时间',
  `CreateBy` int(4) DEFAULT NULL COMMENT '创建者',
  `UpdateBy` int(4) DEFAULT NULL COMMENT '修改者',
  `Gender` tinyint(4) DEFAULT NULL COMMENT '性别0男1女',
  `Phone` varchar(11) DEFAULT NULL COMMENT '手机',
  `Email` varchar(30) DEFAULT NULL COMMENT '邮箱',
  `Remark` varchar(50) DEFAULT NULL COMMENT '备注',
  `HeadShot` varchar(50) DEFAULT NULL COMMENT '头像',  PRIMARY KEY (`Id`)
) ENGINE=InnoDB AUTO_INCREMENT=45 DEFAULT CHARSET=utf8;-- ------------------------------ Records of t_user-- ----------------------------INSERT INTO `t_user` VALUES ('1', 'admin', '超级管理员', 'e10adc3949ba59abbe56e057f20f883e', '1', '', '0001-01-01 00:00:00', '2018-05-12 21:47:34', '0', '1', '0', '15243641131', 'zouyujie@126.com', null, '/Upload/img/mmexport1510485826478[1]_看图王_2.jpg');INSERT INTO `t_user` VALUES ('4', 'test', 'test', 'e10adc3949ba59abbe56e057f20f883e', '12', '', '2018-04-26 10:35:56', '2018-04-29 10:36:12', '0', null, null, null, null, null, null);INSERT INTO `t_user` VALUES ('24', '3', '3', null, '1', '', '2018-04-29 08:42:00', '0001-01-01 00:00:00', '1', null, null, null, null, null, null);INSERT INTO `t_user` VALUES ('25', '2', '2', null, '1', '', '2018-04-29 08:57:05', '0001-01-01 00:00:00', '1', null, null, null, null, null, null);INSERT INTO `t_user` VALUES ('26', '34', '44', null, '1', '', '2018-04-29 08:58:31', '0001-01-01 00:00:00', '1', null, null, null, null, null, null);INSERT INTO `t_user` VALUES ('27', '34', '3', null, '1', '', '2018-04-29 08:59:22', '0001-01-01 00:00:00', '1', null, null, null, null, null, null);INSERT INTO `t_user` VALUES ('28', 'a', 'a', null, '1', '', '2018-04-29 09:04:29', '0001-01-01 00:00:00', '1', null, null, null, null, null, null);INSERT INTO `t_user` VALUES ('29', 't', 't', null, '1', '', '2018-04-29 09:05:24', '0001-01-01 00:00:00', '1', null, null, null, null, null, null);INSERT INTO `t_user` VALUES ('30', '44', '44', 'e10adc3949ba59abbe56e057f20f883e', '1', '', '2018-04-29 09:16:44', '0001-01-01 00:00:00', '1', null, null, null, null, null, null);INSERT INTO `t_user` VALUES ('31', '4', '4', null, '1', '', '2018-04-29 09:17:29', '0001-01-01 00:00:00', '1', null, null, null, null, null, null);INSERT INTO `t_user` VALUES ('32', '4', '4', null, '1', '', '2018-04-29 09:18:57', '0001-01-01 00:00:00', '1', null, null, null, null, null, null);INSERT INTO `t_user` VALUES ('33', '23', '22', 'E10ADC3949BA59ABBE56E057F20F883E', '1', '', '2018-04-29 09:19:55', '0001-01-01 00:00:00', '1', null, null, null, null, null, null);INSERT INTO `t_user` VALUES ('34', '4', '4', null, '1', '', '2018-04-29 09:32:53', '0001-01-01 00:00:00', '1', null, null, null, null, null, null);INSERT INTO `t_user` VALUES ('35', '21', '21', 'e10adc3949ba59abbe56e057f20f883e', '2', '', '2018-04-29 09:33:13', '0001-01-01 00:00:00', '1', null, null, null, null, null, null);INSERT INTO `t_user` VALUES ('36', '4', '4', null, '2', '', '2018-04-29 09:33:30', '2018-04-29 17:29:18', '0', null, null, null, null, null, null);INSERT INTO `t_user` VALUES ('37', '41', '4', 'e10adc3949ba59abbe56e057f20f883e', '1', '', '2018-04-29 09:40:58', '2018-04-29 13:10:08', '0', null, null, null, null, null, null);INSERT INTO `t_user` VALUES ('38', '41', '4', null, '1', '', '0001-01-01 00:00:00', '2018-04-29 10:32:02', '0', null, null, null, null, null, null);INSERT INTO `t_user` VALUES ('40', '41', '41', null, '2', '', '0001-01-01 00:00:00', '2018-04-29 10:08:50', '0', null, null, null, null, null, null);INSERT INTO `t_user` VALUES ('41', '61', '6', null, '2', '', '0001-01-01 00:00:00', '2018-04-29 10:08:09', '0', null, null, null, null, null, null);INSERT INTO `t_user` VALUES ('42', '451', '55', null, '1', '', '0001-01-01 00:00:00', '2018-04-29 10:31:36', '0', null, null, null, null, null, null);INSERT INTO `t_user` VALUES ('43', '41', '41', null, '2', '', '0001-01-01 00:00:00', '2018-04-29 10:07:36', '0', null, null, null, null, null, null);INSERT INTO `t_user` VALUES ('44', '661', '661', null, '2', '', '0001-01-01 00:00:00', '2018-04-29 10:06:52', '0', null, null, null, null, null, null);

3、对项目进行配置。我对配置项进行了详实的注释如有不懂的自己翻阅相关文档。
application.yml
spring:
  profiles:
    active: dev
application-dev.yml

server:
  port: 8080spring:
  thymeleaf:
    cache: false #开发阶段建议关闭Thymeleaf的缓存
    mode: LEGACYHTML5 #使用遗留的html5以去掉对html标签的校验
  datasource:
    name: demo
    url: jdbc:mysql://127.0.0.1:3306/RightControl?useSSL=false&useUnicode=true&characterEncoding=utf-8&zeroDateTimeBehavior=convertToNull&autoReconnect=true
    username: root
    password: yujie
    # 使用druid数据源
    type: com.alibaba.druid.pool.DruidDataSource
    driver-class-name: com.mysql.jdbc.Driver
    filters: stat
    maxActive: 20 # 最大活跃数
    initialSize: 5 # 初始化数量
    maxWait: 60000
    minIdle: 1
    timeBetweenEvictionRunsMillis: 60000
    minEvictableIdleTimeMillis: 300000
    validationQuery: select 'x'
    testWhileIdle: true
    testOnBorrow: false
    testOnReturn: false
    poolPreparedStatements: true
    maxOpenPreparedStatements: 20mybatis:
  mapper-locations: classpath:mapping/*.xml  #Locations of Mapper xml config file.
  type-aliases-package: com.yujie.dao  #Packages to search for type aliases. (Package delimiters are ",; tn")

#pagehelper分页插件
pagehelper:
    helperDialect: mysql
    reasonable: true #pageNumpages超过总数时会查询最后一页
    supportMethodsArguments: true #支持通过 Mapper 接口参数来传递分页参数
    #用于从对象中根据属性名取值可以配置 pageNum,pageSize,count,pageSizeZero,reasonable。
    #不配置映射的用默认值默认值为pageNum=pageNum;pageSize=pageSize;count=countSql;reasonable=reasonable;pageSizeZero=pageSizeZero
    params: count=countSql

4、自动生成mybatis相关的配置具体如何生成这个可以参考我前面的文章。从.Net到Java学习第三篇——spring boot+mybatis+mysql
在自动生成好的mybatis配置中我们还需要自己扩展一个方法CheckLogin用于校验用户名和密码是否正确。
我们首先修改UserModelMapper类需要注意的是checkLogin方法中的参数前面一定要记得添加@Param因为mybatis很坑的一个地方是对于单个参数你不需要添加@Param对于多个参数你必须要添加@Param否则会报错提示找不到参数。

@Componentpublic interface UserModelMapper {    int deleteByPrimaryKey(Integer id);    int insert(UserModel record);    int insertSelective(UserModel record);

    UserModel selectByPrimaryKey(Integer id);    int updateByPrimaryKeySelective(UserModel record);    int updateByPrimaryKey(UserModel record);    //add
    UserModel checkLogin(@Param("username") String username,@Param("password") String password);
}

接下来修改UserModelMapper.xml在其中添加一个checkLogin

Id, UserName, RealName, PassWord, RoleId, Status, CreateOn, UpdateOn, CreateBy, UpdateBy, Gender, Phone, Email, Remark, HeadShot

5、增加验证码的实现类ValidateCode

package com.yujie.util;import javax.imageio.ImageIO;import java.awt.*;import java.awt.image.BufferedImage;import java.io.FileOutputStream;import java.io.IOException;import java.io.OutputStream;import java.util.Random;/**
* 验证码生成器
*
* @author
*/public class ValidateCode { // 图片的宽度。
private int width = 160; // 图片的高度。
private int height = 40; // 验证码字符个数
private int codeCount = 5; // 验证码干扰线数
private int lineCount = 150; // 验证码
private String code = null; // 验证码图片Buffer
private BufferedImage buffImg = null; // 验证码范围,去掉0(数字)和O(拼音)容易混淆的(小写的1和L也可以去掉,大写不用了)
private char[] codeSequence = {'A', 'B', 'C', 'D', 'E', 'F', 'G', 'H', 'I', 'J', 'K', 'L', 'M', 'N', 'P', 'Q', 'R', 'S', 'T', 'U', 'V', 'W', 'X', 'Y', 'Z', '1', '2', '3', '4', '5', '6', '7', '8', '9'}; /**
* 默认构造函数,设置默认参数 */
public ValidateCode() { this.createCode();
} /**
* @param width 图片宽
* @param height 图片高 */
public ValidateCode(int width, int height) { this.width = width; this.height = height; this.createCode();
} /**
* @param width 图片宽
* @param height 图片高
* @param codeCount 字符个数
* @param lineCount 干扰线条数 */
public ValidateCode(int width, int height, int codeCount, int lineCount) { this.width = width; this.height = height; this.codeCount = codeCount; this.lineCount = lineCount; this.createCode();
} public void createCode() { int x = 0, fontHeight = 0, codeY = 0; int red = 0, green = 0, blue = 0;
x = width / (codeCount + 2);//每个字符的宽度(左右各空出一个字符)
fontHeight = height - 2;//字体的高度
codeY = height - 4; // 图像buffer
buffImg = new BufferedImage(width, height, BufferedImage.TYPE_INT_RGB);
Graphics2D g = buffImg.createGraphics(); // 生成随机数
Random random = new Random(); // 将图像填充为白色 g.setColor(Color.WHITE);
g.fillRect(0, 0, width, height); // 创建字体,可以修改为其它的
Font font = new Font("Fixedsys", Font.PLAIN, fontHeight);// Font font = new Font("Times New Roman", Font.ROMAN_BASELINE, fontHeight); g.setFont(font); for (int i = 0; i 
这里需要注意的是假设我们要让验证码大小写不敏感那么需要code.toLowerCase();对生成的验证码字符串进行转换。
6、新增一个ajax对象类AjaxResult


package com.yujie.util;public class AjaxResult { ///
/// 操作结果类型
///
public Object state; ///
/// 获取 消息内容
public String message; ///
/// 获取 返回数据
///
public Object data; public Object getState() { return state;
} public void setState(Object state) { this.state = state;
} public String getMessage() { return message;
} public void setMessage(String message) { this.message = message;
} public Object getData() { return data;
} public void setData(Object data) { this.data = data;
} public static AjaxResult ok(String msg){
AjaxResult model=new AjaxResult();
model.setMessage(msg);
model.state="success"; return model;
} public static AjaxResult error(String msg){
AjaxResult model=new AjaxResult();
model.setMessage(msg);
model.state="fail"; return model;
}
} 
7、添加控制器LoginController

@Controller
@RequestMapping("/login")public class LoginController extends BaseController {
@Autowired
IUserService userService;
@GetMapping("") public String login(Model model){
model.addAttribute("title","后台管理系统"); return render("login");
}
@ResponseBody
@PostMapping("/CheckLogin") public AjaxResult CheckLogin(@RequestParam String username, @RequestParam String password, @RequestParam String code,
HttpServletRequest request,
HttpServletResponse response){
Object objCode=request.getSession().getAttribute("code");
String _code=objCode.toString().toLowerCase(); if(!code.equals(_code)){ return AjaxResult.error("验证码错误请重新输入");
}
UserModel userModel=userService.CheckLogin(username,password); if(userModel==null) { return AjaxResult.error("用户名或密码请重新输入");
}else {
request.getSession().setAttribute("userinfo",userModel); return AjaxResult.ok("成功");
}
} /**
* 响应验证码页面
* @return
*/
@GetMapping(value="/GetAuthCode") public String validateCode(HttpServletRequest request, HttpServletResponse response) throws Exception{ // 设置响应的类型格式为图片格式
response.setContentType("image/jpeg"); //禁止图像缓存。
response.setHeader("Pragma", "no-cache");
response.setHeader("Cache-Control", "no-cache");
response.setDateHeader("Expires", 0);
HttpSession session = request.getSession();
ValidateCode vCode = new ValidateCode(120,40,4,100);
session.setAttribute("code", vCode.getCode());
vCode.write(response.getOutputStream()); return null;
}
}
考虑到一些公共的信息我添加了一个控制器的父类BaseController

public abstract class BaseController { public static String THEME = "admin"; public BaseController title(HttpServletRequest request, String title) {
request.setAttribute("title", title); return this;
} /**
* 主页的页面主题
* @param viewName
* @return
*/
public String render(String viewName) { return THEME + "/" + viewName;
} public String render_404() { return "comm/error_404";
} protected WebSiteModel GetWebSiteModel(){
WebSiteModel model=new WebSiteModel();
model.setSiteName("网站后台管理系统"); return model;
} protected UserModel GetUserInfo(HttpServletRequest request){
HttpSession session = request.getSession(); if (null == session) { return null;
} return (UserModel)session.getAttribute("userinfo");
}
}
8、实现服务层添加IUserService接口接口的命名我沿用C#的规范首字母用I
public interface IUserService extends IBaseService {
UserModel CheckLogin(String username, String password);
}
9、添加接口的实现类UserService

package com.yujie.service.impl;import com.yujie.dao.UserModelMapper;import com.yujie.model.UserModel;import com.yujie.service.IUserService;import org.springframework.beans.factory.annotation.Autowired;import org.springframework.stereotype.Service;
@Servicepublic class UserService implements IUserService {
@Autowired
UserModelMapper userModelMapper;
@Override public UserModel CheckLogin(String username, String password) { return userModelMapper.checkLogin(username,password);
}
}
接触java的时间不长发现一个很有意思的想象不知道是否是写java默认约定那就是实现类都是单独用一个叫做impl的包封装。
10、剩下的就是View了

html>
快速开发平台
<!--[if lte IE 8]>
您还在使用老掉牙的IE正常使用系统前请升级您的浏览器到 IE8以上版本 点击升级 强烈建议您更改换浏览器谷歌 Chrome
登录
适用浏览器IE8以上、360、FireFox、Chrome、Safari、Opera、傲游、搜狗、世界之窗.

templates下添加admin目录admin目录下添加login.html页面。
这样登录就已经实现然后我们还有一个权限拦截器啊。Java中通过实现HandlerInterceptor这个接口来进行过拦截功能其实也可以通过继承另一个类来实现同样的功能不过建议使用接口。具体类名我一下子想不起来啦O(∩_∩)O哈哈~
新建类BaseInterceptor

package com.yujie.filter;

import org.springframework.stereotype.Component;
import org.springframework.web.servlet.HandlerInterceptor;
import org.springframework.web.servlet.ModelAndView;

import javax.servlet.http.HttpServletRequest;
import javax.servlet.http.HttpServletResponse;
import java.util.logging.Logger;
@Component
public class BaseInterceptor implements HandlerInterceptor {
    private static final Logger logger = Logger.getLogger("BaseInterceptor");
    private static final String loginUrl="/login";
    @Override
    public boolean preHandle(HttpServletRequest request, HttpServletResponse response, Object o) throws Exception {
        //1、请求到登录页面 放行
        if(request.getServletPath().startsWith(loginUrl)) {
            return true;
        }

        //2、TODO 比如退出、首页等页面无需登录即此处要放行 允许游客的请求

        //3、如果用户已经登录 放行
        if(request.getSession().getAttribute("userinfo") != null) {
            //更好的实现方式的使用cookie
            return true;
        }
        //4、非法请求 即这些请求需要登录后才能访问
        //重定向到登录页面
        response.sendRedirect(request.getContextPath() + loginUrl);
        return false;
    }

    @Override
    public void postHandle(HttpServletRequest httpServletRequest, HttpServletResponse httpServletResponse, Object o, ModelAndView modelAndView) throws Exception {

    }

    @Override
    public void afterCompletion(HttpServletRequest httpServletRequest, HttpServletResponse httpServletResponse, Object o, Exception e) throws Exception {

    }
}

然后我们要新建一个配置类WebMvcConfig将这个创建的拦截器添加进来。

@Configurationpublic class WebMvcConfig extends WebMvcConfigurerAdapter {
    @Resource    private BaseInterceptor baseInterceptor;
    @Override    public void addInterceptors(InterceptorRegistry registry) {        // addPathPatterns 用于添加拦截规则, 这里假设拦截 /url 后面的全部链接        // excludePathPatterns 用户排除拦截
        registry.addInterceptor(baseInterceptor).addPathPatterns("/**");
    }    /**
     * 添加静态资源文件外部可以直接访问地址
     * @param registry     */
    @Override    public void addResourceHandlers(ResourceHandlerRegistry registry) {
        registry.addResourceHandler("/upload/**").addResourceLocations("upload/");        super.addResourceHandlers(registry);
    }
}

这样就一切OK了接下来看下演示效果。

代码结构图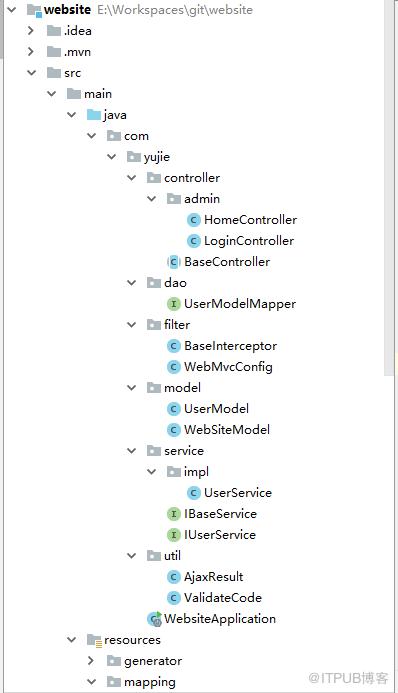
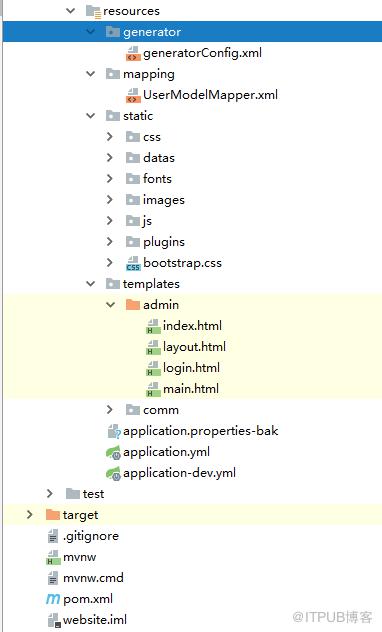
感觉有.net基础的话进行java开发还是蛮简单的。
原文出处https://www.cnblogs.com/jiekzou/p/9303871.html
来自 “ ITPUB博客 ” ,链接:https://blog.itpub.net/2920/viewspace-2806940/ ,如需转载,请注明出处,否则将追究法律责任。

