OpenLdap 使用Berkely-DB来作为数据库存储信息,它是一个为了查询、浏览和搜索而优化的分布式数据库,呈树状组织结构。它是C/S结构模式,需要分别安装server和client服务,server存储数据,client端提供查询目录信息树工具。
Ldap目录结构与特点:
类似书的目录一样,Ldap也以目录信息树(Directory information Tree DIT)以树状的层次结构来存储数据, DIT是一个主要进行读操作的数据,在写方面性能低下。
Ldap工作模式和端口
ldap 389/tcp
ldap 389/udp
ldaps 636/tcp # LDAP over SSL
ldaps 636/udp # LDAP over SSL
1、通过yum安装openldap服务,中间会安装相关的依赖包
点击(此处)折叠或打开
2、Ldap的工作目录和配置
2.1 修改生产的模板文件
2.2 生产根密文
点击(此处)折叠或打开
2.3 继续修改slapd.conf 配置文件,加入2.2生成的密码,保存退出
2.4 测试配置文件正常性
点击(此处)折叠或打开
3、 复制模板数据库,启动slapd服务,可以看到没有任何账户
点击(此处)折叠或打开
4、添加测试账户
4.1、首先安装数据迁移工具,讲创建的用户迁移到Ldap可以识别的文件位置 DB_CONFIG
点击(此处)折叠或打开
4.2 修改/usr/share/migrationtools/migrate_common.ph 在61行指定域mhxy162.cn
4.3 生成base DN文件,并让baseDN加入ldap
5、 在客户端client安装服务
5.1、配置authconfig服务
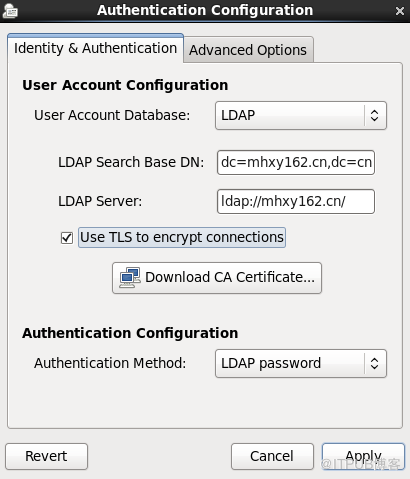
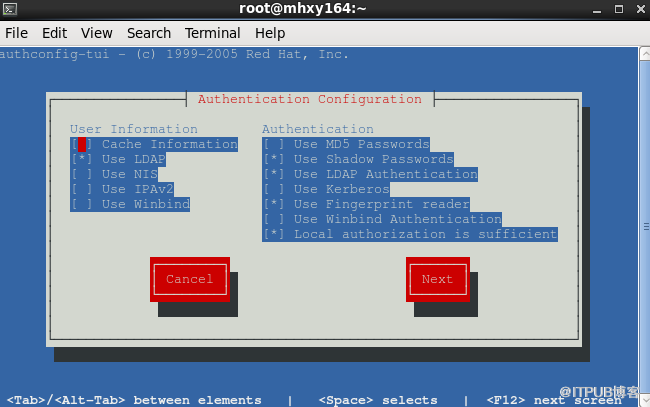
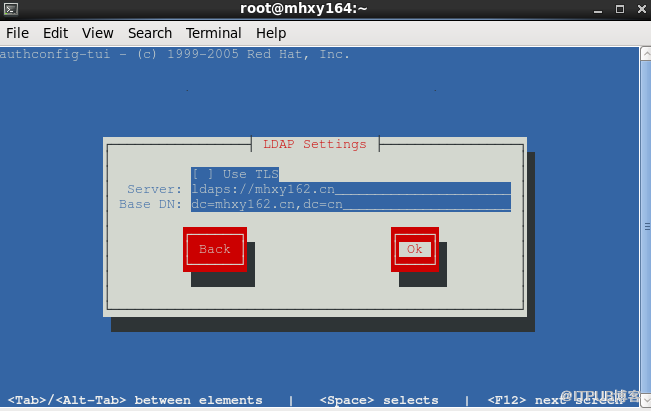
5.2、查看是否可以获得用户
6、开始服务端server共享
点击(此处)折叠或打开
7、客户端配置nfs 可以正常是家目录,并在服务端验证
Ldap目录结构与特点:
类似书的目录一样,Ldap也以目录信息树(Directory information Tree DIT)以树状的层次结构来存储数据, DIT是一个主要进行读操作的数据,在写方面性能低下。
Ldap工作模式和端口
ldap 389/tcp
ldap 389/udp
ldaps 636/tcp # LDAP over SSL
ldaps 636/udp # LDAP over SSL
1、通过yum安装openldap服务,中间会安装相关的依赖包
点击(此处)折叠或打开
- [root@mhxy162 ~]# yum -y install openladp*
- Installed:
- openldap-clients.x86_64 0:2.4.40-12.el6 openldap-devel.x86_64 0:2.4.40-12.el6 openldap-servers.x86_64 0:2.4.40-12.el6 openldap-servers-sql.x86_64 0:2.4.40-12.el6
- Dependency Installed:
- cyrus-sasl-devel.x86_64 0:2.1.23-15.el6_6.2 libtool-ltdl.x86_64 0:2.2.6-15.5.el6 unixODBC.x86_64 0:2.2.14-14.el6
- Updated:
- openldap.x86_64 0:2.4.40-12.el6
- Dependency Updated:
- cyrus-sasl.x86_64 0:2.1.23-15.el6_6.2 cyrus-sasl-gssapi.x86_64 0:2.1.23-15.el6_6.2 cyrus-sasl-lib.x86_64 0:2.1.23-15.el6_6.2
- cyrus-sasl-plain.x86_64 0:2.1.23-15.el6_6.2
- Complete!
点击(此处)折叠或打开
- [root@mhxy162 openldap]# pwd
- /etc/openldap #通过yum安装后 openldap的工作目录
- [root@mhxy162 openldap]# ll
- total 28
- drwxr-xr-x. 2 root root 4096 Jul 14 10:49 certs
- -rw-r----- 1 root ldap 121 May 11 07:32 check_password.conf
- -rw-r--r-- 1 root root 280 May 11 07:32 ldap.conf
- drwxr-xr-x 2 root root 4096 Jul 14 10:49 schema
- drwx------ 3 ldap ldap 4096 Jul 14 10:49 slapd.d #我们需要移除slapd.d目录,目的是需要加载slapd.conf文件,默认情况下是不存在
- [root@mhxy162 openldap]#
-
[root@mhxy162 openldap]# cp /usr/share/openldap-servers/slapd.conf.obsolete /etc/openldap/slapd.conf
[root@mhxy162 openldap]# mv slapd.d/ /tmp/
[root@mhxy162 openldap]# ll
total 24
drwxr-xr-x. 2 root root 4096 Jul 14 10:49 certs
-rw-r----- 1 root ldap 121 May 11 07:32 check_password.conf
-rw-r--r-- 1 root root 280 May 11 07:32 ldap.conf
drwxr-xr-x 2 root root 4096 Jul 14 10:49 schema
-rw-r--r-- 1 root root 4635 Jul 14 12:59 slapd.conf
[root@mhxy162 openldap]#
点击(此处)折叠或打开
- 110 #######################################################################
- 111 # database definitions
- 112 #######################################################################
- 113
- 114 database bdb
- 115 suffix "dc=mhxy162.cn,dc=cn" #修改dc
- 116 checkpoint 1024 15
- 117 rootdn "cn=Manager,dc=mhxy162.cn,dc=cn" #修改dc
点击(此处)折叠或打开
- [root@mhxy162 openldap]# slappasswd
- New password: #123456
- Re-enter new password:
- {SSHA}aM00OztrRkKx5FcbWNGtQYKlr/RAkCoA
- [root@mhxy162 openldap]#
点击(此处)折叠或打开
- # Cleartext passwords, especially for the rootdn, should
- # be avoided. See slappasswd(8) and slapd.conf(5) for details.
- # Use of strong authentication encouraged.
- # rootpw secret
- # rootpw {crypt}ijFYNcSNctBYg
- rootpw {SSHA}aM00OztrRkKx5FcbWNGtQYKlr/RAkCoA
点击(此处)折叠或打开
- root@mhxy162 openldap]# slaptest --help
- slaptest: invalid option -- '-'
- usage: slaptest [-v] [-d debuglevel] [-f configfile] [-F configdir] [-o <name>[=<value>]] [-n databasenumber] [-u] [-Q]
- [root@mhxy162 openldap]# slaptest -u -f slapd.conf
- config file testing succeeded
- [root@mhxy162 openldap]#
点击(此处)折叠或打开
- [root@mhxy162 openldap]# cp /usr/share/openldap-servers/DB_CONFIG.example /etc/openldap/DB_CONFIG
-
[root@mhxy162 openldap]# service slapd restart
Stopping slapd: [FAILED]
Starting slapd: [ OK ]
[root@mhxy162 openldap]# ldapsearch -x -b "dc=mhxy162.cn dc=cn"
# extended LDIF
#
# LDAPv3
# base <dc=mhxy162.cn dc=cn> with scope subtree
# filter: (objectclass=*)
# requesting: ALL
#
# search result
search: 2
result: 32 No such object
# numResponses: 1
[root@mhxy162 openldap]#
4.1、首先安装数据迁移工具,讲创建的用户迁移到Ldap可以识别的文件位置 DB_CONFIG
点击(此处)折叠或打开
-
[root@mhxy162 openldap]# yum -y install migrationtools
-
[root@mhxy162 openldap]# mkdir /ldaphome
-
[root@mhxy162 openldap]#
-
[root@mhxy162 openldap]# for i in {1..5};do useradd -u 200$i -d /ldaphome/ldapuser$i ldapuser$i; echo ldapuser$i:123456 |chpasswd; done
- [root@mhxy162 openldap]#
点击(此处)折叠或打开
-
# Default DNS domain
-
$DEFAULT_MAIL_DOMAIN = "mhxy162.cn";
-
-
# Default base
- $DEFAULT_BASE = "dc=mhxy162.cn,dc=cn"
点击(此处)折叠或打开
-
[root@mhxy162 openldap]# /usr/share/migrationtools/migrate_base.pl > /tmp/base.ldif
- [root@mhxy162 openldap]# grep ldapuser /etc/passwd > /tmp/netuser.txt
- [root@mhxy162 openldap]# grep ldapuser /etc/group > /tmp/netgr.txt
- [root@mhxy162 openldap]# /usr/share/migrationtools/migrate_passwd.pl /tmp/netuser.txt /tmp/user.ldif
-
[root@mhxy162 openldap]# /usr/share/migrationtools/migrate_group.pl /tmp/netgr.txt /tmp/group.ldif
- [root@mhxy162 openldap]#
-
[root@mhxy162 openldap]#
-
[root@mhxy162 etc]# ldapadd -x -w123456 -D "cn=Manager,dc=mhxy162.cn,dc=cn" -f /tmp/base.ldif
adding new entry "dc=mhxy162.cn,dc=cn"
adding new entry "ou=Hosts,dc=mhxy162.cn,dc=cn"
adding new entry "ou=Rpc,dc=mhxy162.cn,dc=cn"
adding new entry "ou=Services,dc=mhxy162.cn,dc=cn"
adding new entry "nisMapName=netgroup.byuser,dc=mhxy162.cn,dc=cn"
adding new entry "ou=Mounts,dc=mhxy162.cn,dc=cn"
adding new entry "ou=Networks,dc=mhxy162.cn,dc=cn"
adding new entry "ou=People,dc=mhxy162.cn,dc=cn"
adding new entry "ou=Group,dc=mhxy162.cn,dc=cn"
adding new entry "ou=Netgroup,dc=mhxy162.cn,dc=cn"
adding new entry "ou=Protocols,dc=mhxy162.cn,dc=cn"
adding new entry "ou=Aliases,dc=mhxy162.cn,dc=cn"
adding new entry "nisMapName=netgroup.byhost,dc=mhxy162.cn,dc=cn"
[root@mhxy162 etc]# ldapadd -x -w123456 -D "cn=Manager,dc=mhxy162.cn,dc=cn" -f /tmp/user.ldif
adding new entry "uid=ldapuser1,ou=People,dc=mhxy162.cn,dc=cn"
adding new entry "uid=ldapuser2,ou=People,dc=mhxy162.cn,dc=cn"
adding new entry "uid=ldapuser3,ou=People,dc=mhxy162.cn,dc=cn"
adding new entry "uid=ldapuser4,ou=People,dc=mhxy162.cn,dc=cn"
adding new entry "uid=ldapuser5,ou=People,dc=mhxy162.cn,dc=cn"
[root@mhxy162 etc]#
[root@mhxy162 etc]# ldapadd -x -w123456 -D "cn=Manager,dc=mhxy162.cn,dc=cn" -f /tmp/group.ldif
adding new entry "cn=ldapuser1,ou=Group,dc=mhxy162.cn,dc=cn"
adding new entry "cn=ldapuser2,ou=Group,dc=mhxy162.cn,dc=cn"
adding new entry "cn=ldapuser3,ou=Group,dc=mhxy162.cn,dc=cn"
adding new entry "cn=ldapuser4,ou=Group,dc=mhxy162.cn,dc=cn"
adding new entry "cn=ldapuser5,ou=Group,dc=mhxy162.cn,dc=cn"
[root@mhxy162 etc]#
[root@mhxy162 openldap]# service slapd restart -
Stopping slapd: [ OK ]
- Starting slapd: [ OK ]
-
[root@mhxy162 etc]# ldapsearch -x -b "dc=mhxy162.cn,dc=cn"
# extended LDIF
#
# LDAPv3
# base <dc=mhxy162.cn,dc=cn> with scope subtree
# filter: (objectclass=*)
# requesting: ALL
#
中间省略其他行
-
# ldapuser1, Group, mhxy162.cn.cn
dn: cn=ldapuser1,ou=Group,dc=mhxy162.cn,dc=cn
objectClass: posixGroup
objectClass: top
cn: ldapuser1
userPassword:: e2NyeXB0fXg=
gidNumber: 2001
# ldapuser2, Group, mhxy162.cn.cn
dn: cn=ldapuser2,ou=Group,dc=mhxy162.cn,dc=cn
objectClass: posixGroup
objectClass: top
cn: ldapuser2
userPassword:: e2NyeXB0fXg=
gidNumber: 2002
[root@mhxy162 etc]#
5.1、配置authconfig服务
点击(此处)折叠或打开
- [root@mhxy164 ~]# yum install -y authconfig-gtk nss-pam-ldapd openldap-clients
-
[root@mhxy164 ~]# authconfig-gtk
点击(此处)折叠或打开
- [root@mhxy164 ~]# authconfig-tui # 第一张跳过,第二张修改TLS 为不启用,确定
5.2、查看是否可以获得用户
点击(此处)折叠或打开
-
[root@mhxy164 ~]# /etc/init.d/nslcd restart
-
Stopping nslcd: [ OK ]
-
Starting nslcd: [ OK ]
-
[root@mhxy164 ~]# getent passwd | grep ldapuser
-
ldapuser1:x:2001:2001:ldapuser1:/ldaphome/ldapuser1:/bin/bash
-
ldapuser2:x:2002:2002:ldapuser2:/ldaphome/ldapuser2:/bin/bash
-
ldapuser3:x:2003:2003:ldapuser3:/ldaphome/ldapuser3:/bin/bash
-
ldapuser4:x:2004:2004:ldapuser4:/ldaphome/ldapuser4:/bin/bash
-
ldapuser5:x:2005:2005:ldapuser5:/ldaphome/ldapuser5:/bin/bash
- [root@mhxy164 ~]#
-
[root@mhxy164 ~]# su ldapuser1
bash-4.1$ #目前还没有家目录
点击(此处)折叠或打开
- [root@mhxy162 openldap]# yum -y install rpcbind
- [root@mhxy162 openldap]# echo "/ldaphome/ *(rw)" > /etc/exports
-
[root@mhxy162 openldap]# service rpcbind restart;service nfs restart
Stopping rpcbind: [ OK ]
Starting rpcbind: [ OK ]
Shutting down NFS daemon: [ OK ]
Shutting down NFS mountd: [ OK ]
Shutting down NFS quotas: [ OK ]
Shutting down NFS services: [ OK ]
Shutting down RPC idmapd: [ OK ]
Starting NFS services: [ OK ]
Starting NFS quotas: [ OK ]
Starting NFS mountd: [ OK ]
Starting NFS daemon: [ OK ]
Starting RPC idmapd: [ OK ]
[root@mhxy162 openldap]#
[root@mhxy162 openldap]#
[root@mhxy162 openldap]# showmount -e 192.168.137.162
Export list for 192.168.137.162:
/ldaphome *
[root@mhxy162 openldap]#
点击(此处)折叠或打开
- [root@mhxy164 ~]# yum install nfs* -y
-
[root@mhxy164 ~]# vim /etc/auto.master
- 增加以下内容
- /ldaphome /etc/auto.misc
-
- [root@mhxy164 ~]# vim /etc/auto.misc
-
末尾增加以下内容
* mhxy162.cn:/ldaphome/& -
[root@mhxy164 ~]# service autofs restart;service nfs restart
Stopping automount: [ OK ]
Starting automount: [ OK ]
Shutting down NFS daemon: [FAILED]
Shutting down NFS mountd: [FAILED]
Shutting down NFS quotas: [FAILED]
Starting NFS services: [ OK ]
Starting NFS quotas: [ OK ]
Starting NFS mountd: [ OK ]
Starting NFS daemon: [ OK ]
Starting RPC idmapd: [ OK ]
[root@mhxy164 ~]# su - ldapuser1
[ldapuser1@mhxy164 ~]$ touch 11.html
[ldapuser1@mhxy164 ~]$ ll
total 0
-rw-rw-r-- 1 ldapuser1 ldapuser1 0 Jul 14 17:19 11.html
[ldapuser1@mhxy164 ~]$ -
- 在服务端验证
-
-
[root@mhxy162 openldap]# ll /ldaphome/ldapuser1/
total 0
-rw-rw-r-- 1 ldapuser1 ldapuser1 0 Jul 14 17:19 11.html
[root@mhxy162 openldap]#
来自 “ ITPUB博客 ” ,链接:https://blog.itpub.net/27039319/viewspace-2122104/ ,如需转载,请注明出处,否则将追究法律责任。

请登录后发表评论
登录
全部评论
最新文章
- 闪回技术-闪回查询
- 闪回技术-闪回数据库01
- 配置ADG 产生ORA-10458错误
- oracle RAC 迁移votedisk
- ORACL RAC 环境下添加磁盘组提示ORA-15032 ORA-15201
- create database提示ORA-01501 ORA-00200 ORA-00202 ORA-27038错误提示
- 手动创建实例时提示ORA-00845的解决方法
- RAC环境中ORA-01157: cannot identify/lock data file 9 - see DBWR trace file
- 在RAC环境中recreate controlfile 提示ORA-01503和ORA-12720 错误
- RMAN-Configuring an Archived Redo Log Deletion Policy
