主要是觉得官网的网速太慢了所以才在这拷了一份,具体信息请查看soapui官网:http://www.soapui.org/Scripting-Properties/tips-a-tricks.html
1. Accessing Properties, Settings and Names
1.1. Get and Set properties
Getting properties from groovy is straight-forward; all objects that contain properties have a getPropertyValue / setPropertyValue methods. The following examples are from inside a Groovy Script. step:
01.// get properties from testCase, testSuite and project
02.def testCaseProperty = testRunner.testCase.getPropertyValue( "MyProp" )
03.def testSuiteProperty = testRunner.testCase.testSuite.getPropertyValue( "MyProp" )
04.def projectProperty = testRunner.testCase.testSuite.project.getPropertyValue( "MyProp" )
05.def globalProperty = com.eviware.soapui.SoapUI.globalProperties.getPropertyValue("MyProp" )
06.
07.// setting values is equally straigh forward
08.testRunner.testCase.setPropertyValue( "MyProp", someValue )
09.testRunner.testCase.testSuite.setPropertyValue( "MyProp", someValue )
10.testRunner.testCase.testSuite.project.setPropertyValue( "MyProp", someValue )
11.com.eviware.soapui.SoapUI.globalProperties.setPropertyValue( "MyProp", someValue )
From inside a Script. Assertion, you have to access testCase in another way:
1.def testCaseProperty = messageExchange.modelItem.testStep.testCase.getPropertyValue("MyProp" )
Have a look at the TestPropertyHolder interface for digging into the object model.
1.2. Get and Set Settings
Global preferences can be set via the SoapUI.settings property, the different tabs have corresponding Settings interfaces in the com.eviware.soapui.settings package, each interface defines constants for each settings. So for example to set the SSL Keystore and password programmatically, you could call
01.import com.eviware.soapui.settings.SSLSettings
02.import com.eviware.soapui.SoapUI
03.
04.// set
05.SoapUI.settings.setString( SSLSettings.KEYSTORE, pathToKeystore )
06.SoapUI.settings.setString( SSLSettings.KEYSTORE_PASSWORD, keystorePassword )
07.
08.// get
09.SoapUI.settings.getString( SSLSettings.KEYSTORE, "value to return if there is no such setting set" )
1.3. Project name
This is how to access the Project name from a Groovy Script. TestStep:
1.testRunner.testCase.testSuite.project.name
(almost all items have a name property)
1.4. Conditional inline property expansion
This is how you could conditionally expand a property in a request, or similar, based on the value of a third custom property. If the selection TestCase property has the value "selection" the TestCase property myFirstXMLSnippet will be expanded, else mySecondXMLSnippet will be expanded:
1.${= testCase.getPropertyValue( "selection" ) == "first" ? testCase.getPropertyValue("myFirstXMLSnippet" ) : testCase.getPropertyValue( "mySecondXMLSnippet" )}
2. DataSources and DataSinks
2.1. Implementing Groovy DataSources and DataSinks
Here's an example Groovy DataSource to get you going:
01.def groovyUtils = new com.eviware.soapui.support.GroovyUtils(context)
02.def projectPath = groovyUtils.projectPath
03.def folderName = projectPath + "/testData"
04.def row = testRunner.testCase.testSteps["DataSource"].currentRow
05.def allFiles = []
06.new File( folderName ).eachFile() { file ->
07.if( file.name =~ /.txt/ )
08.{
09.allFiles.add( file.name ) }
10.}
11.
12.if ( (row + 1) <= allFiles.size )
13.{
14.// output to the TestStep property called inputData
15.result["inputData"] = new File( folderName + "/" + allFiles[row] ).text
16.}
Here's an example Groovy DataSink :
1.// Write the response from the "Test Request: login" TestStep to a file
2.def currentUser = context.expand( '${#TestCase#currentUser}' )
3.def response = context.expand( '${Test Request: login#Response}' )
4.new File( "C:/Users/eviware/" + currentUser + "_response.txt" ).write( response )
5.
6.// To use another charset than the default, do this instead:
7.// new File( "C:/Users/eviware/" + currentUser + "_response.txt" ).write( response, "UTF-8" )
2.2. Aggregating multiple DataSource rows to the same request
One way to do this is to use a Datasource + Datasource Loop with a Groovy step between which appends the Datasource elements to a property, and then use the property after exiting the loop.
1.def countryCode = context.expand( '${DataSource#CountryCode}' )
2.def countryName = context.expand( '${DataSource#CountryName}' )
3.
4.def frag = context.expand( '${Properties#XmlFragment}' )
5.
6.def newPropertyValue = '${frag}${countryCode}${countryName}'
7.testRunner.testCase.setPropertyValue( 'XmlFragment', newPropertyValue )
Thanks to M McDonald for this one!
2.3. Randomizing DataSource rows
There is no built in support for DataSources fetching random rows in soapUI, but this can be achieved with some scripting. Structure your TestCase like this:
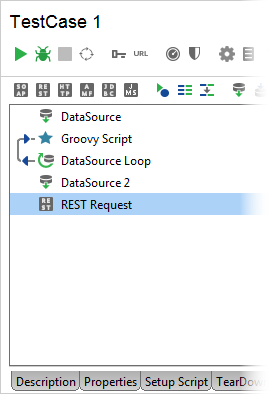
The TestSteps should contain the following:
Original DataSourceA DataSource test step for the actual data that you want to randomize. Use this as you would normally.
Collect row1.// create list if necessary
2.if( context["allRows"] == null ) context["allRows"] = []
3.
4.// append current row from Original Source to allRows
5.context["allRows"] << context.expand( '${Original Source#output}' )
DataSource Loop that loops to Collect row (Target Step) for each row in Original Source (DataSource Step).
Shuffle collected rows1.Collections.shuffle( context["allRows"] )
1.def row = testRunner.testCase.testSteps["Groovy DataSource"].currentRow
2.
3.if ( row + 1 <= context["allRows"].size() )
4.{
5.result["randomRow"] = context["allRows"][row]
6.}
DataSource Loop that loops to the first test step using the random data (Target Step) for each row inGroovy DataSource (DataSource Step).
3. XML nodes
3.1. Iterate nodes
A common and equally straight forward task, use the GroovyUtils class to create an XmlHolder, which you can use for a variety of XML related activities:
1.// create groovyUtils and XmlHolder for response of Request 1 request
2.def groovyUtils = new com.eviware.soapui.support.GroovyUtils( context )
3.def holder = groovyUtils.getXmlHolder( "Request 1#Response" )
4.
5.// loop item nodes in response message
6.for( item in holder.getNodeValues( "//item" ))
7.log.info "Item : [$item]"
If the desired content is namespace qualified (very likely for SOAP responses), you need to define the namespace first. Continuoing from above:
1.// define namespace
3.
4.// loop item nodes in response message
5.for( item in holder.getNodeValues( "//ns:item" ))
6.log.info "Item : [$item]"
3.2. Count nodes
Use the GroovyUtils class to create an XmlHolder, which you can use for a variety of XML related activities:
1.// create groovyUtils and XmlHolder for response of Request 1 request
2.def groovyUtils = new com.eviware.soapui.support.GroovyUtils( context )
3.def holder = groovyUtils.getXmlHolder( "Request 1#Response" )
4.
5.def numberOfLinksInParagraphs = holder["count(//html/body/p/a)"]
3.3. Advanced parsing and updating
Please read XML Parsing in soapUI (by Robert Nemet).
The example below sets the JMS header JMSCorrelationID to "foo4711" for myTestStep.
1.def myTestStep = testRunner.testCase.getTestStepByName("Some JMS TestStep")
2.def msgID = "foo4711"
3.
4.myTestStep.testRequest.jMSHeaderConfig.messageSelector = "JMSCorrelationID = '${msgID}'"
5. Change a request XML from groovy
This example sets the password inside a request SOAP message:
01.def groovyUtils = new com.eviware.soapui.support.GroovyUtils( context )
02.
03.// get XmlHolder for request message def
04.holder = groovyUtils.getXmlHolder( "login#Request" )
05.
06.// change password using XPath
07.holder["//username"] = "test"
08.
09.// write updated request back to teststep
10.holder.updateProperty()
6. Changing response before before it gets validated
For example if you want to change all 555 to 444 in all response messages, proper way is to useRequestFilter.afterRequest event handler and add script.:
01.if( request.response == null )
02.return
03.
04.// get response content
05.def content = context.httpResponse.responseContent
06.
07.// manipulate content
08.content = content.replaceAll( "555", "444" )
09.
10.// write it back
11.context.httpResponse.responseContent = content
Now these changes will be picked up by assertions, too (read more at Custom Event Handlers).
7. Playback and MockService Control
7.1. Loop a sequence of TestSteps X times
A simple loop is easiest achieved by placing a Groovy Script. TestStep after the last TestStep in the loop with the following content:
1.if( context.loopIndex == null )
2.context.loopIndex = 0
3.
4.if( ++context.loopIndex < 10 )
5.testRunner.gotoStepByName( "Name of first TestStep in loop" )
This script. first creates the loop counter in the context and then loops back until the value is 10 (think of it as a do...while loop)
7.2. Start and stop MockServices
This can come in handy both from the Project onLoad script. (if you want to start your MockServices when the project is opened) or from a TestCase/TestSuite setup script. (if you need the MockService running for your functional tests). Here from a TestCase setup script.:
1.def runner = testCase.testSuite.project.mockServices["My MockService"].start()
2.context.mockRunner = runner
The returned runner object is required to stop the MockService... so save it to the context and use it in the tearDown script.:
1.context.mockRunner.stop()
Have a look at the WsdlMockService and the WsdlMockRunner classes for more methods and properties that might come in handy.
8. Logging results
8.1. Saving all TestStep's results into files
To save the result (request data, response data, response time, etc.) of every executed TestStep in a Project, create a Project EventHandler (Project Window > Events tab > Add new EventHandler) of typeTestRunListener.afterStep with the following content:
1.filePath = 'c:/users/henrik/soapUI-results/'
2.fos = new FileOutputStream( filePath + testStepResult.testStep.label + '.txt', true )
3.pw = new PrintWriter( fos )
4.testStepResult.writeTo( pw )
5.pw.close()
6.fos.close()
8.2. Logging the result messages of all TestSteps in all failing TestCases
This is intended to run in a TestSuite Teardown Script.
01.for ( testCaseResult in runner.results )
02.{
03.testCaseName = testCaseResult.getTestCase().name
04.log.info testCaseName
05.if ( testCaseResult.getStatus().toString() == 'FAILED' )
06.{
07.log.info "$testCaseName has failed"
08.for ( testStepResult in testCaseResult.getResults() )
09.{
10.testStepResult.messages.each() { msg -> log.info msg }
11.}
12.}
13.}
Thanks to Finan for this one!
9. Determine whether a TestCase is run from the Command Line, as a LoadTest, etc.
1.if( com.eviware.soapui.SoapUI.isCommandLine() )
2.{
3.log.info "This code is executed by Command Line soapUI"
4.}
5.if( context.LoadTestContext != null )
6.{
7.log.info "This code is executed from a LoadTest"
8.}
10. Use a JDBC Driver from inside a groovy script
If you want to do direct JDBC calls from a groovy script. you first need to register the driver as follows
1.// register MySQL JDBC driver
2.com.eviware.soapui.support.GroovyUtils.registerJdbcDriver( "com.mysql.jdbc.Driver" )
(note that you still have to add the actual JDBC Driver jar to the bin\ext folder)
11. Access SOAP Operations / REST Resources
This example accesses SOAP Operations in the Sample Project.
1.import com.eviware.soapui.impl.wsdl.WsdlInterface
2.myInterface = (WsdlInterface) testRunner.testCase.testSuite.project.getInterfaceByName("SampleServiceSoapBinding")
3.myOperation = myInterface.getOperationByName("login")
4.myRequest = myOperation.getRequestByName("Request 1")
来自 “ ITPUB博客 ” ,链接:https://blog.itpub.net/25980175/viewspace-751121/
,如需转载,请注明出处,否则将追究法律责任。

