本文演示了Spring Security的最最基本用法,二个页面(或理解成二个url),一个需要登录认证后才能访问(比如:../admin/),一个可匿名访问(比如:../welcome)
注:以下内容参考了 http://www.mkyong.com/spring-security/spring-security-hello-world-example/
一、利用STS(Spring Tools Suite)创建一个Spring MVC Project
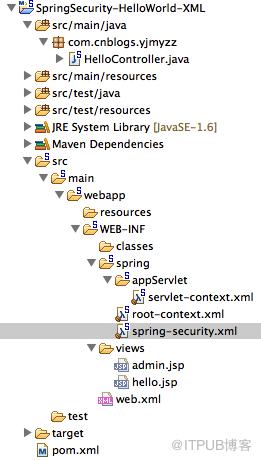
如果不想使用STS,在普通Eclipse上安装Spring Tool Suite插件也行,用Spring插件创建项目的好处在于,很多配置已经自动帮我们生成好了,基本的项目架子已经具备,不需要在这上面花太多心思,下面是项目结构图
pom文件中的dependencies
1 24 4.0.0 5com.cnblogs 6SpringSecurity-HelloWorld-XML 7SpringSecurity-HelloWorld-XML 8war 91.0 1011 16 171.6 123.2.8.RELEASE 133.2.3.RELEASE 141.2 1518 <!-- Spring dependencies --> 19 8820 24org.springframework 21spring-core 22${spring.version} 2325 29org.springframework 26spring-aop 27${spring.version} 2830 34org.springframework 31spring-beans 32${spring.version} 3335 39org.springframework 36spring-expression 37${spring.version} 3840 44org.springframework 41spring-context 42${spring.version} 4345 49org.springframework 46spring-context-support 47${spring.version} 4850 54 55org.springframework 51spring-web 52${spring.version} 5356 60 61 <!-- Spring Security --> 62org.springframework 57spring-webmvc 58${spring.version} 5963 67 68org.springframework.security 64spring-security-core 65${spring.security.version} 6669 73 74org.springframework.security 70spring-security-web 71${spring.security.version} 7275 79 80 <!-- jstl for jsp page --> 81org.springframework.security 76spring-security-config 77${spring.security.version} 7882 86 87jstl 83jstl 84${jstl.version} 8589 12690 12591 104maven-eclipse-plugin 922.9 9394 10395 97org.springframework.ide.eclipse.core.springnature 9698 100org.springframework.ide.eclipse.core.springbuilder 99true 101true 102105 116org.apache.maven.plugins 106maven-compiler-plugin 1072.5.1 108109 1151.6 1101.6 111-Xlint:all 112true 113true 114117 124org.codehaus.mojo 118exec-maven-plugin 1191.2.1 120121 123org.test.int1.Main 122
二、Controller
 1 package com.cnblogs.yjmyzz;
 2
 3 import org.springframework.stereotype.Controller;
 4 import org.springframework.web.bind.annotation.RequestMapping;
 5 import org.springframework.web.bind.annotation.RequestMethod;
 6 import org.springframework.web.servlet.ModelAndView;
 7
 8 @Controller
 9 public class HelloController {
10
11     @RequestMapping(value = { "/", "/welcome" }, method = RequestMethod.GET)
12     public ModelAndView welcome() {
13
14         ModelAndView model = new ModelAndView();
15         model.addObject("title", "Welcome - Spring Security Hello World");
16         model.addObject("message", "This is welcome page!");
17         model.setViewName("hello");
18         return model;
19
20     }
21
22     @RequestMapping(value = "/admin", method = RequestMethod.GET)
23     public ModelAndView admin() {
24
25         ModelAndView model = new ModelAndView();
26         model.addObject("title", "Admin - Spring Security Hello World");
27         model.addObject("message", "This is protected page!");
28         model.setViewName("admin");
29
30         return model;
31
32     }
33
34 }
毫无撸点,二个普通的Action而已,分别对应视图admin.jsp以及hello.jsp
三、web.xml
1 25 6 <!-- The definition of the Root Spring Container shared by all Servlets 7 and Filters --> 8 9 12 13 <!-- Creates the Spring Container shared by all Servlets and Filters --> 14contextConfigLocation 10/WEB-INF/spring/root-context.xml 1115 17 18 <!-- Processes application requests --> 19org.springframework.web.context.ContextLoaderListener 1620 28 29appServlet 21org.springframework.web.servlet.DispatcherServlet 2223 26contextConfigLocation 24/WEB-INF/spring/appServlet/servlet-context.xml 251 2730 33 34 <!-- Spring Security --> 35appServlet 31/ 3236 39 40springSecurityFilterChain 37org.springframework.web.filter.DelegatingFilterProxy 3841 44 45springSecurityFilterChain 42/* 43
稍做解释一下:看似一大堆,但其实除了34-43行需要手动添加之外,其它全是STS工具自动生成的,34-43行通过添加一个过滤器,对每个请求进行“拦截”处理。
此外注意里面配置的几个xml文件
/WEB-INF/spring/root-context.xml 这是Spring-beans的核心主文件
/WEB-INF/spring/appServlet/servlet-context.xml 这是Spring-MVC的入口Servlet配置文件
四、servlet-context.xml
1 29 10 <!-- DispatcherServlet Context: defines this servlet's request-processing infrastructure --> 11 12 <!-- Enables the Spring MVC @Controller programming model --> 13 14 15 <!-- Handles HTTP GET requests for /resources/** by efficiently serving up static resources in the ${webappRoot}/resources directory --> 16 17 18 <!-- Resolves views selected for rendering by @Controllers to .jsp resources in the /WEB-INF/views directory --> 19 20 23 2421 22 25 26 27 28
这个是工具自动生成的,主要用来处理Spring-MVC的相关内容,跟Security其实没啥关系
五、root-context.xml
1 25 6 <!-- Root Context: defines shared resources visible to all other web components --> 7 8 9
这个看似乎平淡无奇,但其实包含了“配置模块化”的思想,通过import,把跟Security相关的配置,单独放在另一个xml文件中,然后import进来,配置文件特别多的时候,这样可以使Spring的配置看上去更有条理
六、spring-security.xml
17 8 9 11 1210 13 19 2014 1815 1716
这才是Security的精华所在,8-10行,表示“/admin”请求需要ROLE_USER角色的用户才能访问,12-18行配置了一个用户yjmyzz,以及密码123456,并将该用户授于ROLE_USER角色(当然:这里只是演示,实际应用中,更常见的做法是将用户名、密码放到数据库中)
七、admin.jsp及hello.jsp
hello.jsp
1 3 4 html PUBLIC "-//W3C//DTD HTML 4.01 Transitional//EN" "http://www.w3.org/TR/html4/loose.dtd"> 5 6 7 8${title} 9 10 11Title:${title}
12Message:${message}
13 14
admin.jsp
1 3 4 html PUBLIC "-//W3C//DTD HTML 4.01 Transitional//EN" "http://www.w3.org/TR/html4/loose.dtd"> 5 6 7 8${title} 9 10 11Title : ${title}
12Message : ${message}
13 1415 20 2116 Welcome : ${pageContext.request.userPrincipal.name} | "> Logout 18
19
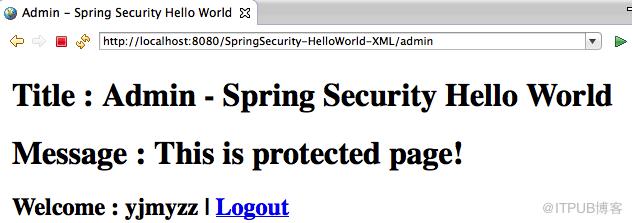
二个常规页面,唯一值得注意的是17行的a链接: j_spring_security_logout,是Spring Security默认生成的logout地址,除非开发人员有其它设置,否则默认退出地址就是它
运行效果:
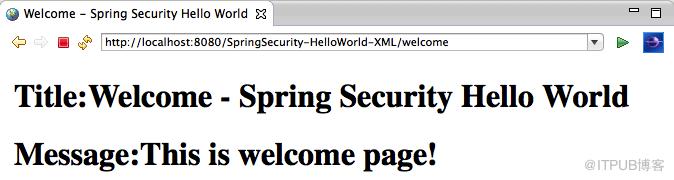
访问/welcome时,毫无阻力
访问/admin时,会重定向到Spring Security自动生成的login页面 spring_security_login
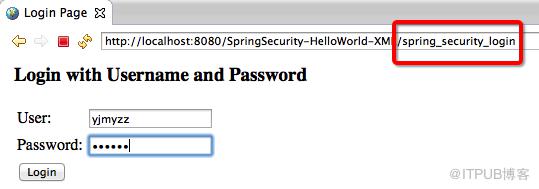
在登录页面输入yjmyzz/123456后,自动跳转到登录前的页面 /admin
最后:附示例源代码:SpringSecurity-HelloWorld-XML(0717).zip
来自 “ ITPUB博客 ” ,链接:https://blog.itpub.net/2548/viewspace-2800951/ ,如需转载,请注明出处,否则将追究法律责任。

