在前一节,学习了如何自定义登录页,但是用户名、密码仍然是配置在xml中的,这样显然太非主流,本节将学习如何把用户名/密码/角色存储在db中,通过db来实现用户认证
一、项目结构
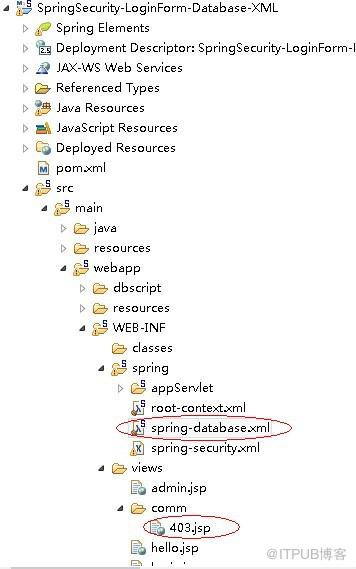
与前面的示例相比,因为要连接db,所以多出了一个spring-database.xml用来定义数据库连接,此外,为了演示登录用户权限不足的场景,加了一个页面403.jsp,用来统一显示权限不足的提示信息
二、数据库表结构(oracle环境)
 1 create table T_USERS
 2 (
 3   d_username VARCHAR2(50) not null,
 4   d_password VARCHAR2(60),
 5   d_enabled  NUMBER(1)
 6 );
 7 alter table T_USERS
 8   add constraint PK_USERS_USERNAME primary key (D_USERNAME) ;
 9
10 create table T_USER_ROLES
11 (
12   d_user_role_id NUMBER(10) not null,
13   d_username     VARCHAR2(50),
14   d_role         VARCHAR2(50)
15 );
16 alter table T_USER_ROLES
17   add constraint PK_USER_ROLES primary key (D_USER_ROLE_ID);
18 alter table T_USER_ROLES
19   add constraint IDX_UNI_ROLE_USERNAME unique (D_USERNAME, D_ROLE);
这里创建了二张表,一张用来保存用户名/密码,另一张用来保存用户所属的权限角色,表名和字段名无所谓,可以随便改,但是用户表中,必须要有"用户名/密码/帐号的有效状态"这三列信息,权限角色表必须要有“用户名/权限角色”这二列信息
再insert几条测试数据
 1 insert into T_USERS (D_USERNAME, D_PASSWORD, D_ENABLED)
 2 values ('YJMYZZ', '123456', 1);
 3
 4 insert into T_USERS (D_USERNAME, D_PASSWORD, D_ENABLED)
 5 values ('MIKE', 'MIKE123', 1);
 6
 7 insert into T_USER_ROLES (D_USER_ROLE_ID, D_USERNAME, D_ROLE)
 8 values (1, 'MIKE', 'POWER');
 9
10 insert into T_USER_ROLES (D_USER_ROLE_ID, D_USERNAME, D_ROLE)
11 values (2, 'YJMYZZ', 'ADMIN');
12
13 insert into T_USER_ROLES (D_USER_ROLE_ID, D_USERNAME, D_ROLE)
14 values (3, 'YJMYZZ', 'POWER');
这里插入了二个用户YJMYZZ/MIKE,而且MIKE属于POWER组,YJMYZZ同时属于POWERADMIN二个权限组
三、spring-security.xml
17 8 9 19 20 <!-- Select users and user_roles from database --> 2110 <!-- access denied page --> 11 12 15 16 <!-- enable csrf protection --> 17 18 22 28 2923 2726
注意第9行,这里使用了一个el表达式,目的是/admin开头的url,必须有ADMIN角色的登录用户才可访问
第11行,表示如果登录用户权限不够,将跳转到/403这个url
24,25这二行,指定了查询用户/角色的sql语句,注意:虽然前面提到了用户/角色这二张表的表名/字段名可以随便写,但是写sql时,用户名的别名必须是username,密码列的别名必须是password,帐号有效状态的别名必须是enabled,而权限角色列的别名必须是role
23行指定了db数据源,它的详细定义在 spring-database.xml中,内容如下:
1 26 7 9 1410 11 12 13
本文使用的是oracle数据库,如果是其它数据库,请自行调整上面的内容
四、Controller
 1 package com.cnblogs.yjmyzz;
 2
 3 import org.springframework.security.authentication.AnonymousAuthenticationToken;
 4 import org.springframework.security.core.Authentication;
 5 import org.springframework.security.core.context.SecurityContextHolder;
 6 import org.springframework.security.core.userdetails.UserDetails;
 7 import org.springframework.stereotype.Controller;
 8 import org.springframework.web.bind.annotation.RequestMapping;
 9 import org.springframework.web.bind.annotation.RequestMethod;
10 import org.springframework.web.bind.annotation.RequestParam;
11 import org.springframework.web.servlet.ModelAndView;
12
13 @Controller
14 public class HelloController {
15
16     @RequestMapping(value = { "/", "/welcome" }, method = RequestMethod.GET)
17     public ModelAndView welcome() {
18
19         ModelAndView model = new ModelAndView();
20         model.addObject("title",
21                 "Spring Security Login Form - Database Authentication");
22         model.addObject("message", "This is default page!");
23         model.setViewName("hello");
24         return model;
25
26     }
27
28     @RequestMapping(value = "/admin", method = RequestMethod.GET)
29     public ModelAndView admin() {
30
31         ModelAndView model = new ModelAndView();
32         model.addObject("title",
33                 "Spring Security Login Form - Database Authentication");
34         model.addObject("message", "This page is for ROLE_ADMIN only!");
35         model.setViewName("admin");
36         return model;
37
38     }
39
40     @RequestMapping(value = "/login", method = RequestMethod.GET)
41     public ModelAndView login(
42             @RequestParam(value = "error", required = false) String error,
43             @RequestParam(value = "logout", required = false) String logout) {
44
45         ModelAndView model = new ModelAndView();
46         if (error != null) {
47             model.addObject("error", "Invalid username and password!");
48         }
49
50         if (logout != null) {
51             model.addObject("msg", "You've been logged out successfully.");
52         }
53         model.setViewName("login");
54
55         return model;
56
57     }
58
59     // for 403 access denied page
60     @RequestMapping(value = "/403", method = RequestMethod.GET)
61     public ModelAndView accesssDenied() {
62
63         ModelAndView model = new ModelAndView();
64
65         // check if user is login
66         Authentication auth = SecurityContextHolder.getContext()
67                 .getAuthentication();
68         if (!(auth instanceof AnonymousAuthenticationToken)) {
69             UserDetails userDetail = (UserDetails) auth.getPrincipal();
70             model.addObject("username", userDetail.getUsername());
71         }
72
73         model.setViewName("comm/403");
74         return model;
75
76     }
77
78 }
66-71行演示了如何在服务端判断一个用户是否已经登录
五、视图页面
hello.jsp
1 3 5 6 7 8 9${title} 10 11 12Title : ${title}
13Message : ${message}
1415 <!-- For login user --> 16 34 3517 21 26 27 28 3329 User : ${pageContext.request.userPrincipal.name} | Logout | 31
3236 41 42 43
3738 login 39
40
注意一下:14、27、35这三行,它们演示了如何在jsp端判断用户具有的角色权限、是否已登录等用法
403.jsp
1 2 3 4HTTP Status 403 - Access is denied
5 67 17 18 198 10You do not have permission to access this page!
911 1612 Username : ${username}
15
You do not have permission to access 13 this page! 14
admin.jsp


1 2 3 4 513 18 19Title : ${title}
6Message : ${message}
7 89
21 Welcome : ${pageContext.request.userPrincipal.name} | Logout | 23
24因为在xml中已经配置了/admin开头的请求url,必须具有ADMIN角色权限,所以admin.jsp端反而不用任何额外的判断了
来自 “ ITPUB博客 ” ,链接:https://blog.itpub.net/2144/viewspace-2800952/ ,如需转载,请注明出处,否则将追究法律责任。

