在Silverlight项目中,Treeview控件是比较常用的表示层次或者等级的控件,该控件可以非常清晰的显示数据之间的隶属关系。对于Treeview控件的基本使用已经有很多文章介绍,这里我想讲解一下Silverlight Treeivew的HierarchicalDataTemplate的使用方法。
HierarchicalDataTemplate可以叫做"层级式数据模板",主要是应用层级比较明显数据集合。下面我来一步步演示HierarchicalDataTemplate在Silverlight treeview中的使用方法。在演示中,我将引用另外一个Silverlight控件ListBox进行对比,因为,Treeview和Listbox都属于Itemscontrol,
所以有很多类似相同之处,通过对比能够帮助大家记忆以及使用该控件。
首先建立一个空的项目,
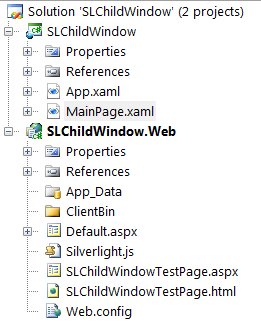
在MainPage页面中建立一个ListBox,在Xaml中写入代码,
Code highlighting produced by Actipro CodeHighlighter (freeware)
http://www.CodeHighlighter.com/
--> 1 <UserControl x:Class="TreeviewDemo.MainPage" 2 xmlns="http://schemas.microsoft.com/winfx/2006/xaml/presentation" 3 xmlns:x="http://schemas.microsoft.com/winfx/2006/xaml" 4 xmlns:d="http://schemas.microsoft.com/expression/blend/2008" 5 xmlns:mc="http://schemas.openxmlformats.org/markup-compatibility/2006" 6 xmlns:sys="clr-namespace:System;assembly=mscorlib" 7 mc:Ignorable="d" d:DesignWidth="640" d:DesignHeight="480"> 8 <Grid x:Name="LayoutRoot"> 9 <ListBox>10 <sys:String>树型演示1sys:String>11 <sys:String>树型演示2sys:String>12 <sys:String>树型演示3sys:String>13 <sys:String>树型演示4sys:String>14 <sys:String>树型演示5sys:String>15 ListBox>16 Grid>17 UserControl>
运行后会显示:
在上面代码基础上,我们可以添加一个ItemTemplate,对数据进行绑定。
Code highlighting produced by Actipro CodeHighlighter (freeware)
http://www.CodeHighlighter.com/
--> 1 <UserControl x:Class="TreeviewDemo.MainPage" 2 xmlns="http://schemas.microsoft.com/winfx/2006/xaml/presentation" 3 xmlns:x="http://schemas.microsoft.com/winfx/2006/xaml" 4 xmlns:d="http://schemas.microsoft.com/expression/blend/2008" 5 xmlns:mc="http://schemas.openxmlformats.org/markup-compatibility/2006" 6 xmlns:sys="clr-namespace:System;assembly=mscorlib" 7 mc:Ignorable="d" d:DesignWidth="640" d:DesignHeight="480"> 8 <Grid x:Name="LayoutRoot"> 9 <ListBox>10 <ListBox.ItemTemplate>11 <DataTemplate>12 <TextBlock Foreground="Blue" Text="{Binding}" />13 DataTemplate>14 ListBox.ItemTemplate>15 <sys:String>树型演示1sys:String>16 <sys:String>树型演示2sys:String>17 <sys:String>树型演示3sys:String>18 <sys:String>树型演示4sys:String>19 <sys:String>树型演示5sys:String>20 ListBox>21 Grid>22 UserControl>23
运行结果如下:
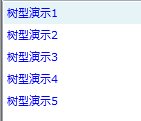
这里ListBox的选项都变成了蓝色。
就像我们前面所说的,ListBox是一个ItemsControl,任何ItemsControl都是相同的,可以将它们的内容包括到一个容器中。所以,我们可以再次重写上面代码:
Code highlighting produced by Actipro CodeHighlighter (freeware)
http://www.CodeHighlighter.com/
--> 1 <UserControl x:Class="TreeviewDemo.MainPage" 2 xmlns="http://schemas.microsoft.com/winfx/2006/xaml/presentation" 3 xmlns:x="http://schemas.microsoft.com/winfx/2006/xaml" 4 xmlns:d="http://schemas.microsoft.com/expression/blend/2008" 5 xmlns:mc="http://schemas.openxmlformats.org/markup-compatibility/2006" 6 xmlns:sys="clr-namespace:System;assembly=mscorlib" 7 mc:Ignorable="d" d:DesignWidth="640" d:DesignHeight="480"> 8 <Grid x:Name="LayoutRoot"> 9 <ListBox>10 11 12 <ListBoxItem Content="树型演示1">13 <ListBoxItem.ContentTemplate>14 <DataTemplate x:Name="myTemplate">15 <TextBlock Foreground="Blue" Text="{Binding}" />16 DataTemplate>17 ListBoxItem.ContentTemplate>18 ListBoxItem>19 <ListBoxItem Content="树型演示2" ContentTemplate="{Binding ElementName=myTemplate}" />20 <ListBoxItem Content="树型演示3" ContentTemplate="{Binding ElementName=myTemplate}" />21 <ListBoxItem Content="树型演示4" ContentTemplate="{Binding ElementName=myTemplate}" />22 <ListBoxItem Content="树型演示5" ContentTemplate="{Binding ElementName=myTemplate}" />23 ListBox>24 Grid>25 UserControl>26
在上面的代码中,ListBox中创建五个ListBoxItem,ListBoxItem的Content属性绑定着不同的选项,而ListBoxItem的ContentTemplate绑定着ListBox的ItemTemplate。
运行结果和上面的相同:
根据上面的基础,我们可以使用同样的概念来理解Silverlight Treeivew控件。
在使用Treeview控件前,需要添加引用,Treeview控件被装配在System.Windows.Controls下,另外在客户端页面需要添加命名空间如下:
Code highlighting produced by Actipro CodeHighlighter (freeware)
http://www.CodeHighlighter.com/
--> xmlns:Controls="clr-namespace:System.Windows.Controls;assembly=System.Windows.Controls"
Treeview控件也是一个ItemsControl,同样,每次初始化,Treeview控件会为所属选项创建TreeViewItem。 如果我们使用和ListBox同样的代码,可以得到下面结果,
Code highlighting produced by Actipro CodeHighlighter (freeware)
http://www.CodeHighlighter.com/
--> 1 <UserControl x:Class="TreeviewDemo.MainPage" 2 xmlns="http://schemas.microsoft.com/winfx/2006/xaml/presentation" 3 xmlns:x="http://schemas.microsoft.com/winfx/2006/xaml" 4 xmlns:d="http://schemas.microsoft.com/expression/blend/2008" 5 xmlns:mc="http://schemas.openxmlformats.org/markup-compatibility/2006" 6 xmlns:sys="clr-namespace:System;assembly=mscorlib" 7 xmlns:Controls="clr-namespace:System.Windows.Controls;assembly=System.Windows.Controls" 8 mc:Ignorable="d" d:DesignWidth="640" d:DesignHeight="480"> 9 <Grid x:Name="LayoutRoot">10 <Controls:TreeView>11 <sys:String>树形演示1sys:String>12 <sys:String>树形演示2sys:String>13 <sys:String>树形演示3sys:String>14 Controls:TreeView>15 Grid>16 UserControl>17
运行结果:
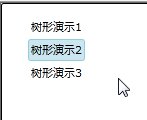
同样,也可以添加ItemTemplate到Treeview控件,
Code highlighting produced by Actipro CodeHighlighter (freeware)
http://www.CodeHighlighter.com/
--> 1 <UserControl x:Class="TreeviewDemo.MainPage" 2 xmlns="http://schemas.microsoft.com/winfx/2006/xaml/presentation" 3 xmlns:x="http://schemas.microsoft.com/winfx/2006/xaml" 4 xmlns:d="http://schemas.microsoft.com/expression/blend/2008" 5 xmlns:mc="http://schemas.openxmlformats.org/markup-compatibility/2006" 6 xmlns:sys="clr-namespace:System;assembly=mscorlib" 7 xmlns:Controls="clr-namespace:System.Windows.Controls;assembly=System.Windows.Controls" 8 mc:Ignorable="d" d:DesignWidth="640" d:DesignHeight="480"> 9 <Grid x:Name="LayoutRoot">10 <Controls:TreeView>11 <Controls:TreeView.ItemTemplate>12 <DataTemplate>13 <TextBlock Foreground="Green" Text="{Binding}" />14 DataTemplate>15 Controls:TreeView.ItemTemplate>16 <sys:String>树型演示1sys:String>17 <sys:String>树型演示2sys:String>18 <sys:String>树型演示3sys:String>19 Controls:TreeView>20 Grid>21 UserControl>22
运行结果:
从上面,我们可以看出,ListBox和Treeview有很多相似之处,在一些情况下基本可以替换使用,但是,这两个控件也有明显的区别。TreeView控件在建立选项的时候,使用的是TreeViewItem类,而TreeViewItem是HeaderedItemsControl(详细定义可以查看MSDN http://msdn.microsoft.com/en-us/library/system.windows.controls.treeviewitem(VS.95).aspx),作为HeaderedItemsControl,可以将控件选项内容赋值到Header或者HeaderTemplate属性中。这里,我们可以简单的理解,HeaderedItemsControl的Header/HeaderTemplate和ContentControl的Content/ContentTemplate功能是相同的,都是呈现内容的载体。 所以,在ListBox中,选项是被绑定到ListBoxItem的content属性中,而在Treeview控件中,选项是被绑定到TreeViewItem的Header属性中。同样,TreeView的ItemTemplate绑定也可以使用TreeviewItem的HeaderTemplate属性进行绑定,结果是相同的。根据上面所述,可以得到下面的代码:
Code highlighting produced by Actipro CodeHighlighter (freeware)
http://www.CodeHighlighter.com/
--> 1 <UserControl x:Class="TreeviewDemo.MainPage" 2 xmlns="http://schemas.microsoft.com/winfx/2006/xaml/presentation" 3 xmlns:x="http://schemas.microsoft.com/winfx/2006/xaml" 4 xmlns:d="http://schemas.microsoft.com/expression/blend/2008" 5 xmlns:mc="http://schemas.openxmlformats.org/markup-compatibility/2006" 6 xmlns:sys="clr-namespace:System;assembly=mscorlib" 7 xmlns:Controls="clr-namespace:System.Windows.Controls;assembly=System.Windows.Controls" 8 mc:Ignorable="d" d:DesignWidth="640" d:DesignHeight="480"> 9 <Grid x:Name="LayoutRoot">10 <Controls:TreeView>11 <Controls:TreeViewItem Header="树型演示1">12 <Controls:TreeViewItem.HeaderTemplate>13 <DataTemplate x:Name="myTemplate">14 <TextBlock Foreground="Green" Text="{Binding}" />15 DataTemplate>16 Controls:TreeViewItem.HeaderTemplate>17 Controls:TreeViewItem>18 <Controls:TreeViewItem Header="树型演示2" HeaderTemplate="{Binding ElementName=myTemplate}" />19 <Controls:TreeViewItem Header="树型演示3" HeaderTemplate="{Binding ElementName=myTemplate}" />20 Controls:TreeView>21 Grid>22 UserControl>23
运行结果和上面相同:
相信通过上面的演示,大家已经基本理解ItemsControl的Template使用,根据上述,我们可以延伸到HierarchicalDataTemplate,使用HierarchicalDataTemplate我们需要建立一个例程数据类供TreeView调用。
Code highlighting produced by Actipro CodeHighlighter (freeware)
http://www.CodeHighlighter.com/
--> 1 public class Country 2 { 3 public Country() 4 { 5 Privinces = new ObservableCollection<Province>(); 6 } 7 8 public string Name { get; set; } 9 public ObservableCollection<Province> Privinces { get; set; }10 }11 12 public class Province13 {14 public Province()15 {16 Citys = new ObservableCollection<City>();17 }18 19 public string Name { get; set; }20 public ObservableCollection<City> Citys { get; set; }21 }22 23 public class City24 {25 public string Name { get; set; }26 }
然后建立例程数据,代码如下:

 代码
代码 Code highlighting produced by Actipro CodeHighlighter (freeware)
http://www.CodeHighlighter.com/
--> 1 tvDemo.ItemsSource = new ObservableCollection<Country> { 2 new Country { 3 Name = "中国", 4 Privinces = { new Province 5 { 6 Name="山东省", 7 Citys = { 8 new City { Name = "济南市" }, 9 new City { Name= "淄博市" }10 }11 },12 new Province 13 { 14 Name="广东省", 15 Citys = { 16 new City { Name = "广州市" },17 new City { Name= "佛山市" }18 }19 }20 }21 },22 new Country { 23 Name = "加拿大", 24 Privinces = { new Province 25 { 26 Name="哥伦比亚省",27 Citys = { 28 new City { Name = "温哥华市" },29 new City { Name= "维多利亚市" }30 }31 },32 new Province 33 { 34 Name="阿尔伯塔省", 35 Citys = { 36 new City { Name = "埃德蒙顿市" },37 new City { Name= "卡尔加里市" }38 }39 }40 }41 }42 };
首先我们使用TreeView的ItemTemplate来显示该数据树形结构,前台代码:
Code highlighting produced by Actipro CodeHighlighter (freeware)
http://www.CodeHighlighter.com/
-->1 <Controls:TreeView x:Name="tvDemo">2 <Controls:TreeView.ItemTemplate>3 <DataTemplate>4 <TextBlock Text="{Binding Name}" />5 DataTemplate>6 Controls:TreeView.ItemTemplate>7 Controls:TreeView>
显示结果如下:

这里Treeview控件建立了两个TreeViewItems,并且绑定TreeViewitem的Header属性到Country对象,而且将TreeViewItem的HeaderTemplate设置为TreeView的ItemTemplate。下面,我们需要子数据同时绑定到Treeview控件中,这里我们需要使用HierarchicalDataTemplate。在使用HierarchicalDataTemplate前,需要声明新的命名空间:
Code highlighting produced by Actipro CodeHighlighter (freeware)
http://www.CodeHighlighter.com/
-->xmlns:common="clr-namespace:System.Windows;assembly=System.Windows.Controls"
其实HierarchicalDataTemplate是一个带有多个扩展属性DataTemplate。 如果我们不使用这些扩展属性,HierarchicalDataTemplate和普通DataTemplate是相同的,例如,我们修改上面代码:
Code highlighting produced by Actipro CodeHighlighter (freeware)
http://www.CodeHighlighter.com/
-->1 <Controls:TreeView x:Name="tvDemo">2 <Controls:TreeView.ItemTemplate>3 <common:HierarchicalDataTemplate>4 <TextBlock Text="{Binding Name}" />5 common:HierarchicalDataTemplate>6 Controls:TreeView.ItemTemplate>7 Controls:TreeView>8
显示结果和上面相同:
所谓HierarchicalDataTemplate的扩展属性,主要是ItemsSource和ItemTemplate两个属性。其中ItemsSource属性可以获取TreeView.ItemsSource的数据,ItemTemplate可以获取到TreeViewItem.ItemTemplate模板。根据这两个属性,我们可以修改以上代码,获取到子数据。通常来说,我们会把HierarchicalDataTemplate定义在Resource中,这样可以使代码布局整洁,另外提高易读性。
Code highlighting produced by Actipro CodeHighlighter (freeware)
http://www.CodeHighlighter.com/
--> 1 <UserControl.Resources> 2 <common:HierarchicalDataTemplate x:Key="CityTemplate"> 3 <StackPanel> 4 <TextBlock Text="{Binding Name}"/> 5 StackPanel> 6 common:HierarchicalDataTemplate> 7 <common:HierarchicalDataTemplate x:Key="ProvinceTemplate" ItemsSource="{Binding Citys}" ItemTemplate="{StaticResource CityTemplate}"> 8 <StackPanel> 9 <TextBlock Text="{Binding Name}" Foreground="Green"/>10 StackPanel>11 common:HierarchicalDataTemplate>12 <common:HierarchicalDataTemplate x:Key="CountryTemplate" ItemsSource="{Binding Privinces}" ItemTemplate="{StaticResource ProvinceTemplate}">13 <TextBlock Text="{Binding Name}" Foreground="Blue"/>14 common:HierarchicalDataTemplate>15 UserControl.Resources>
在Resource中设置完HierarchicalDataTemplate,在TreeView控件中调用ItemTemplate就可以了。
Code highlighting produced by Actipro CodeHighlighter (freeware)
http://www.CodeHighlighter.com/
--><Controls:TreeView x:Name="tvDemo" ItemTemplate="{StaticResource CountryTemplate}">Controls:TreeView>
显示结果如下:
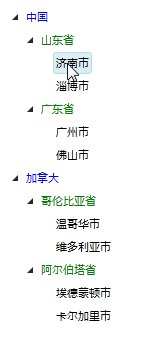
值得注意的是,在定义资源文件的时候,设置CityTemplate,ProvinceTemplate和CountryTemplate的顺序不能交换,否则无法查找到相关资源模板,同时,该资源文件也需要放在TreeView控件声明前,否则也是无法找到相关资源模板。
感谢 银光中国网 (SilverlightChina.Net) 提供空间发布代码和演示。
在线演示: http://silverlightchina.net/html/tips/2009/1211/391.html
源码下载: http://silverlightchina.net/uploads/soft/091211/1-091211164055.zip
(转载请注明出处)
[@more@]来自 “ ITPUB博客 ” ,链接:https://blog.itpub.net/20061902/viewspace-1029680/ ,如需转载,请注明出处,否则将追究法律责任。

-
博文量4
-
访问量10711
