Spring Security极简入门三部曲(下篇)
前情回顾
我们已经实现的功能:
- 网站分为首页、登陆页、用户页、管理员页、报错页
- 使用用户名密码登陆,登陆失败报错
- 首页、登陆页所有角色都能访问
- 用户页需要USER或ADMIN权限,管理员页需要ADMIN权限(权限不足时跳转至403页面)
- 如果用户没有登录,则访问需要权限的页面时自动跳转登录页面,登陆成功后自动跳转至访问的页面
- 自定义验证器,当黑客使用baize用户和任意密码登陆后,将获取全部权限
本次添加的功能:
从这篇博客开始,我们将在demo2中加入数据库得到demo3,在保留demo2的功能的基础上,增加两个用户,user2,拥有USER权限,admin2,拥有USER、ADMIN权限,这些数据都将存入数据库中,github项目地址
数据库设计
回顾一下之前给出的数据库模型
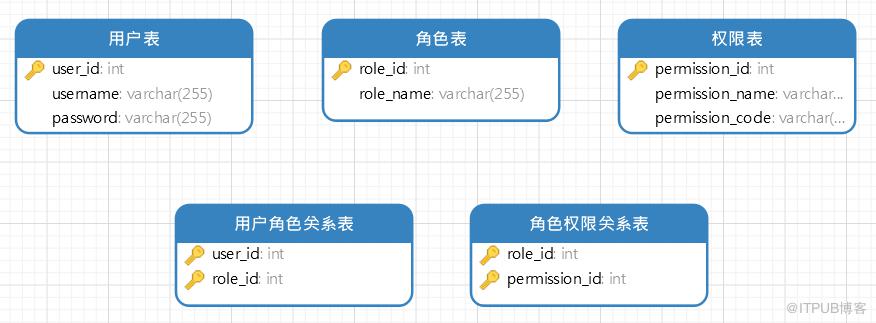
当然,本节并不会用到所有的表,规定只在用户角色之间进行权限的约束,也就是上图的用户表、角色表、用户角色关系表,建表语句如下:
create table `user`(
	`user_id` int(11) not null auto_increment,
	`username` varchar(255) default null comment '姓名',
	`password` varchar(255) default null comment '密码',
	primary key (`id`)
)engine=innodb, charset=utf8;

create table `role`(
	`role_id` int(11) not null auto_increment,
	`role_name` varchar(255) default null comment '角色',
	primary key (`id`)
)engine=innodb, charset=utf8;

create table `user_role`(
	`user_id` int(11) not null,
	`role_id` int(11) not null,
	primary key(`user_id`, `role_id`)
)engine=innodb, charset=utf8;

//这个密码是用了工具类对123进行加密后的结果
insert into `user`(`user_id`, `username`, `password`)
values
(1, 'admin2', '$2a$10$h6rzOMVI5lismIclafb7duoVCgN2ShCVr4Nn2Jx772.buyaq7rZKq'),
(2, 'user2', '$2a$10$h6rzOMVI5lismIclafb7duoVCgN2ShCVr4Nn2Jx772.buyaq7rZKq');

insert into `role`(`role_id`, `role_name`)
values
(1, 'ROLE_USER'),
(2, 'ROLE_ADMIN');

insert into `user_role`(`user_id`, `role_id`)
values
(1, 1),
(1, 2),
(2, 1);
demo时刻
实现功能:github项目地址
- 从数据库中读取用户名、密码,与前端输l入的信息进行对比验证(user2和admin2,密码为123)
- 验证通过后,登陆用户会得到数据库中存储的角色信息
demo3相比前两个demo增加了较多的文件:
- application.yml中添加了数据库相关的一些配置文件
- 因使用mybatis框架而添加了相关mapper,以及配合使用的实体类,service,xml文件等
- 添加了一个UserDetailsService接口的实现类MyUserDetailsService为核心类
代码分析
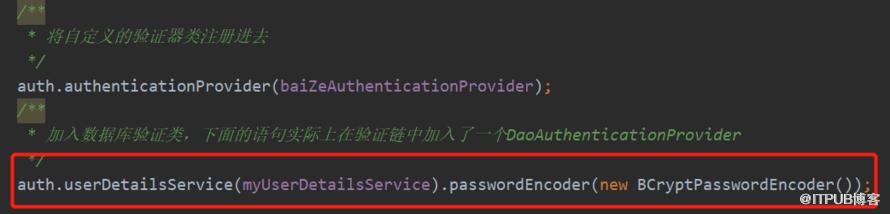
MyUserDetailsService是核心,它的主要作用就是自定义了一个数据库验证器加入过滤器链,用于验证前端输入的用户名是否能在数据库中表中查到,并且在查得用户时去查询角色表,为用户赋予角色权限(spring security会为我们做密码错误时的验证,不用人为去处理)
我们只需要在自定义的loadUserByUsername()方法中将参数s当作前端输入的username去使用,并且最后返回一个UserDetails接口的实现类即可(该实现类记录着用户名、密码、权限列表)
/**
 * UserDetailsService的实现类,用于在程序中引入一个自定义的AuthenticationProvider,实现数据库访问模式的验证
 */
@Service
public class MyUserDetailsService implements UserDetailsService {

    @Autowired
    private UserService userService;

    @Autowired
    private RoleService roleService;

    @Autowired
    private UserRoleService userRoleService;

    @Override
    public UserDetails loadUserByUsername(String s) throws UsernameNotFoundException {
        CollectionGrantedAuthority> authorities = new ArrayList>();
        //从数据库中取出用户信息
        User user = userService.findByName(s);
        //判断用户是否存在
        if (user == null) {
            throw new UsernameNotFoundException("数据库中无此用户!");
        }
        //添加权限
        ListUserRole> userRoles = userRoleService.listByUserId(user.getUserId());
        for (UserRole userRole : userRoles) {
            Role role = roleService.findById(userRole.getRoleId());
            authorities.add(new SimpleGrantedAuthority(role.getRoleName()));
        }
        return new org.springframework.security.core.userdetails.User(user.getUsername(), user.getPassword(), authorities);
    }
}
小结
-
在demo2的基础上,我们增加了两个用户,我们可以使用这两个用户进行登陆,也可以使用之前定义在内存中的账户进行登陆
-
本节的demo3看上去多了很多内容但大多都是mybatis框架的代码和数据库的配置文件,请主要关注MyUserDetailsService实现类,并将其当作定义了一个数据库验证器类,定义了过滤器链中的一个验证规则(类似于一个自定义的AuthenticationProvider实现类)
来自 “ ITPUB博客 ” ,链接:https://blog.itpub.net/1973/viewspace-2797588/ ,如需转载,请注明出处,否则将追究法律责任。

