那么我们这次的统一处理异常的方案是什么呢????
我们知道Java中的异常可以分为两类
- 编译时期异常
- 运行期异常
对于运行期异常我们是无法掌控的,只能通过代码质量、在系统测试时详细测试等排除运行时异常
而对于编译时期的异常,我们可以在代码手动处理异常可以try/catch捕获,可以向上抛出。
我们可以换个思路,自定义一个模块化的异常信息,比如:商品类别的异常
public class CustomException extends Exception {

    //异常信息
    private String message;

    public CustomException(String message){
        super(message);
        this.message = message;

    }

    public String getMessage() {
        return message;
    }

    public void setMessage(String message) {
        this.message = message;
    }

}我们在查看Spring源码的时候发现:前端控制器DispatcherServlet在进行HandlerMapping、调用HandlerAdapter执行Handler过程中,如果遇到异常,在系统中自定义统一的异常处理器,写系统自己的异常处理代码。。
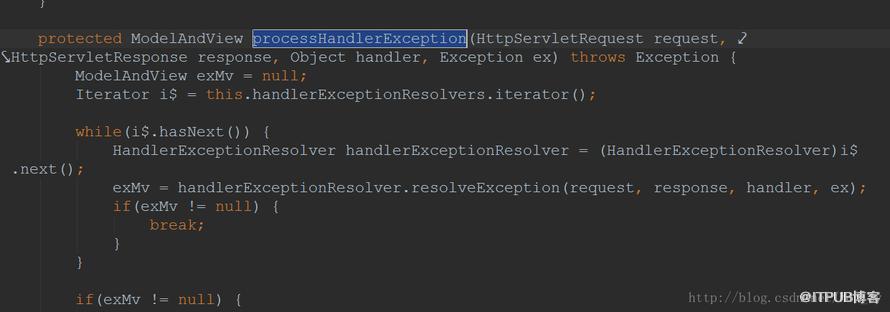
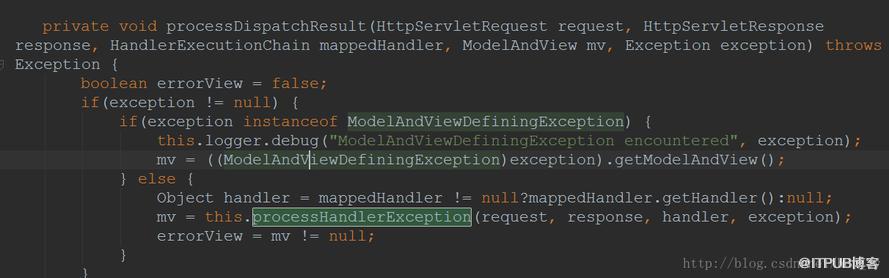
我们也可以学着点,定义一个统一的处理器类来处理异常...
综合上面的解释,我们总结一下什么是RESTful架构:
- (1)每一个URI代表一种资源;
- (2)客户端和服务器之间,传递这种资源的某种表现层;
- (3)客户端通过四个HTTP动词,对服务器端资源进行操作,实现"表现层状态转化"。
关于RESTful幂等性的理解:http://www.oschina.net/translate/put-or-post
简单来说,如果对象在请求的过程中会发生变化(以Java为例子,属性被修改了),那么此是非幂等的。多次重复请求,结果还是不变的话,那么就是幂等的。
PUT用于幂等请求,因此在更新的时候把所有的属性都写完整,那么多次请求后,我们其他属性是不会变的
在上边的文章中,幂等被翻译成“状态统一性”。这就更好地理解了。
其实一般的架构并不能完全支持RESTful的,因此,只要我们的系统支持RESTful的某些功能,我们一般就称作为支持RESTful架构...
RESTful的url是简洁的:http:// localhost:8080/items/editItems/1
更改DispatcherServlet的配置
从上面我们可以发现,url并没有.action后缀的,因此我们要修改核心分配器的配置
<!-- restful的配置 -->
springmvc_rest org.springframework.web.servlet.DispatcherServlet <!-- 加载springmvc配置 -->contextConfigLocation <!-- 配置文件的地址 如果不配置contextConfigLocation, 默认查找的配置文件名称classpath下的:servlet名称+"-serlvet.xml"即:springmvc-serlvet.xml -->classpath:spring/springmvc.xml springmvc_rest <!-- rest方式配置为/ -->/ 在Controller上使用PathVariable注解来绑定对应的参数
    //根据商品id查看商品信息rest接口
    //@RequestMapping中指定restful方式的url中的参数,参数需要用{}包起来
    //@PathVariable将url中的{}包起参数和形参进行绑定
    @RequestMapping("/viewItems/{id}")
    public @ResponseBody ItemsCustom viewItems(@PathVariable("id") Integer id) throws Exception{
        //调用 service查询商品信息
        ItemsCustom itemsCustom = itemsService.findItemsById(id);

        return itemsCustom;

    }
当DispatcherServlet拦截/开头的所有请求,对静态资源的访问就报错:我们需要配置对静态资源的解析
<!-- 静态资源 解析 -->
/**就表示不管有多少层,都对其进行解析,/*代表的是当前层的所有资源..
SpringMVC拦截器
在Struts2中拦截器就是我们当时的核心,原来在SpringMVC中也是有拦截器的
用户请求到DispatherServlet中,DispatherServlet调用HandlerMapping查找Handler,HandlerMapping返回一个拦截的链儿(多个拦截),springmvc中的拦截器是通过HandlerMapping发起的。
实现拦截器的接口:
public class HandlerInterceptor1 implements HandlerInterceptor {

    //在执行handler之前来执行的
    //用于用户认证校验、用户权限校验
    @Override
    public boolean preHandle(HttpServletRequest request,
            HttpServletResponse response, Object handler) throws Exception {

        System.out.println("HandlerInterceptor1...preHandle");

        //如果返回false表示拦截不继续执行handler,如果返回true表示放行
        return false;
    }
    //在执行handler返回modelAndView之前来执行
    //如果需要向页面提供一些公用 的数据或配置一些视图信息,使用此方法实现 从modelAndView入手
    @Override
    public void postHandle(HttpServletRequest request,
            HttpServletResponse response, Object handler,
            ModelAndView modelAndView) throws Exception {
        System.out.println("HandlerInterceptor1...postHandle");

    }
    //执行handler之后执行此方法
    //作系统 统一异常处理,进行方法执行性能监控,在preHandle中设置一个时间点,在afterCompletion设置一个时间,两个时间点的差就是执行时长
    //实现 系统 统一日志记录
    @Override
    public void afterCompletion(HttpServletRequest request,
            HttpServletResponse response, Object handler, Exception ex)
            throws Exception {
        System.out.println("HandlerInterceptor1...afterCompletion");
    }

}
配置拦截器
    <!--拦截器 -->
    <!--多个拦截器,顺序执行 --><!--


--><!-- /**可以拦截路径不管多少层 --> 如果两个拦截器都放行
测试结果:
HandlerInterceptor1...preHandle
HandlerInterceptor2...preHandle

HandlerInterceptor2...postHandle
HandlerInterceptor1...postHandle

HandlerInterceptor2...afterCompletion
HandlerInterceptor1...afterCompletion

总结:
执行preHandle是顺序执行。
执行postHandle、afterCompletion是倒序执行
1 号放行和2号不放行
测试结果:
HandlerInterceptor1...preHandle
HandlerInterceptor2...preHandle
HandlerInterceptor1...afterCompletion

总结:
如果preHandle不放行,postHandle、afterCompletion都不执行。
只要有一个拦截器不放行,controller不能执行完成
1 号不放行和2号不放行
测试结果:
HandlerInterceptor1...preHandle
总结:
只有前边的拦截器preHandle方法放行,下边的拦截器的preHandle才执行。
日志拦截器或异常拦截器要求
- 将日志拦截器或异常拦截器放在拦截器链儿中第一个位置,且preHandle方法放行
拦截器拦截
public class LoginInterceptor implements HandlerInterceptor {

    //在执行handler之前来执行的
    //用于用户认证校验、用户权限校验
    @Override
    public boolean preHandle(HttpServletRequest request,
            HttpServletResponse response, Object handler) throws Exception {

        //得到请求的url
        String url = request.getRequestURI();

        //判断是否是公开 地址
        //实际开发中需要公开 地址配置在配置文件中
        //...
        if(url.indexOf("login.action")>=0){
            //如果是公开 地址则放行
            return true;
        }

        //判断用户身份在session中是否存在
        HttpSession session = request.getSession();
        String usercode = (String) session.getAttribute("usercode");
        //如果用户身份在session中存在放行
        if(usercode!=null){
            return true;
        }
        //执行到这里拦截,跳转到登陆页面,用户进行身份认证
        request.getRequestDispatcher("/WEB-INF/jsp/login.jsp").forward(request, response);

        //如果返回false表示拦截不继续执行handler,如果返回true表示放行
        return false;
    }
    //在执行handler返回modelAndView之前来执行
    //如果需要向页面提供一些公用 的数据或配置一些视图信息,使用此方法实现 从modelAndView入手
    @Override
    public void postHandle(HttpServletRequest request,
            HttpServletResponse response, Object handler,
            ModelAndView modelAndView) throws Exception {
        System.out.println("HandlerInterceptor1...postHandle");

    }
    //执行handler之后执行此方法
    //作系统 统一异常处理,进行方法执行性能监控,在preHandle中设置一个时间点,在afterCompletion设置一个时间,两个时间点的差就是执行时长
    //实现 系统 统一日志记录
    @Override
    public void afterCompletion(HttpServletRequest request,
            HttpServletResponse response, Object handler, Exception ex)
            throws Exception {
        System.out.println("HandlerInterceptor1...afterCompletion");
    }

}
Controller
@Controller
public class LoginController {

    //用户登陆提交方法
    @RequestMapping("/login")
    public String login(HttpSession session, String usercode,String password)throws Exception{

        //调用service校验用户账号和密码的正确性
        //..

        //如果service校验通过,将用户身份记录到session
        session.setAttribute("usercode", usercode);
        //重定向到商品查询页面
        return "redirect:/items/queryItems.action";
    }

    //用户退出
    @RequestMapping("/logout")
    public String logout(HttpSession session)throws Exception{

        //session失效
        session.invalidate();
        //重定向到商品查询页面
        return "redirect:/items/queryItems.action";

    }

}
- 使用Spring的校验方式就是将要校验的属性前边加上注解声明。
- 在Controller中的方法参数上加上@Validation注解。那么SpringMVC内部就会帮我们对其进行处理(创建对应的bean,加载配置文件)
- BindingResult可以拿到我们校验错误的提示
- 分组校验就是将让我们的校验更加灵活:某方法需要校验这个属性,而某方法不用校验该属性。我们就可以使用分组校验了。
- 对于处理异常,SpringMVC是用一个统一的异常处理器类的。实现了HandlerExceptionResolver接口。
- 对模块细分多个异常类,都交由我们的统一异常处理器类进行处理。
- 对于RESTful规范,我们可以使用SpringMVC简单地支持的。将SpringMVC的拦截.action改成是任意的。同时,如果是静态的资源文件,我们应该设置不拦截。
- 对于url上的参数,我们可以使用@PathVariable将url中的{}包起参数和形参进行绑定
- SpringMVC的拦截器和Struts2的拦截器差不多。不过SpringMVC的拦截器配置起来比Struts2的要简单。
- 至于他们的拦截器链的调用顺序,和Filter的是没有差别的。
来自 “ ITPUB博客 ” ,链接:https://blog.itpub.net/1369/viewspace-2799844/ ,如需转载,请注明出处,否则将追究法律责任。

