Android系统中的广播(Broadcast)机制简要介绍和学习计划 .(二)
- xml version="1.0" encoding="utf-8"?>
- <LinearLayout xmlns:android="http://schemas.android.com/apk/res/android"
- android:orientation="vertical"
- android:layout_width="fill_parent"
- android:layout_height="fill_parent"
- android:gravity="center">
- <LinearLayout
- android:layout_width="fill_parent"
- android:layout_height="wrap_content"
- android:layout_marginBottom="10px"
- android:orientation="horizontal"
- android:gravity="center">
- <TextView
- android:layout_width="wrap_content"
- android:layout_height="wrap_content"
- android:layout_marginRight="4px"
- android:gravity="center"
- android:text="@string/counter">
- TextView>
- <TextView
- android:id="@+id/textview_counter"
- android:layout_width="wrap_content"
- android:layout_height="wrap_content"
- android:gravity="center"
- android:text="0">
- TextView>
- LinearLayout>
- <LinearLayout
- android:layout_width="fill_parent"
- android:layout_height="wrap_content"
- android:orientation="horizontal"
- android:gravity="center">
- <Button
- android:id="@+id/button_start"
- android:layout_width="wrap_content"
- android:layout_height="wrap_content"
- android:gravity="center"
- android:text="@string/start">
- Button>
- <Button
- android:id="@+id/button_stop"
- android:layout_width="wrap_content"
- android:layout_height="wrap_content"
- android:gravity="center"
- android:text="@string/stop" >
- Button>
- LinearLayout>
- LinearLayout>
这个界面配置文件也很简单,等一下我们在模拟器把这个应用程序启动起来后,就可以看到它的截图了。
应用程序用到的字符串资源文件位于res/values/strings.xml文件中:
- xml version="1.0" encoding="utf-8"?>
- <resources>
- <string name="app_name">Broadcaststring>
- <string name="counter">Counter: string>
- <string name="start">Start Counterstring>
- <string name="stop">Stop Counterstring>
- resources>
最后,我们还要在工程目录下放置一个编译脚本文件Android.mk:Broadcast Counter: Start Counter Stop Counter
- LOCAL_PATH:= $(call my-dir)
- include $(CLEAR_VARS)
- LOCAL_MODULE_TAGS := optional
- LOCAL_SRC_FILES := $(call all-subdir-java-files)
- LOCAL_PACKAGE_NAME := Broadcast
- include $(BUILD_PACKAGE)
LOCAL_PATH:= $(call my-dir)
include $(CLEAR_VARS)

LOCAL_MODULE_TAGS := optional

LOCAL_SRC_FILES := $(call all-subdir-java-files)

LOCAL_PACKAGE_NAME := Broadcast

include $(BUILD_PACKAGE) 接下来就要编译了。有关如何单独编译Android源代码工程的模块,以及如何打包system.img,请参考如何单独编译Android源代码中的模块一文。执行以下命令进行编译和打包:
- USER-NAME@MACHINE-NAME:~/Android$ mmm packages/experimental/Broadcast
- USER-NAME@MACHINE-NAME:~/Android$ make snod
USER-NAME@MACHINE-NAME:~/Android$ mmm packages/experimental/Broadcast
USER-NAME@MACHINE-NAME:~/Android$ make snod
这样,打包好的Android系统镜像文件system.img就包含我们前面创建的Broadcast应用程序了。
再接下来,就是运行模拟器来运行我们的例子了。关于如何在Android源代码工程中运行模拟器,请参考在Ubuntu上下载、编译和安装Android最新源代码一文。
执行以下命令启动模拟器:
- USER-NAME@MACHINE-NAME:~/Android$ emulator
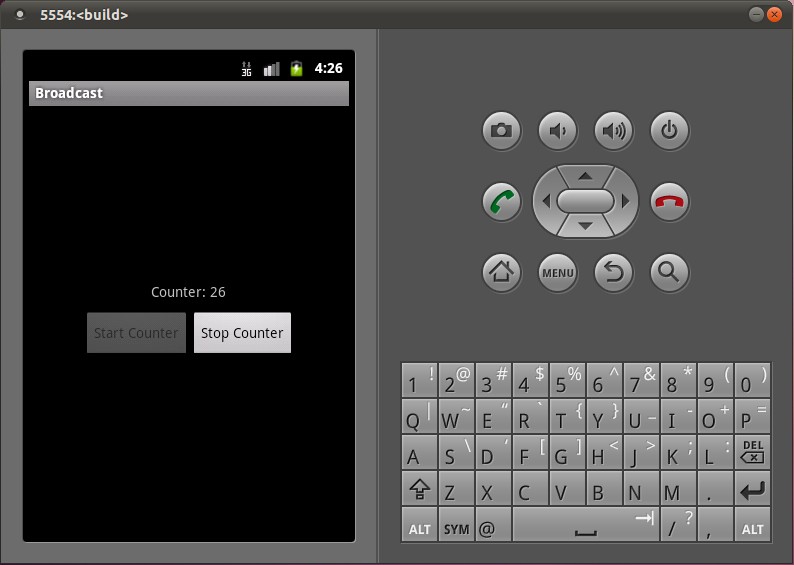
USER-NAME@MACHINE-NAME:~/Android$ emulator模拟器启动起,就可以App Launcher中找到Broadcast应用程序图标,接着把它启动起来,然后点击界面上的Start Counter按钮,就可以把计数器服务启动起来了,计数器服务又通过广播把计数值反馈给MainActivity,于是,我们就会在MainActivity界面看到计数器的值不断地增加了:
这样,使用广播的例子就介绍完了。回顾一下,使用广播的两个步骤:
1. 广播的接收者需要通过调用registerReceiver函数告诉系统,它对什么样的广播有兴趣,即指定IntentFilter,并且向系统注册广播接收器,即指定BroadcastReceiver:
- IntentFilter counterActionFilter = new IntentFilter(CounterService.BROADCAST_COUNTER_ACTION);
- registerReceiver(counterActionReceiver, counterActionFilter);
IntentFilter counterActionFilter = new IntentFilter(CounterService.BROADCAST_COUNTER_ACTION);
registerReceiver(counterActionReceiver, counterActionFilter);
这里,指定感兴趣的广播就是CounterService.BROADCAST_COUNTER_ACTION了,而指定的广播接收器就是counterActonReceiver,它是一个BroadcastReceiver类型的实例。
- Intent intent = new Intent(BROADCAST_COUNTER_ACTION);
- intent.putExtra(COUNTER_VALUE, counter);
- sendBroadcast(intent)
Intent intent = new Intent(BROADCAST_COUNTER_ACTION);
intent.putExtra(COUNTER_VALUE, counter);
sendBroadcast(intent)
这里,指定的广播为CounterService.BROADCAST_COUNTER_ACTION,并且附带的带参数当前的计数器值counter。调用了sendBroadcast函数之后,所有注册了CounterService.BROADCAST_COUNTER_ACTION广播的接收者便可以收到这个广播了。
在第1步中,广播的接收者把广播接收器注册到ActivityManagerService中;在第2步中,广播的发送者同样是把广播发送到ActivityManagerService中,由ActivityManagerService去查找注册了这个广播的接收者,然后把广播分发给它们。
在第2步的分发的过程,其实就是把这个广播转换成一个消息,然后放入到接收器所在的线程消息队列中去,最后就可以在消息循环中调用接收器的onReceive函数了。这里有一个要非常注意的地方是,由于ActivityManagerService把这个广播放进接收器所在的线程消息队列后,就返回了,它不关心这个消息什么时候会被处理,因此,对广播的处理是异步的,即调用sendBroadcast时,这个函数不会等待这个广播被处理完后才返回。
下面,我们以一个序列图来总结一下,广播的注册和发送的过程:
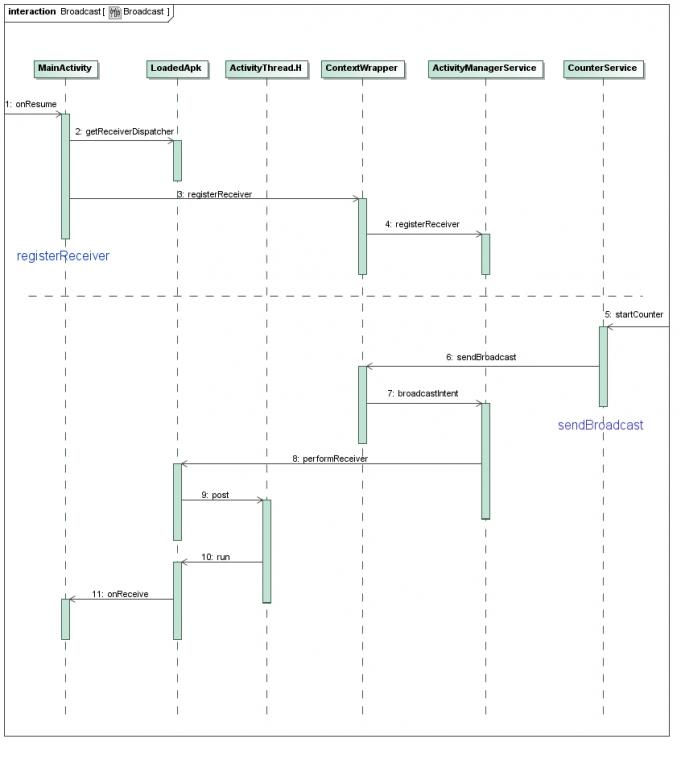
虚线上面Step 1到Step 4步是注册广播接收器的过程,其中Step 2通过LoadedApk.getReceiverDispatcher在LoadedApk内部创建了一个IIntentReceiver接口,并且传递给ActivityManagerService;虚线下面的Step 5到Step 11是发送广播的过程,在Step 8中,ActivityManagerService利用上面得到的IIntentReceiver远程接口,调用LoadedApk.performReceiver接口,LoadedApk.performReceiver接口通过ActivityThread.H接口的post函数将这个广播消息放入到ActivityThread的消息队列中去,最后这个消息在LoadedApk的Args.run函数中处理,LoadedApk.Args.run函数接着调用MainActivity.BroadcastReceiver的onReceive函数来最终处理这个广播。
原博客链接:http://blog.csdn.net/luoshengyang/article/details/6730748

本文节选自《Android系统源代码情景分析》
电子工业出版社出版
罗升阳 著
来自 “ ITPUB博客 ” ,链接:https://blog.itpub.net/13164110/viewspace-748090/ ,如需转载,请注明出处,否则将追究法律责任。

