
众所周知 HashMap 是一个无序的 Map,因为每次根据 key 的 hashcode 映射到 Entry 数组上,所以遍历出来的顺序并不是写入的顺序。
因此 JDK 推出一个基于 HashMap 但具有顺序的 LinkedHashMap 来解决有排序需求的场景。
它的底层是继承于 HashMap 实现的,由一个双向链表所构成。
LinkedHashMap 的排序方式有两种:
根据写入顺序排序。
根据访问顺序排序。
其中根据访问顺序排序时,每次 get 都会将访问的值移动到链表末尾,这样重复操作就能的到一个按照访问顺序排序的链表。
数据结构
    @Test
    public void test(){
        Map map = new LinkedHashMap();
        map.put("1",1) ;
        map.put("2",2) ;
        map.put("3",3) ;
        map.put("4",4) ;
        map.put("5",5) ;
        System.out.println(map.toString());

    }
调试可以看到 map 的组成:
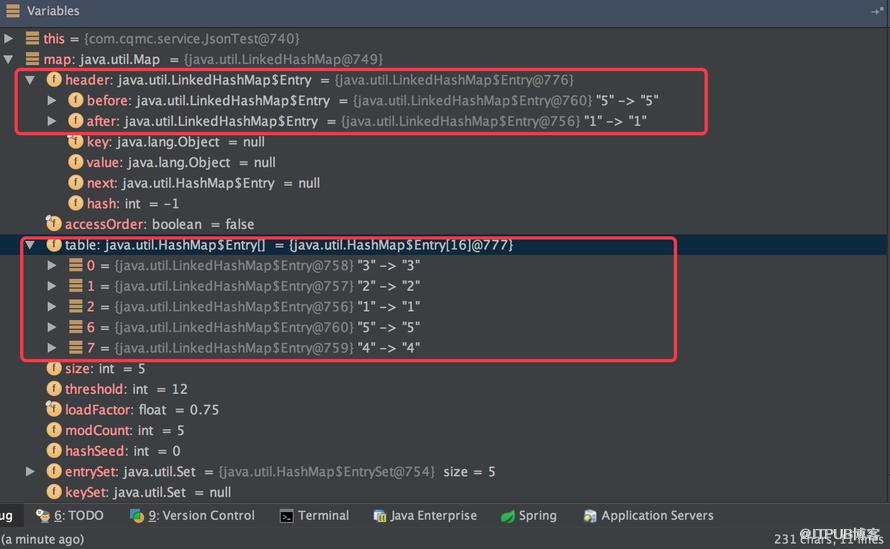
打开源码可以看到:
/** * The head of the doubly linked list. */ private transient Entryheader; /** * The iteration ordering method for this linked hash map: true * for access-order, false for insertion-order. * * @serial */ private final boolean accessOrder; private static class Entry extends HashMap.Entry { // These fields comprise the doubly linked list used for iteration. Entry before, after; Entry(int hash, K key, V value, HashMap.Entry next) { super(hash, key, value, next); } }
其中 Entry 继承于 HashMap 的 Entry,并新增了上下节点的指针,也就形成了双向链表。
还有一个 header 的成员变量,是这个双向链表的头结点。
上边的 demo 总结成一张图如下:
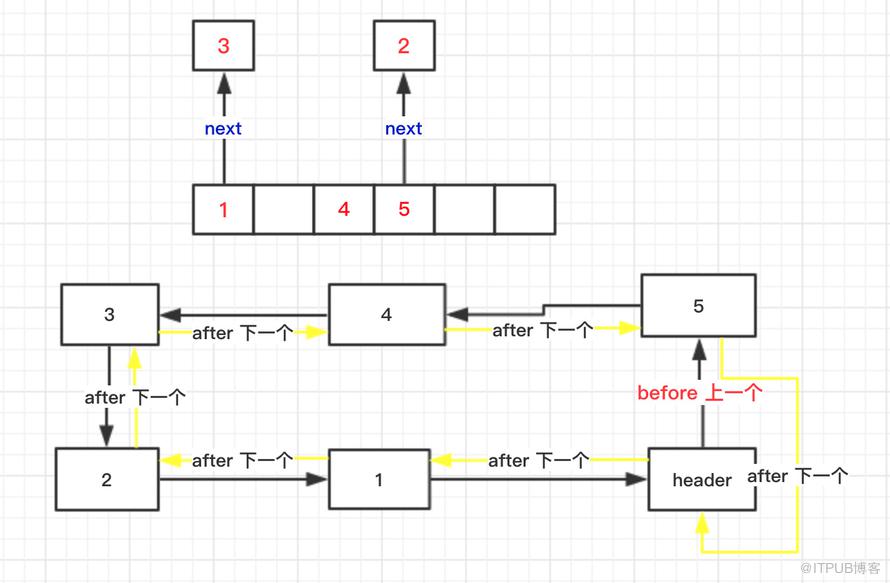
第一个类似于 HashMap 的结构,利用 Entry 中的 next 指针进行关联。
下边则是 LinkedHashMap 如何达到有序的关键。
就是利用了头节点和其余的各个节点之间通过 Entry 中的 after 和 before 指针进行关联。
其中还有一个 accessOrder 成员变量,默认是 false,默认按照插入顺序排序,为 true 时按照访问顺序排序,也可以调用:
    public LinkedHashMap(int initialCapacity,                         float loadFactor,                         boolean accessOrder) {        super(initialCapacity, loadFactor);        this.accessOrder = accessOrder;
    }
这个构造方法可以显示的传入 accessOrder。
构造方法
LinkedHashMap 的构造方法:
    public LinkedHashMap() {        super();
        accessOrder = false;
    }
其实就是调用的 HashMap 的构造方法:
HashMap 实现:
public HashMap(int initialCapacity, float loadFactor) { if (initialCapacity MAXIMUM_CAPACITY)
initialCapacity = MAXIMUM_CAPACITY; if (loadFactor 可以看到里面有一个空的 init(),具体是由 LinkedHashMap 来实现的:
@Override
void init() {
header = new Entry(-1, null, null, null);
header.before = header.after = header;
}其实也就是对 header 进行了初始化。
put 方法
看 LinkedHashMap 的 put() 方法之前先看看 HashMap 的 put 方法:
public V put(K key, V value) { if (table == EMPTY_TABLE) {
inflateTable(threshold);
} if (key == null) return putForNullKey(value); int hash = hash(key); int i = indexFor(hash, table.length); for (Entry e = table[i]; e != null; e = e.next) {
Object k; if (e.hash == hash && ((k = e.key) == key || key.equals(k))) {
V oldValue = e.value;
e.value = value; //空实现,交给 LinkedHashMap 自己实现
e.recordAccess(this); return oldValue;
}
}
modCount++; // LinkedHashMap 对其重写
addEntry(hash, key, value, i); return null;
}
// LinkedHashMap 对其重写
void addEntry(int hash, K key, V value, int bucketIndex) { if ((size >= threshold) && (null != table[bucketIndex])) {
resize(2 * table.length);
hash = (null != key) ? hash(key) : 0;
bucketIndex = indexFor(hash, table.length);
}
createEntry(hash, key, value, bucketIndex);
}
// LinkedHashMap 对其重写
void createEntry(int hash, K key, V value, int bucketIndex) {
Entry e = table[bucketIndex];
table[bucketIndex] = new Entry(hash, key, value, e);
size++;
} 主体的实现都是借助于 HashMap 来完成的,只是对其中的 recordAccess(), addEntry(), createEntry() 进行了重写。
LinkedHashMap 的实现:
//就是判断是否是根据访问顺序排序,如果是则需要将当前这个 Entry 移动到链表的末尾
void recordAccess(HashMap m) {
LinkedHashMap lm = (LinkedHashMap)m; if (lm.accessOrder) {
lm.modCount++;
remove();
addBefore(lm.header);
}
}
//调用了 HashMap 的实现,并判断是否需要删除最少使用的 Entry(默认不删除)
void addEntry(int hash, K key, V value, int bucketIndex) { super.addEntry(hash, key, value, bucketIndex); // Remove eldest entry if instructed
Entry eldest = header.after; if (removeEldestEntry(eldest)) {
removeEntryForKey(eldest.key);
}
}
void createEntry(int hash, K key, V value, int bucketIndex) {
HashMap.Entry old = table[bucketIndex];
Entry e = new Entry(hash, key, value, old); //就多了这一步,将新增的 Entry 加入到 header 双向链表中
table[bucketIndex] = e;
e.addBefore(header);
size++;
}
//写入到双向链表中
private void addBefore(Entry existingEntry) {
after = existingEntry;
before = existingEntry.before;
before.after = this;
after.before = this;
}
get 方法
LinkedHashMap 的 get() 方法也重写了:
public V get(Object key) {
Entry e = (Entry)getEntry(key); if (e == null) return null;
//多了一个判断是否是按照访问顺序排序,是则将当前的 Entry 移动到链表头部。
e.recordAccess(this); return e.value;
}
void recordAccess(HashMap m) {
LinkedHashMap lm = (LinkedHashMap)m; if (lm.accessOrder) {
lm.modCount++;
//删除
remove(); //添加到头部
addBefore(lm.header);
}
} clear() 清空就要比较简单了:
//只需要把指针都指向自己即可,原本那些 Entry 没有引用之后就会被 JVM 自动回收。
public void clear() { super.clear();
header.before = header.after = header;
}总结
总的来说 LinkedHashMap 其实就是对 HashMap 进行了拓展,使用了双向链表来保证了顺序性。
因为是继承与 HashMap 的,所以一些 HashMap 存在的问题 LinkedHashMap 也会存在,比如不支持并发等。
号外
最近在总结一些 Java 相关的知识点,感兴趣的朋友可以一起维护。
作者: crossoverJie
来自 “ ITPUB博客 ” ,链接:https://blog.itpub.net/1075/viewspace-2810831/ ,如需转载,请注明出处,否则将追究法律责任。

