一次不太成功的项目实战:HOG特征+SVM实现交通标志的检测
本文主要讲如何通过HOG特征和SVM分类器实现部分交通标志的检测。由于能力有限,本文的检测思路很简单,主要是用来自己练习编程用,也顺便发布出来供需要的人参考。本项目完整的代码可以在我的github上下载:traffic-sign-detection。博客或代码中遇到的任何问题,欢迎指出,希望能相互学习。废话不多说了,下面就来一步步介绍我的检测过程。**
https://pan.baidu.com/s/1Q0cqJI9Dnvxkj7159Be4Sw。对于负样本,可以使用python中的xml模块自己写xml标注文件,主要函数如下:from xml.dom.minidom import Documentimport osimport cv2def write_img_to_xml(imgfile, xmlfile):
"""
write xml file.
Args:
imgfile: image file.
xmlfile: output xml file.
"""
img = cv2.imread(imgfile)
img_folder, img_name = os.path.split(imgfile)
img_height, img_width, img_depth = img.shape
doc = Document()
annotation = doc.createElement("annotation")
doc.appendChild(annotation)
folder = doc.createElement("folder")
folder.appendChild(doc.createTextNode(img_folder))
annotation.appendChild(folder)
filename = doc.createElement("filename")
filename.appendChild(doc.createTextNode(img_name))
annotation.appendChild(filename)
size = doc.createElement("size")
annotation.appendChild(size)
width = doc.createElement("width")
width.appendChild(doc.createTextNode(str(img_width)))
size.appendChild(width)
height = doc.createElement("height")
height.appendChild(doc.createTextNode(str(img_height)))
size.appendChild(height)
depth = doc.createElement("depth")
depth.appendChild(doc.createTextNode(str(img_depth)))
size.appendChild(depth) with open(xmlfile, "w") as f:
doc.writexml(f, indent="t", addindent="t", newl="n", encoding="utf-8")
def write_imgs_to_xmls(imgdir, xmldir):
    img_names = os.listdir(imgdir)    for img_name in img_names:
        img_file = os.path.join(imgdir,img_name)
        xml_file = os.path.join(xmldir, img_name.split(".")[0]+".xml")        print img_name, "has been written to xml file in ", xml_file
        write_img_to_xml(img_file, xml_file)
梯度方向直方图Histogram of Oriented Gradients (HOG)。在具体的实现上是利用skimage库中的feature模块,函数如下:def hog_feature(img_array, resize=(64,64)):
"""extract hog feature from an image.
Args:
img_array: an image array.
resize: size of the image for extracture.
Return:
features: a ndarray vector.
"""
img = cv2.cvtColor(img_array, cv2.COLOR_BGR2GRAY)
img = cv2.resize(img, resize)
bins = 9
cell_size = (8, 8)
cpb = (2, 2)
norm = "L2"
features = ft.hog(img, orientations=bins, pixels_per_cell=cell_size,
cells_per_block=cpb, block_norm=norm, transform_sqrt=True) return features
def extra_hog_features_dir(img_dir, write_txt, resize=(64,64)):
"""extract hog features from images in a directory.
Args:
img_dir: image directory.
write_txt: the path of a txt file used for saving the hog features of all images.
resize: size of the image for extracture.
Return:
none.
"""
img_names = os.listdir(img_dir)
img_names = [os.path.join(img_dir, img_name) for img_name in img_names] if os.path.exists(write_txt):
os.remove(write_txt) with open(write_txt, "a") as f:
index = 0
for img_name in img_names:
img_array = cv2.imread(img_name)
features = hog_feature(img_array, resize)
label_name = img_name.split("/")[-1].split("_")[0]
label_num = img_label[label_name]
row_data = img_name + "t" + str(label_num) + "t"
for element in features:
row_data = row_data + str(round(element,3)) + " "
row_data = row_data + "n"
f.write(row_data) if index%100 == 0: print "total image number = ", len(img_names), "current image number = ", index
index += 1
def hog_feature(img_array, resize=(64,64)):
    """extract hog feature from an image.
    Args:
        img_array: an image array.
        resize: size of the image for extracture.
    Return:
    features:  a ndarray vector.
    """
    img = cv2.cvtColor(img_array, cv2.COLOR_BGR2GRAY)
    img = cv2.resize(img, resize)
    bins = 9
    cell_size = (8, 8)
    cpb = (2, 2)
    norm = "L2"
    features = ft.hog(img, orientations=bins, pixels_per_cell=cell_size,
                        cells_per_block=cpb, block_norm=norm, transform_sqrt=True)    return features
def extra_hog_features_dir(img_dir, write_txt, resize=(64,64)):
    """extract hog features from images in a directory.
    Args:
        img_dir: image directory.
        write_txt: the path of a txt file used for saving the hog features of all images.
        resize: size of the image for extracture.
    Return:
        none.
    """
    img_names = os.listdir(img_dir)
    img_names = [os.path.join(img_dir, img_name) for img_name in img_names]    if os.path.exists(write_txt):
        os.remove(write_txt)    with open(write_txt, "a") as f:
        index = 0
        for img_name in img_names:
            img_array = cv2.imread(img_name)
            features = hog_feature(img_array, resize)
            label_name = img_name.split("/")[-1].split("_")[0]
            label_num = img_label[label_name]

            row_data = img_name + "t" + str(label_num) + "t"

            for element in features:
                row_data = row_data + str(round(element,3)) + " "
            row_data = row_data + "n"
            f.write(row_data)            if index%100 == 0:                print "total image number = ", len(img_names), "current image number = ", index
            index += 1
HOG特征提取的一些参数设置可以在函数中看到,如图像尺寸为64×64,设置了9个梯度方向(bin=9)进行梯度信息统计,cell的大小为8×8,每个block包含4个cell(cpb=(2, 2)),标准化方法采用L2标准化(norm=”L2”)。
支持向量机通俗导论(理解SVM的三层境界),建议去看一看。我们这里主要是用SVM来对找到的候选区域上提取到的HOG特征做分类。这里我将分别SVM分类器的数据集创建和扩充、模型训练和测试。
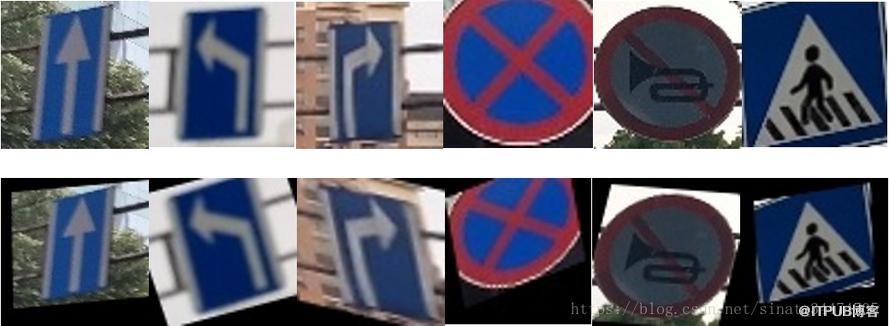
Affine Transformations ,这里也给出我对数据集仿射变换的函数:def affine(img, delta_pix):
"""affine transformation
Args:
img: a numpy image array.
delta_pix: the offset for affine.
Return:
res: affined image.
"""
rows, cols, _ = img.shape
pts1 = np.float32([[0,0], [rows,0], [0, cols]])
pts2 = pts1 + delta_pix
M = cv2.getAffineTransform(pts1, pts2)
res = cv2.warpAffine(img, M, (rows, cols)) return resdef affine_dir(img_dir, write_dir, max_delta_pix):
""" affine transformation on the images in a directory.
Args:
img_dir: image directory.
write_dir: save directory of affined images.
max_delta_pix: the maximum offset for affine.
"""
img_names = os.listdir(img_dir)
img_names = [img_name for img_name in img_names if img_name.split(".")[-1]=="jpg"] for index, img_name in enumerate(img_names):
img = cv2.imread(os.path.join(img_dir,img_name))
save_name = os.path.join(write_dir, img_name.split(".")[0]+"f.jpg")
delta_pix = np.float32(np.random.randint(-max_delta_pix, max_delta_pix+1, [3,2]))
img_a = affine(img, delta_pix)
cv2.imwrite(save_name, img_a)
def affine(img, delta_pix):
    """affine transformation
    Args:
        img: a numpy image array.
        delta_pix: the offset for affine.
    Return:
        res: affined image.
    """
    rows, cols, _ = img.shape
    pts1 = np.float32([[0,0], [rows,0], [0, cols]])
    pts2 = pts1 + delta_pix
    M = cv2.getAffineTransform(pts1, pts2)
    res = cv2.warpAffine(img, M, (rows, cols))    return resdef affine_dir(img_dir, write_dir, max_delta_pix):
    """ affine transformation on the images in a directory.
    Args:
        img_dir: image directory.
        write_dir: save directory of affined images.
        max_delta_pix: the maximum offset for affine.
    """
    img_names = os.listdir(img_dir)
    img_names = [img_name for img_name in img_names if img_name.split(".")[-1]=="jpg"]    for index, img_name in enumerate(img_names):
        img = cv2.imread(os.path.join(img_dir,img_name))
        save_name = os.path.join(write_dir, img_name.split(".")[0]+"f.jpg")
        delta_pix = np.float32(np.random.randint(-max_delta_pix, max_delta_pix+1, [3,2]))
        img_a = affine(img, delta_pix)
        cv2.imwrite(save_name, img_a)
上面函数输入参数max_delta_pix用来控制随机仿射变换的最大强度(正整数),max_delta_pix的绝对值越大,变换越明显(太大可能导致目标信息的完全丢失),我在扩充时这个参数取为10。需要注意的是,10只是变换的最大强度,在对每一张图片进行变换前,会在[-max_delta, max_delta]生成一个随机整数delta_pix(当然你也可以多取几次不同的值来生成更多的变换图片),这个整数控制了当前图片变换的强度。以下是一些变换的结果示例:
原文出处
来自 “ ITPUB博客 ” ,链接:https://blog.itpub.net/106/viewspace-2809605/ ,如需转载,请注明出处,否则将追究法律责任。
下一篇:
Promise 异步控制流

请登录后发表评论
登录
全部评论
